In today’s Internet era, protecting network security is crucial. DNS encryption can effectively prevent network attacks and ensure the security of network connections. PHP editor Yuzai will introduce in detail how to encrypt DNS in Windows 11 system. If you want to improve your network security, understanding how to encrypt DNS is essential. This article will guide you step-by-step through the process, making it easy to protect your network connection from cyber threats.
Step one: First enter the disk and find the folder you want to encrypt.

Step 2: Then open [Ethernet] on the right.

Step 3: Then find the DNS server allocation below and click [Edit].

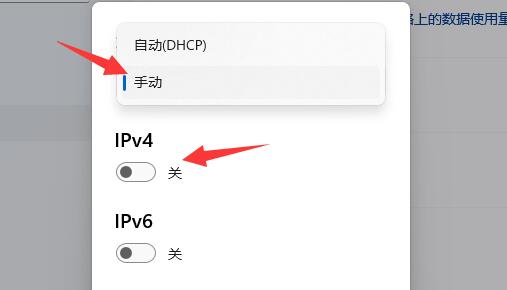
Step 4: After changing [Auto (DHCP)] to [Manual], turn on [IPv4] below.

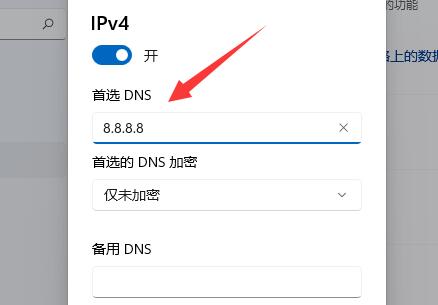
Step 5: After turning it on, enter [8.8.8.8] in the preferred DNS.

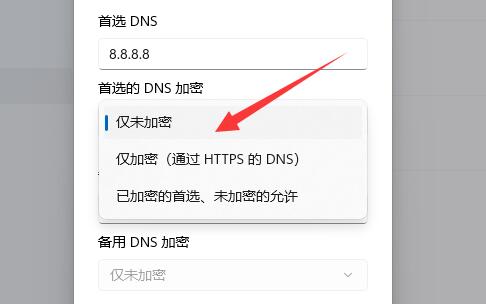
Step 6: Then change the preferred DNS encryption to [Encryption only (DNS over HTTPS)].

Step 7: After the changes are completed, click [Save] and you will find that the dns encryption is successful.

The above is the detailed content of How to encrypt dns in win11_How to encrypt dns in win11. For more information, please follow other related articles on the PHP Chinese website!
 There is no WLAN option in win11
 How to skip online activation in win11
 Win11 skips the tutorial to log in to Microsoft account
 How to open win11 control panel
 Introduction to win11 screenshot shortcut keys
 Windows 11 my computer transfer to the desktop tutorial
 Solution to the problem of downloading software and installing it in win11
 How to skip network connection during win11 installation


