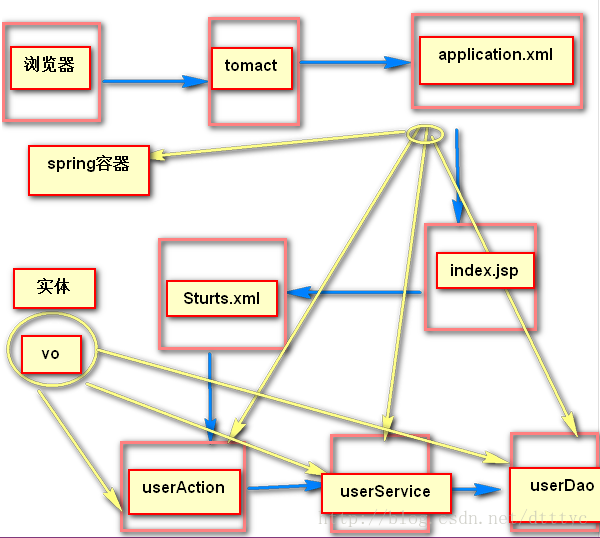
According to the flow chart, we can see the process of our program from the initial browser to the final page echo. If there is anything you don’t understand, please leave a message.

Mainly responsible for mapping files and injection of Action and Service, and responsible for calling between the three layers of background services**
It is equivalent to the html page in our asp.net. If it is similar to our html page, then it can also write ajax and can trigger our events. The event is triggered through the action attribute. Triggered, there will be an address in this attribute, which is specifically used to establish a connection with our backend
<form id=<span class="hljs-string">"loginForm"</span> action=<span class="hljs-string">"<span class="hljs-variable">${ pageContext.request.contextPath }</span>/user_login.action"</span> method=<span class="hljs-string">"post"</span> novalidate=<span class="hljs-string">"novalidate"</span>>
According to the configuration of Strust, we can find the method we want to get. The front-end interface looks for the method provided by the back-end. According to name=login, User_* means that all our addresses starting with user are placed in the userAction class.
result means the returned result. Since we can find the userAction class, then after executing a series of functions such as userAction, we must return the result to my front page. Why is there a name attribute after the result? ? ? Everyone has written three-layer code. We want the background to pass me a parameter, which is given by the method, not the class. We can only say that the class contains the method
So we have many methods in our userAction class, and the method result of name=login can jump to the path of /WEB-INF/jsp/login.jsp
<action <span class="hljs-property">name</span>=<span class="hljs-string">"user_*"</span> <span class="hljs-type">class</span>=<span class="hljs-string">"userAction"</span> method=<span class="hljs-string">"{1}"</span>>
<<span class="hljs-constant">result</span> <span class="hljs-property">name</span>=<span class="hljs-string">"login"</span>>/WEB-INF/jsp/login.jsp</<span class="hljs-constant">result</span>>Action is our action layer. This is the name I gave him. Why do I say that? Because the first place that jsp goes to the background after triggering an event is Action. To execute the corresponding method, he usually uses ActionSupport and introduces ModelDriven. To use model-driven objects, they are actually our entities. In fact, Action can be regarded as the u layer among our three layers, and then Action calls service
According to our Struts, we can find our login method stored in the userAction class. One of the methods can be seen as return. It is through this that it returns to the result attribute in our Struts, and then finds us. The jsp page displays
<span class="hljs-keyword">public</span> String <span class="hljs-title">login</span>(){
      User existUser = userService.login(user);
      <span class="hljs-comment">//      判断返回会来的数据是否为空</span>
      <span class="hljs-keyword">if</span>(existUser == <span class="hljs-keyword">null</span>){
          <span class="hljs-keyword">this</span>.addActionError(<span class="hljs-string">"登录失败:用户名或者密码或用户没有激活"</span>);
          <span class="hljs-keyword">return</span> LOGIN;
      }<span class="hljs-keyword">else</span>{
        <span class="hljs-comment">//保存到共享变量中  </span>
         ServletActionContext.getRequest().getSession().setAttribute(<span class="hljs-string">"existUser"</span>, existUser);
        <span class="hljs-comment">// 页面跳转</span>
         <span class="hljs-keyword">return</span> <span class="hljs-string">"loginSuccess"</span>;
      }
}The main thing to be implemented is to call Dao. In fact, the role of coupling is realized here, which also reduces the workload of Action. According to the code, it can be seen that the method of the dao persistence layer is simply called.
<span class="hljs-javadoc">/**
    *  登录功能
    */</span>

    <span class="hljs-comment">//用户登录的方法</span>
    <span class="hljs-keyword">public</span> User <span class="hljs-title">login</span>(User user) {
        <span class="hljs-keyword">return</span> userDao.login(user);
}This is the persistence layer. In fact, it is used to perform database statements, additions, deletions, modifications, and queries. It is generally implemented using getHibernateTemplate.XX. The implementation process is to pass in the statements and parameters for executing mysql. See the code. Execute the search method we implemented, and change our status value. If successful, return our username
 <span class="hljs-javadoc">/**
 *  登录功能
 */</span>
   <span class="hljs-keyword">public</span>  User <span class="hljs-title">login</span>(User user) {
      String hql = <span class="hljs-string">"from User where username = ? and password = ? and state = ?"</span>;
      List<User> list = <span class="hljs-keyword">this</span>.getHibernateTemplate().find(hql,user.getUsername(),user.getPassword(),<span class="hljs-number">1</span>);
        <span class="hljs-keyword">if</span>(list != <span class="hljs-keyword">null</span> && list.size() > <span class="hljs-number">0</span>){
            <span class="hljs-keyword">return</span> list.get(<span class="hljs-number">0</span>);
        }
        <span class="hljs-keyword">return</span> <span class="hljs-keyword">null</span>;
}vo is the entity layer. In fact, it is the same as the EF mapping in our MVC. In fact, in vo we have an entity layer and an xml. We use xml to map entities
<span class="hljs-tag"><<span class="hljs-title">hibernate-mapping</span>></span>--表示根元素,包含一些属性
 <span class="hljs-comment"><!-- 找到我们的包User,然后映射的表是user表 --></span>
    <span class="hljs-tag"><<span class="hljs-title">class</span> <span class="hljs-attribute">name</span>=<span class="hljs-value">"cn.itcast.shop.user.vo.User"</span> <span class="hljs-attribute">table</span>=<span class="hljs-value">"user"</span>></span>
   <span class="hljs-comment"><!--id主键,用native  --></span>
     <span class="hljs-tag"><<span class="hljs-title">id</span> <span class="hljs-attribute">name</span>=<span class="hljs-value">"uid"</span>></span>
         <span class="hljs-tag"><<span class="hljs-title">generator</span> <span class="hljs-attribute">class</span>=<span class="hljs-value">"native"</span>/></span>
     <span class="hljs-tag"></<span class="hljs-title">id</span>></span>
     <span class="hljs-comment"><!-- 字段属性进行映射,实体与数据库的字段要保持一直性,否则报错 --></span>
     <span class="hljs-tag"><<span class="hljs-title">property</span> <span class="hljs-attribute">name</span>=<span class="hljs-value">"username"</span>/></span>
     <span class="hljs-tag"><<span class="hljs-title">property</span> <span class="hljs-attribute">name</span>=<span class="hljs-value">"password"</span>/></span>
     <span class="hljs-tag"><<span class="hljs-title">property</span> <span class="hljs-attribute">name</span>=<span class="hljs-value">"name"</span>/></span>
     <span class="hljs-tag"><<span class="hljs-title">property</span> <span class="hljs-attribute">name</span>=<span class="hljs-value">"email"</span>/></span>
     <span class="hljs-tag"><<span class="hljs-title">property</span> <span class="hljs-attribute">name</span>=<span class="hljs-value">"phone"</span>/></span>
     <span class="hljs-tag"><<span class="hljs-title">property</span> <span class="hljs-attribute">name</span>=<span class="hljs-value">"addr"</span>/></span>
     <span class="hljs-tag"><<span class="hljs-title">property</span> <span class="hljs-attribute">name</span>=<span class="hljs-value">"state"</span>/></span>
     <span class="hljs-tag"><<span class="hljs-title">property</span> <span class="hljs-attribute">name</span>=<span class="hljs-value">"code"</span>/></span>
    <span class="hljs-tag"></<span class="hljs-title">class</span>></span>
<span class="hljs-tag"></<span class="hljs-title">hibernate-mapping</span>></span>After these few days of study, I have almost mastered one line of ssh. If you have any questions, you can contact me at any time
The above is the detailed content of One line to understand the causes and consequences of SSH login. For more information, please follow other related articles on the PHP Chinese website!


