php editor Youzi will introduce to you how to enable the eye protection function in WIN10 system. The WIN10 system has a built-in eye protection mode, which can effectively reduce the irritation of the screen to the eyes and protect vision. The method to turn it on is simple, just go to "Settings" - "System" - "Display" - "Night Light" to set it up. Adjust the brightness and color temperature to choose the appropriate mode according to your personal needs. After turning on the eye protection function, the screen will show warm colors and reduce blue light radiation, which is suitable for users who use the computer for a long time. I hope the above operation methods are helpful to you.
1. Use the Win R shortcut key combination to open [Run], then type the command to open the registry "regedit", and press the Enter key to confirm opening.

2. After opening the Win10 registry, expand the tree menu on the left: HKEY_CURRENT_USERControl PanelColors, then find the "Windows" value on the right, and double-click to open it.
3. Double-click Windows to open the edit string window. Change the three sets of color values 255 255 255 (the default is white background) to 202 234 206 (light green). After completion, click [OK] below 】save.

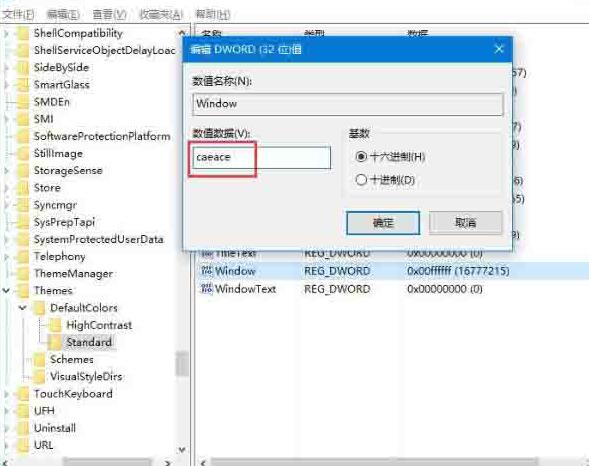
4. Continue to find the path to the registry: [HKEY_LOCAL_MACHINESOFTWAREMicrosoftWindowsCurrentVersionThemesDefaultColorsStandard]
5. Also find "Windows" on the right and double-click to open it, and set the default data value ffffff After changing to caeace, click OK below to save.

6. After completing the above operations, you need to restart the computer to take effect, so that the eye protection effect is adjusted.
The above is the detailed content of How to enable eye protection function in WIN10. For more information, please follow other related articles on the PHP Chinese website!
 win10 bluetooth switch is missing
 Why do all the icons in the lower right corner of win10 show up?
 The difference between win10 sleep and hibernation
 Win10 pauses updates
 What to do if the Bluetooth switch is missing in Windows 10
 win10 connect to shared printer
 Clean up junk in win10
 How to share printer in win10


