

 Software Tutorial
Mobile Application
The copy of windows7 build 7601 is not genuine. The simplest solution is that the copy of build 7601 is not genuine.
Software Tutorial
Mobile Application
The copy of windows7 build 7601 is not genuine. The simplest solution is that the copy of build 7601 is not genuine.
The copy of windows7 build 7601 is not genuine. The simplest solution is that the copy of build 7601 is not genuine.

php editor Youzi introduces you a simple method to solve the problem of "The copy of Windows 7 internal version 7601 is not genuine". This issue usually occurs in the user's system and may cause inconvenience and distress. With simple steps, you can resolve this issue and make your system genuine again and smoother to use.
Recently, some friends reported that their computer prompts "The copy of Windows 7 internal version 7601 is not genuine." They all want to know if the copy of Win7 is not genuine 7601 and affects the use. The main reason for this is that the user's system has not been activated. Today The editor is here to tell you the simplest solution to the problem that the copy of internal version 7601 is not genuine. Friends in need can come and take a look.

The copy of windows7 build 7601 is not genuine
method one:
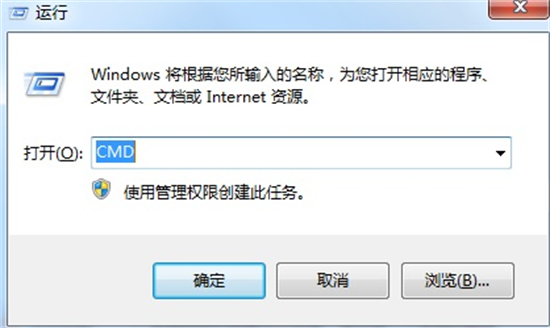
1. Press "win r" on the keyboard at the same time, then enter "CMD", and then Press "Enter" to confirm.
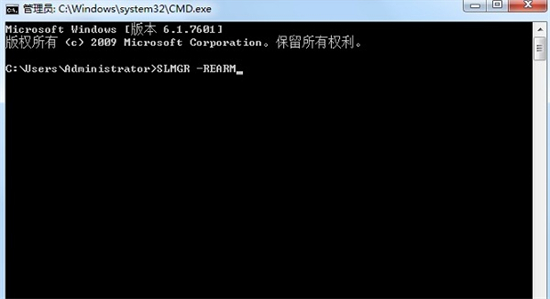
2, Input "SLMGR -REARM" in the pop-up window, pay attention to there is a space in the middle, don't miss it.
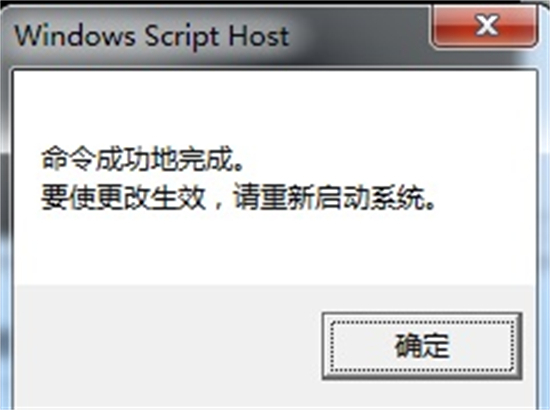
3, Then press Enter to confirm, a dialog box will pop up and click "Confirm", and finally restart the computer.
4. It should be noted that activating the system using this method is only valid for four months.
Method Two:
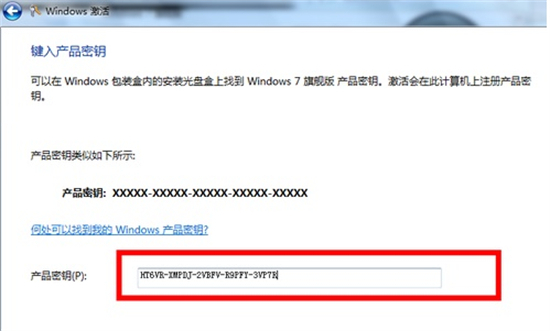
Purchase a genuine key for activation, or search for the win7 key on Baidu to see if there is one that can be used. ( Editor’s recommendation: Win7 Ultimate Edition permanent activation key)
Method 3: Reinstall the system
1. Preparations for installing win7 on old computers
1. You need to have a USB flash drive with memory greater than 7GB;
2. Fat Claw Installation Master software, click to download: Fat Claw Installation Master.
2. Important tips for installing win7 on old computers
1. System installation will overwrite the original system files on the c drive, so you must back up the data in advance. System hard disk programs other than the C drive are not affected. (Make sure which system disk you have. Some users may not have the C drive. Remember!!)
2. During the process of making the PE from the USB flash drive, the files and data in the USB flash drive will be automatically cleared. Please perform backup processing if necessary.
3. If you encounter any problems during the installation process, you can enter the homepage of Fat Claw Installation Master (https://zj.xitongcheng.com/) and contact the customer service staff through QQ, WeChat public accounts, etc.
4. Confirm your motherboard BIOS startup shortcut key, distinguish between assembled computers, laptops, and brand desktops. Fat Claw Installation Master has already prepared it for you!
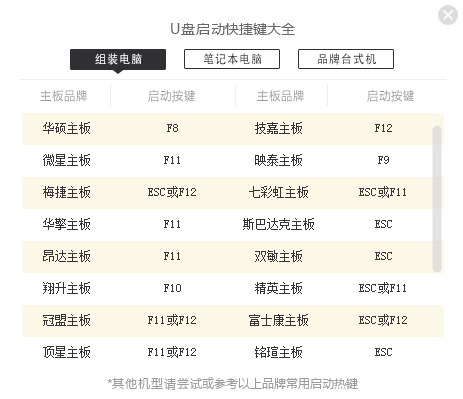
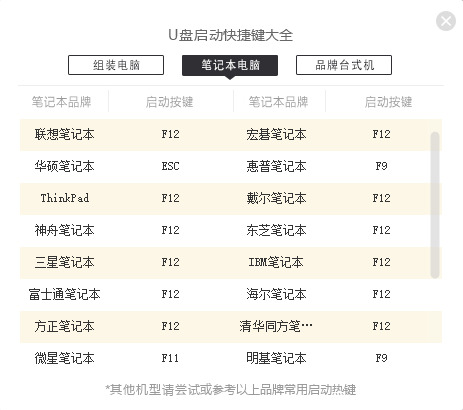
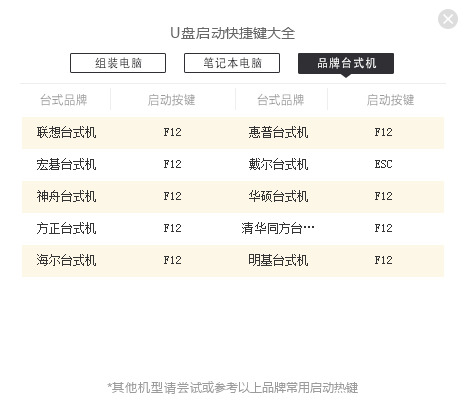
For more computer brands U disk startup shortcut keys, you can view: U disk installation system startup hotkey shortcut keys for various brands and models of computersTutorial.
3. Make win7 pe USB disk
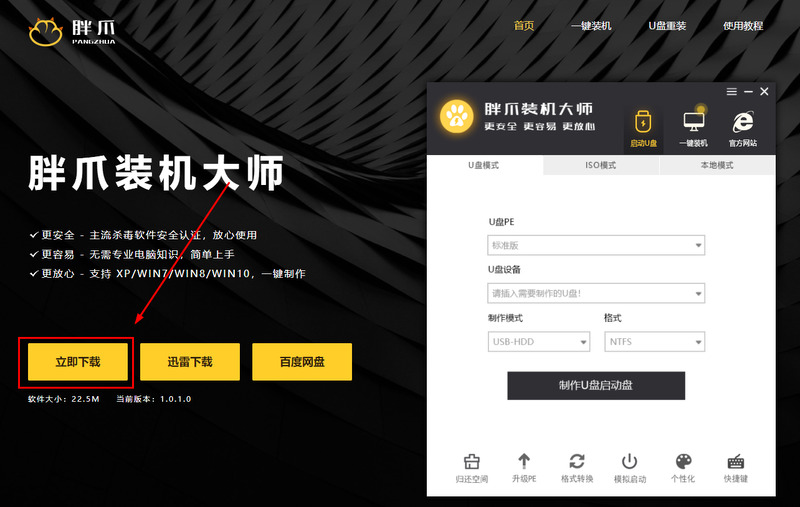
1. Click on the homepage link of Fat Claw Installation Master (https://zj.xitongcheng.com/): Fat Claw Installation Master. Some browsers will report an error when entering this page and continue accessing directly. Enter the homepage and click Download Now (Figure 1). Be careful not to install Fat Claw Installer Master into the system disk (Figure 2). Generally speaking, Drive letter other than C drive;
Picture 1
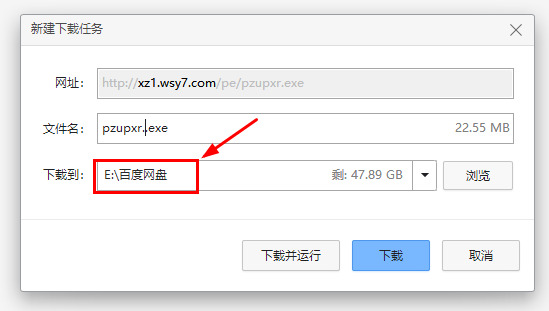
Figure II
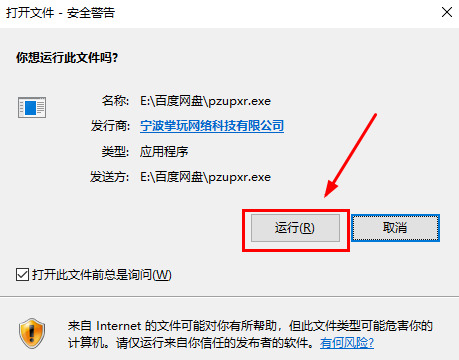
2. After the software is downloaded, double-click the software according to the location where you downloaded it, click to run , and the software will automatically complete the installation (such as Figure 3). After the installation is completed, Fat Claw Installation Master will pop up the corresponding interface (as shown in Figure 4);
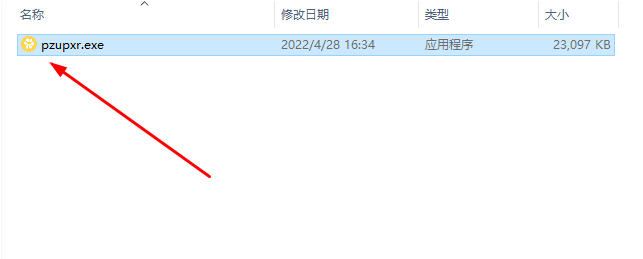
Picture 3

Picture 4
3. After opening Fat Claw Installation Master, insert the prepared USB disk to ensure that the software can recognize the USB disk information (as shown in Figure 5);
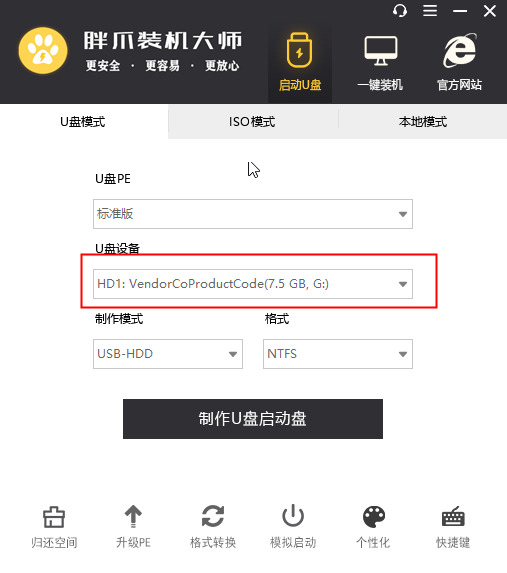
Picture 5
4. Select usbhdd in the production mode, select ntfs in the format (as shown in Figure 6), and then Create USB boot disk (Figure 7);
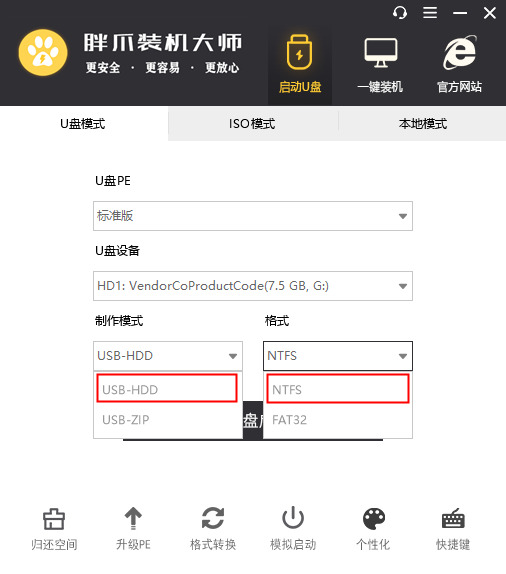
Picture 6
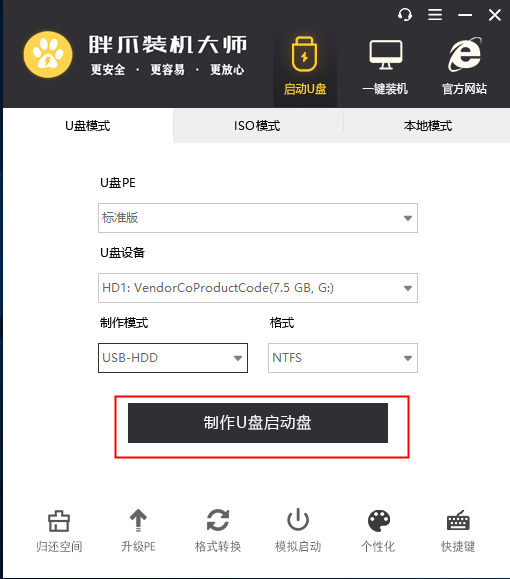
Picture 7
5. Click on the win7 system column, as shown in Figure 8. Find the system that needs to be downloaded in the column, click to start production (Picture 9), and enter the next step;
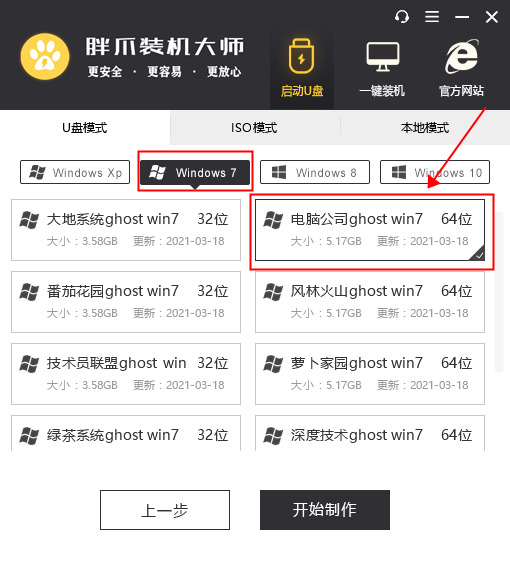
Picture 8
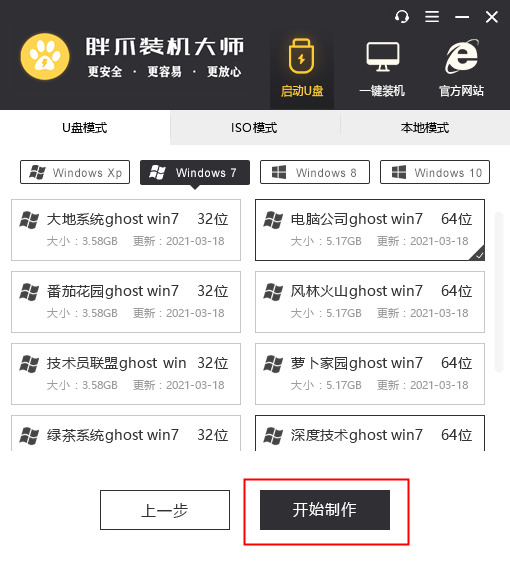
Picture 9
6.Note: The software will format the USB disk and make it into a PE launcher. To confirm that there is no important data in the USB flash drive, click OK (Figure 10);
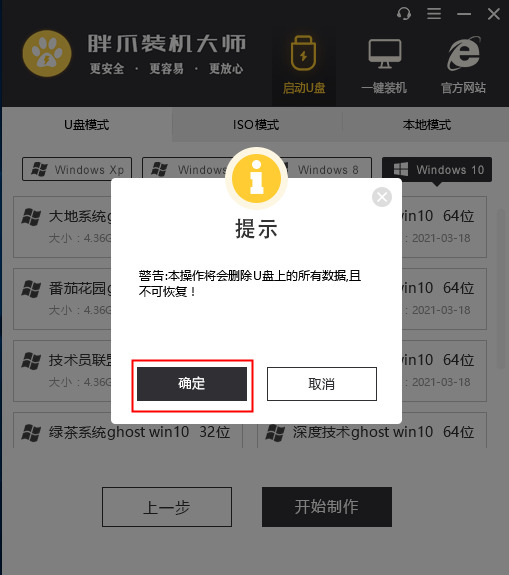
Picture 10
7. Fat Claw Installation Master will automatically download related resources (the whole process is expected to take about 20 minutes). No operation is required during the waiting period. Do not pull out the USB disk(Figure 11);
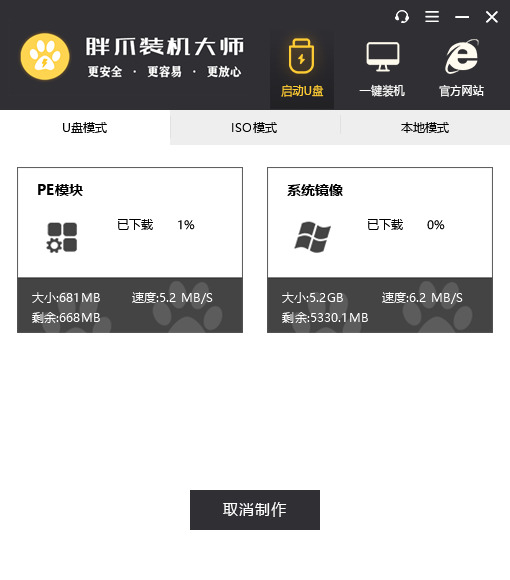
Picture 11
8. After the U disk pe tool is created, the system will have corresponding prompts (as shown in Figure 11), click Cancel; if you want to simulate pe startup first, you can preview it and operate according to the guidance, at any time Can be turned off (without damaging the computer). Before starting to upgrade win7, confirm the shortcut keys for entering the bios page of the current computer and click Shortcut Key List to view (as shown in Figure 12);
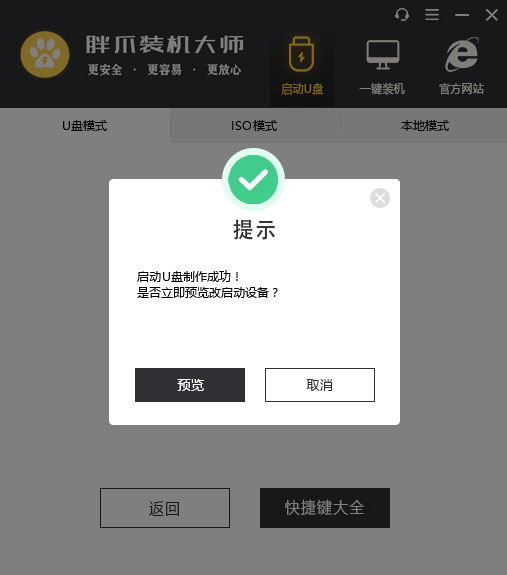
Picture 11
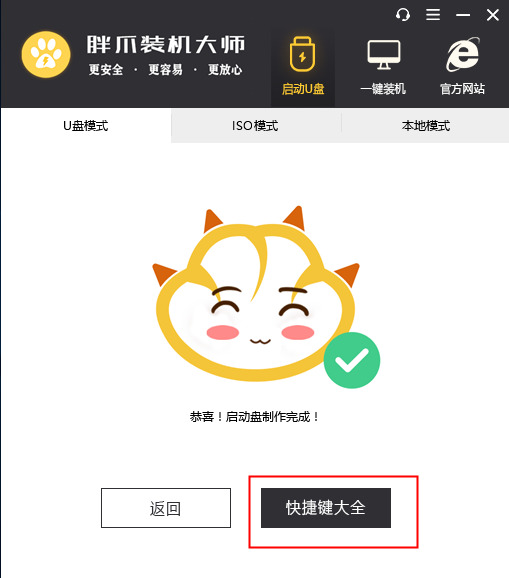
Picture 12
4. Steps to install win7 from USB disk
According to the USB boot shortcut keys that you know in advance, enter the bios interface to adjust the startup sequence. For specific related operations, you can view: How to set bios to let the computer boot from the USB disk Tutorial, if you still cannot enter bios, you can enter the homepage of Fat Claw Installation Master (https://zj.xitongcheng.com/) and publicize it through QQ and WeChat Customer service personnel in the form of information such as numbers.
Insert the USB disk and restart the computer. If the interface is as shown in Figure 13, the first one is selected by default; but when your computer resolution is relatively low, you can select the second one;
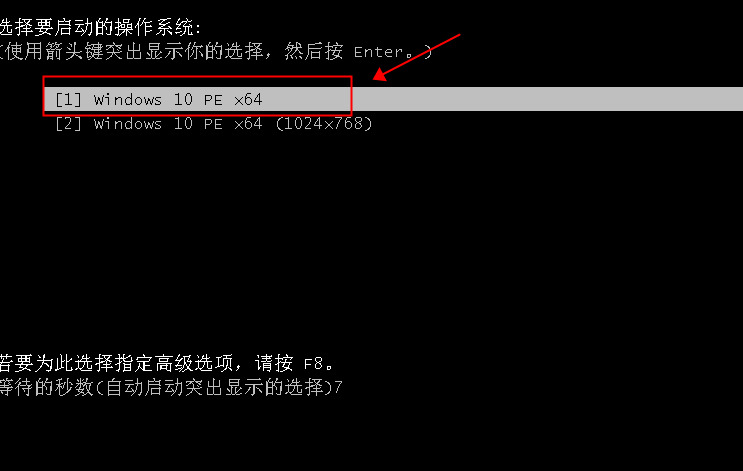
Picture 13
2. If the interface shown in Figure 14 is shown, directly select the first one to enter the PE system; if you have any other needs in this interface, you can enter the PE desktop and double-click on the desktop to make a selection;
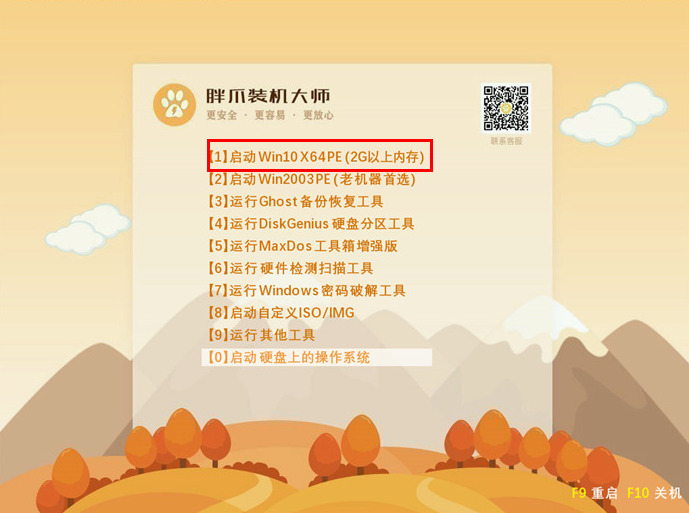
Picture 14
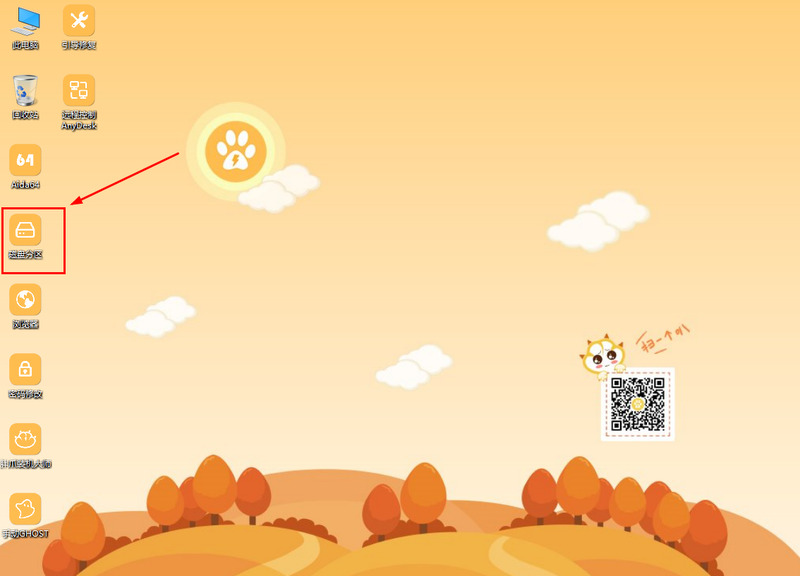
3. After selecting the first item, you will enter the pe system desktop, and the system will automatically pop up the Fat Claw Installation Master interface (as shown in Figure 15);

Picture 15
4. If you need to partition the system before system installation, you can click on the Disk Partition function on the left to partition (as shown in Figure 16), specific operation steps You can view: Fat Claw Installation Master pe hard disk partition tutorial. If not necessary, ignore this step and continue with the next operation;
Picture 16
5. Click Browse in the system installation function and find the previously downloaded win7 system resources (with the word win7 iso). According to our step-by-step guide, it will be on the U disk Display system, as shown in (Figure 17);
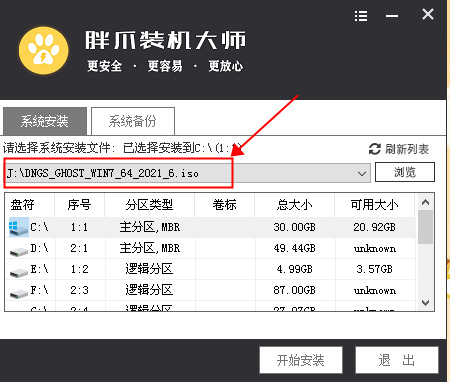
Picture 17
6. After finding the windows7 resources, click on the system installation disk (generally the default is c drive) → Start the installation(such as Figure 18);
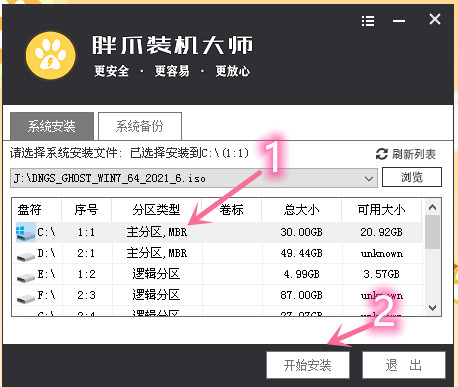
Picture 18
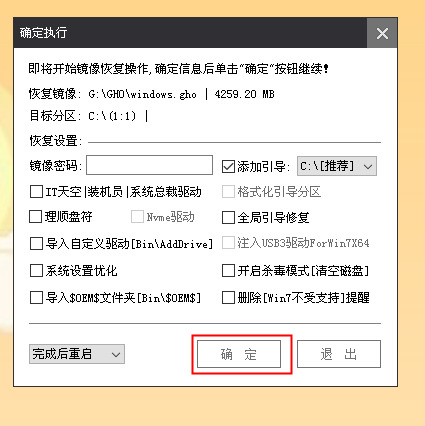
7. On the confirmation execution page, the current selection is selected by default. Directly click Confirm (as shown in Figure 19), reminds you again, remember to back up your important data;
Picture 19
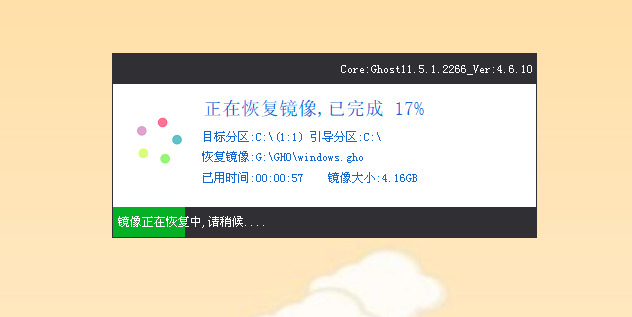
9. After completing the above steps, the PE system will restore the previously downloaded Windows 10 image resources and wait for the progress bar to finish reading (as shown in Figure 20);
Picture 20
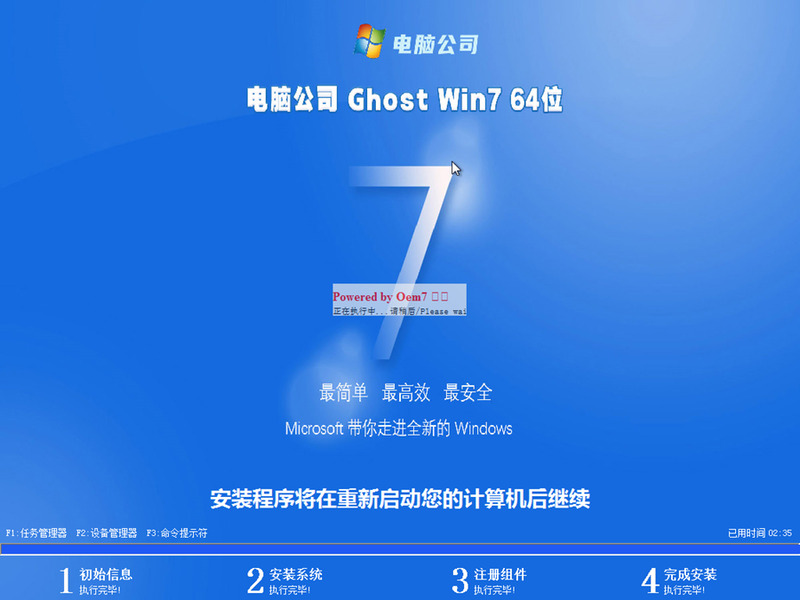
6. After the image recovery is completed, the computer system will automatically restart after a short period of time. When the computer restarts, weunplug the USB disk and wait patiently for the installation. The system will enter the automatic installation step (it is expected to take ten minutes to complete the installation) (Figure 21), and then the system can be used normally.
Picture 21
The above is the detailed content of The copy of windows7 build 7601 is not genuine. The simplest solution is that the copy of build 7601 is not genuine.. For more information, please follow other related articles on the PHP Chinese website!

Hot AI Tools

Undress AI Tool
Undress images for free

Undresser.AI Undress
AI-powered app for creating realistic nude photos

AI Clothes Remover
Online AI tool for removing clothes from photos.

Clothoff.io
AI clothes remover

Video Face Swap
Swap faces in any video effortlessly with our completely free AI face swap tool!

Hot Article
Hot Tools

Notepad++7.3.1
Easy-to-use and free code editor

SublimeText3 Chinese version
Chinese version, very easy to use

Zend Studio 13.0.1
Powerful PHP integrated development environment

Dreamweaver CS6
Visual web development tools

SublimeText3 Mac version
God-level code editing software (SublimeText3)


 How to install WinNTSetup into Win11 system_How to install WinNTSetup into Win11 system
May 08, 2024 am 11:19 AM
How to install WinNTSetup into Win11 system_How to install WinNTSetup into Win11 system
May 08, 2024 am 11:19 AM
First download the latest Win11 system ISO image, and then in Win10 system, you can directly right-click on the downloaded ISO image file and select [Load]; if it is under WinPE, WinXP, or Win7 system, you need to use the virtual optical drive tool to load the ISO Image; or you can directly decompress the ISO image file without using a virtual optical drive. Then run WinNTSetup. The software interface is as shown in the figure: First locate the location of the install.wim file. You can find the install.wim file in the sources directory of the Win11 ISO image loaded or decompressed by the virtual optical drive. Then set the location of the boot disk and installation disk. Generally, you are going to put W
 Specific steps for expanding the C drive using the partition tool diskgenius
May 08, 2024 pm 08:04 PM
Specific steps for expanding the C drive using the partition tool diskgenius
May 08, 2024 pm 08:04 PM
First, download and install the [DiskGenius] tool on your computer, then open the tool, then click [File Menu] at the top, and then click [Restart the system and run the DiskGenius software], as shown in the figure. Then click [OK] in the pop-up prompt box, as shown in the figure. After that, the computer will restart and then enter the Diskgen hard disk partition interface. At this time, if we want to expand the C drive, we only need to right-click the D drive next to the logical partition and click "Adjust Partition Size" in the pop-up menu, as shown in the figure shown. Then you need to adjust the size of the D drive partition. For example, the current capacity of the D drive is 14.99GB, as shown in the figure below. At this time, we can adjust the installment of the D drive. For example, if we want to allocate 1.03GB to the C drive, we only need to allocate 1.03GB to the C drive.
 How to enter bios after assembling a computer? How to enter bios when assembling a computer?
May 07, 2024 am 09:13 AM
How to enter bios after assembling a computer? How to enter bios when assembling a computer?
May 07, 2024 am 09:13 AM
How to enter bios after assembling a computer? Before entering the BIOS, you need to make sure that the computer is completely shut down and powered off. Here are several common ways to enter the BIOS: 1. Use shortcut keys: Most computer manufacturers will display a prompt message at startup telling you which key to press to enter the BIOS settings. Usually the F2, F10, F12 or Delete key. After pressing the appropriate keys, you should be able to see a screen with information about your computer's hardware and BIOS settings. 2. Use the button on the motherboard: Some computer motherboards have a dedicated button for entering BIOS settings. This button is usually labeled "BIOS" or "UEFI". After pressing the button you should be able to see
 How to upgrade Win11 system on old computers_Tutorial on upgrading Win11 system on old computers
May 07, 2024 pm 08:07 PM
How to upgrade Win11 system on old computers_Tutorial on upgrading Win11 system on old computers
May 07, 2024 pm 08:07 PM
1. First we need to download the win11 image file. 2. Put the downloaded win11 image into another disk. 3. Then we find the win11 image file among the searched image files. 4. Then when we come to this interface, we select install.wim to proceed to the next step. 5. Then select the Windows 11 system and click OK to restore the image file. 6. Then we wait for pe to download and install. Wait patiently. After the download is completed, click restart according to the prompts. 7. Then come to this interface, we select the second xiaobaiPE. After selecting, the win11 system will be automatically installed for us. After the installation is completed, click to restart the computer immediately according to the prompts. 8. Finally, the system installation is completed, and we come to
 Does the newly assembled computer keyboard light not light up?
May 07, 2024 pm 04:40 PM
Does the newly assembled computer keyboard light not light up?
May 07, 2024 pm 04:40 PM
Does the newly assembled computer keyboard light not light up? The motherboard model should be UEFIbios. First find a keyboard with PS2 port, enter bios, turn off UEFI boot, and change to Legacy mode. If there is fast boot, turn off options like FastBoot, UEFI boot, turn on fast boot, and enter the system. USB interface detection may be turned off before, and USB devices can be used to assemble the computer after entering the system. The mouse and keyboard lights do not light up when the computer is turned on? If the keyboard light does not come on, there is a high possibility of memory failure, or it may be caused by static electricity on the motherboard or the motherboard is faulty. Use an eraser to wipe the gold finger of the memory graphics card, and remove and insert the memory several times. The problem remains. There are dual memory sticks and a single memory stick is used for testing. The problem persists. Re-plug the various cables inside and outside the chassis, and then unplug the connector on the motherboard.
 How to assemble an acer desktop computer?
May 08, 2024 pm 08:25 PM
How to assemble an acer desktop computer?
May 08, 2024 pm 08:25 PM
How to assemble an acer desktop computer? The assembly method of Acer desktop computer is as follows: open the case, install the power supply into the case, and tighten the screws. Install the CPU onto the motherboard, making sure the pins on the CPU are aligned with the slots on the motherboard, and tighten the screws on the CPU heat sink. Install the memory module onto the motherboard, making sure that the bumps on the memory module are aligned with the slots on the motherboard. Press down hard until you hear a "pop" sound to complete the installation. Install graphics cards, sound cards, network cards and other boards onto the motherboard, making sure the screws on the boards are tightened. Install storage devices such as hard drives and optical drives into the chassis, making sure the screws are tightened. Connect the motherboard to the chassis, including power cables, hard drive cables, optical drive cables, etc. Finally, close the chassis cover and tighten the screws to complete the assembly. exist
 Anbi app official download v2.96.2 latest version installation Anbi official Android version
Mar 04, 2025 pm 01:06 PM
Anbi app official download v2.96.2 latest version installation Anbi official Android version
Mar 04, 2025 pm 01:06 PM
Binance App official installation steps: Android needs to visit the official website to find the download link, choose the Android version to download and install; iOS search for "Binance" on the App Store. All should pay attention to the agreement through official channels.
 Guide to Personalized Beautification of Win7 System: Minimalist UI Design Gives Your Desktop a New Life
May 09, 2024 pm 04:22 PM
Guide to Personalized Beautification of Win7 System: Minimalist UI Design Gives Your Desktop a New Life
May 09, 2024 pm 04:22 PM
Windows 7 is a classic operating system launched by Microsoft. Although official support has been stopped, many users still choose to continue using it. This article will start from two aspects: minimalist UI design and personalized desktop experience, and provide you with an in-depth analysis of the desktop and system beautification of win7! 1. Minimalist UI design: simplifying complexity and improving operating efficiency. Windows 7 adheres to the minimalist concept in UI design and creates a fresh and simple visual experience by streamlining redundant elements and optimizing layout. The classic Aero frosted glass effect, combined with translucent window borders and taskbars, creates a light and transparent texture. The start menu adopts a rectangular tile layout, and commonly used programs are clear at a glance, which greatly improves startup efficiency. At the same time, the taskbar supports custom tiles
