
php editor Zimo will introduce you in detail how to import photos from your Apple phone to your computer. Through the graphic tutorials in this article, you will learn a variety of methods, including using iTunes, iCloud, Windows Explorer, etc. Whether you are a novice or an experienced user, you can easily master the skills of importing iPhone photos to your computer so that your photos can be backed up and managed anytime and anywhere. Follow our guidance to make your digital life more convenient!
After taking many photos and videos on an Apple phone, the memory of the phone is far from enough to save these photos or videos. I believe many people will choose to import them into their computers.
So, how to transfer iPhone photos to computer quickly and losslessly, try these 4 methods!

Is it difficult to manage Apple photos, videos and other data?
Try the professional Apple data management tool. It is an iOS device transfer and backup tool that is more powerful than iTunes. It supports one-click import, export, deletion and addition of multiple files. Optional operation.
Operation Guide:
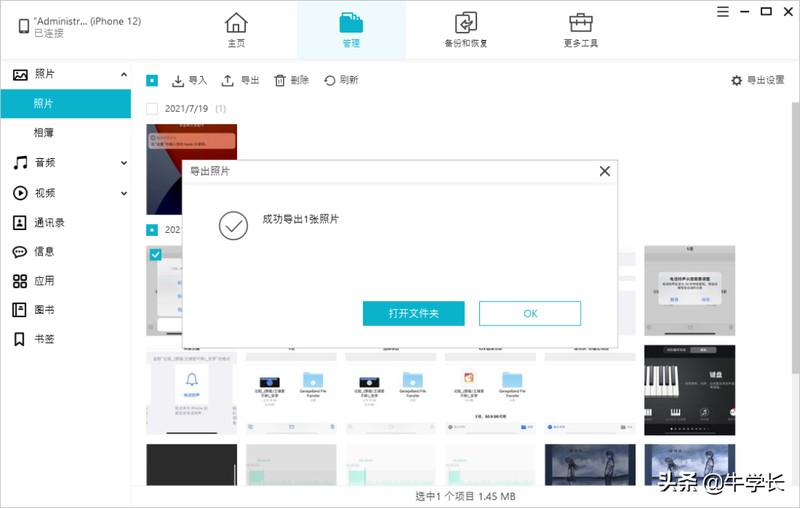
Step 1: Download and install Niu Xuechang Apple Data Management Tool, after the software recognizes the device, click the [Manage] function area.
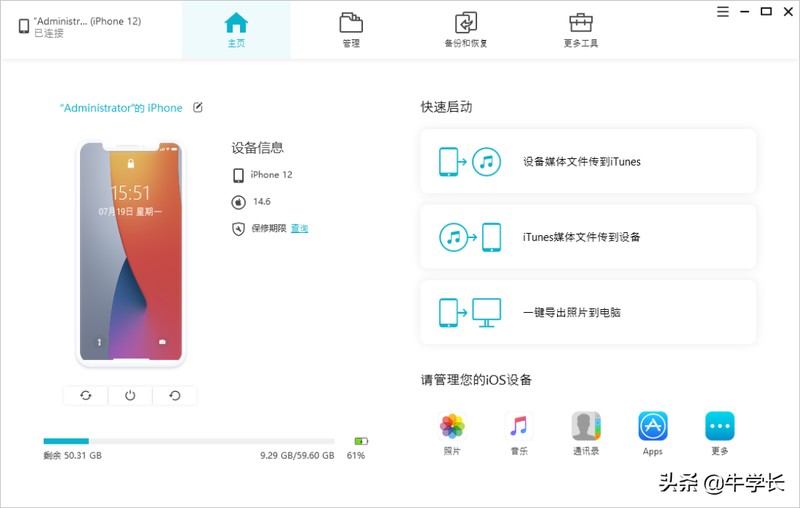

Step 2: After clicking to enter the [Management] interface, the data on the iPhone will be displayed by category, including photos, videos, audios, contacts, applications, etc.
You can freely choose the import or export function, selectively export iPhone data to the computer, or import from the computer to the iPhone.
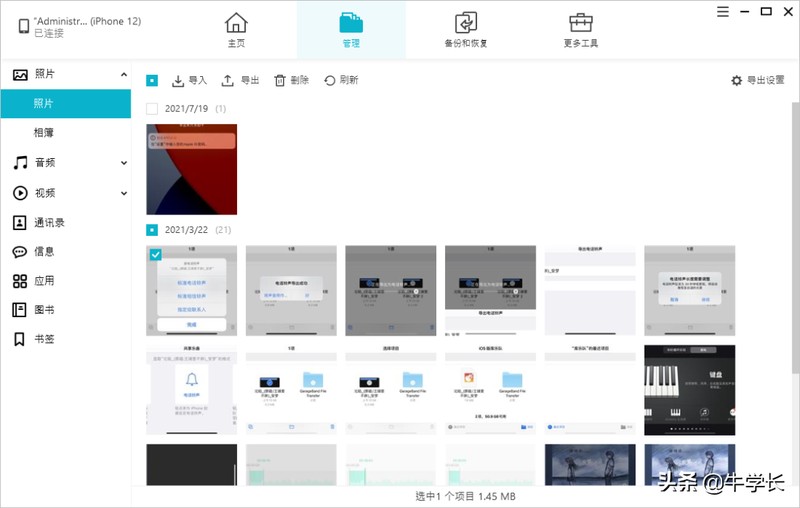

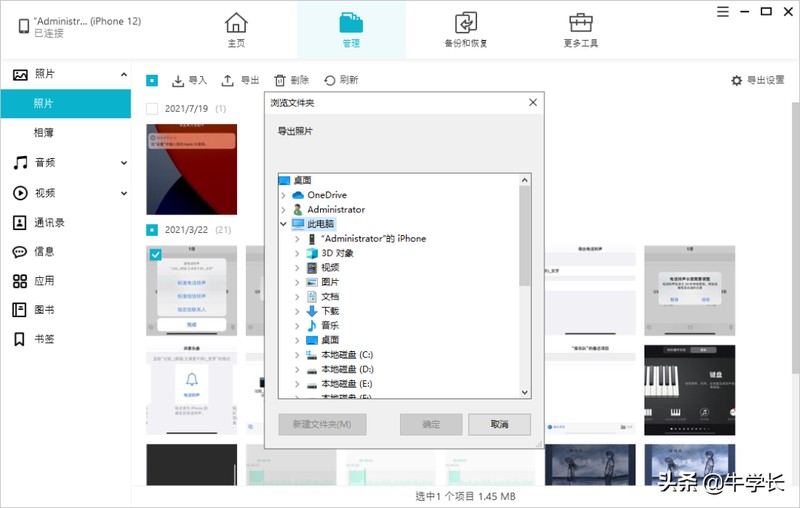
Step 3: After selecting the photos or videos you need, select the [Export] function, select to export the saved file, and click OK.


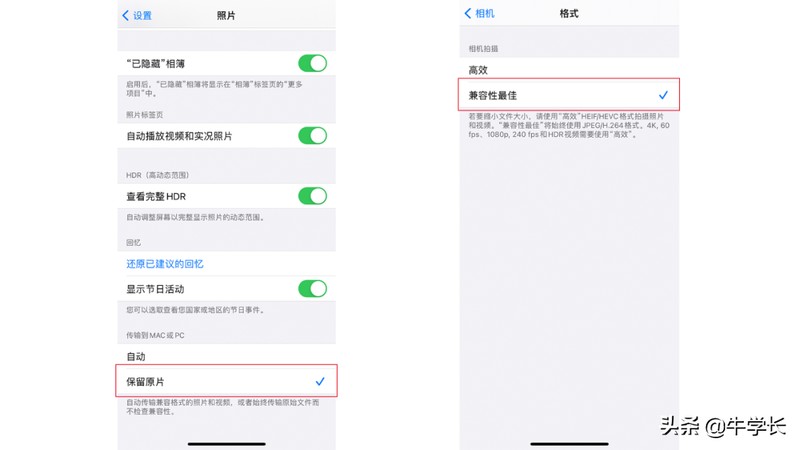
In order to avoid photos or videos being compressed and lost, it is recommended to follow the following steps on the iPhone:
1. [Settings]-[Photos]-[Transfer to Mac or PC ], then select [Keep Original]
2. [Settings]-[Camera]-[Format]-[Best Compatibility]

But it’s best to pay attention The original data cable prevents the computer from not recognizing it or transmitting abnormally, or other problems occur during the transmission process.
When the computer is connected to the iPhone, a "Trust" pop-up box will appear on the mobile phone. Please make sure to click "Trust".


Use the USB data cable, click "This PC", find the iPhone icon item in "Devices and Drives", then find the folder of the relevant photos or videos, copy them, and transfer the photos or videos to your computer. Can.


When we directly use the data cable to connect the device to the computer, do we sometimes find that the iPhone's storage disk cannot be found? This is for Apple's security reasons. Just download Just install an iTunes.
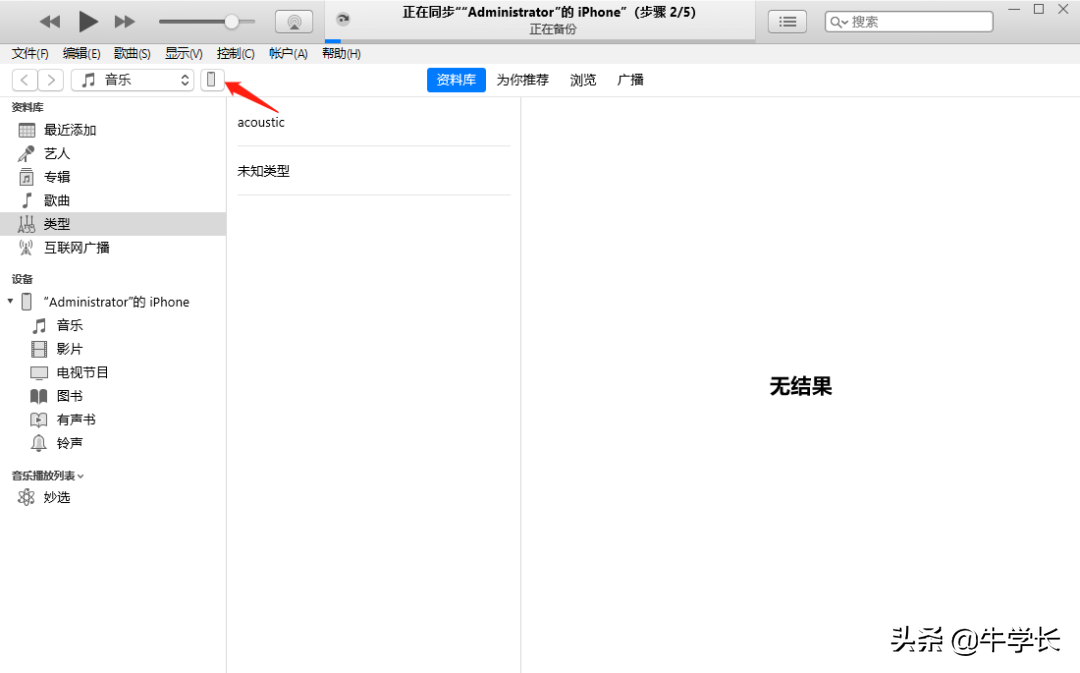
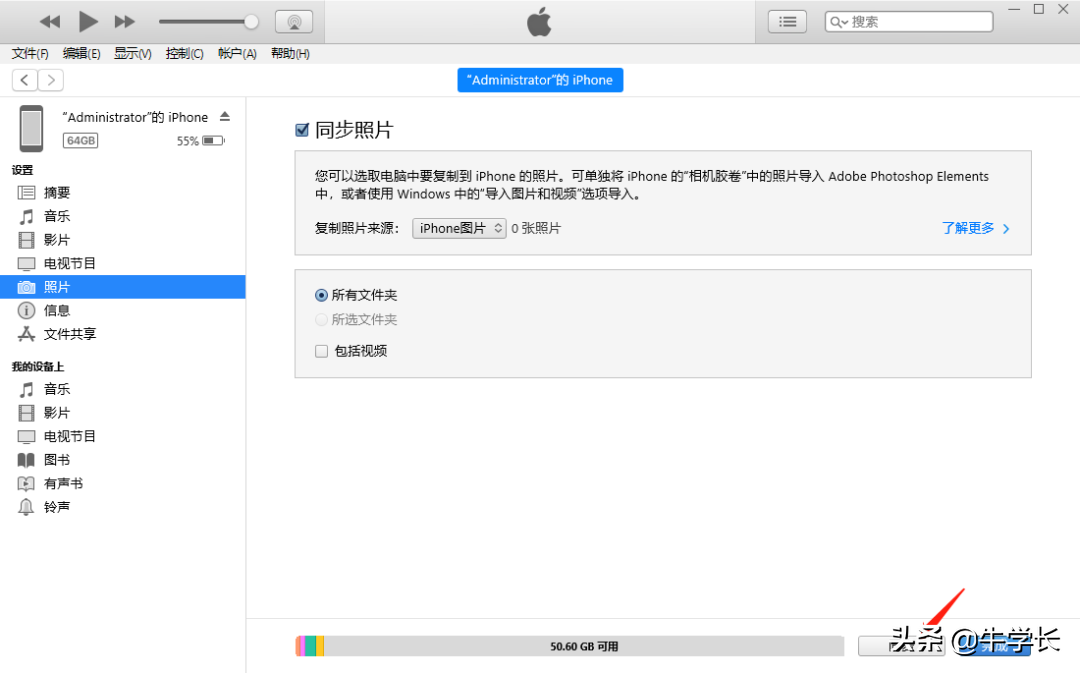
Step 1: Download and install the latest version of iTunes on your computer, and connect your iPhone to the computer using a USB data cable. After the software recognizes the iPhone, click the iPhone icon in the upper left corner to enter the iPhone interface.

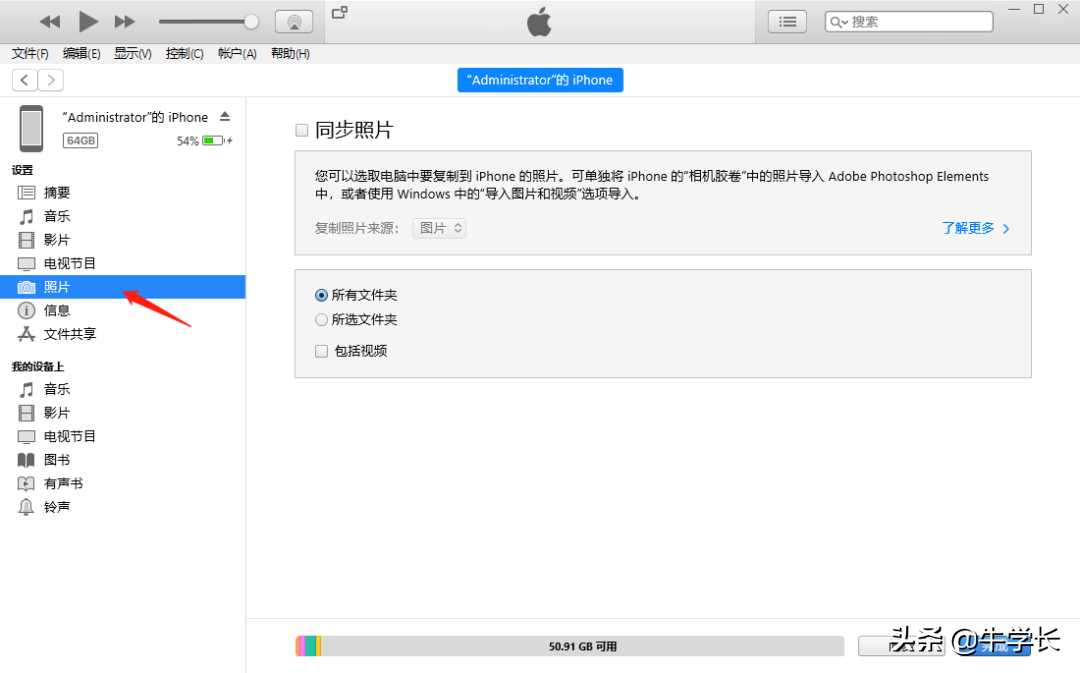
Step 2: Then select the "Photos" column in the sidebar below the iPhone, check the "Sync Photos" option at the top, and then select the folder you want to synchronize.
After selecting the folder that needs to be synchronized, you can display the photos that need to be synchronized on the right, and then click the "Sync" button at the bottom to start synchronization.


This method is simply to create a shared Windows folder and add a server in the iPhone "Files" application to transfer files between iPhone and PC.
At the same time, make sure the iPhone and computer are in the same WiFi environment.
Operation Guide:
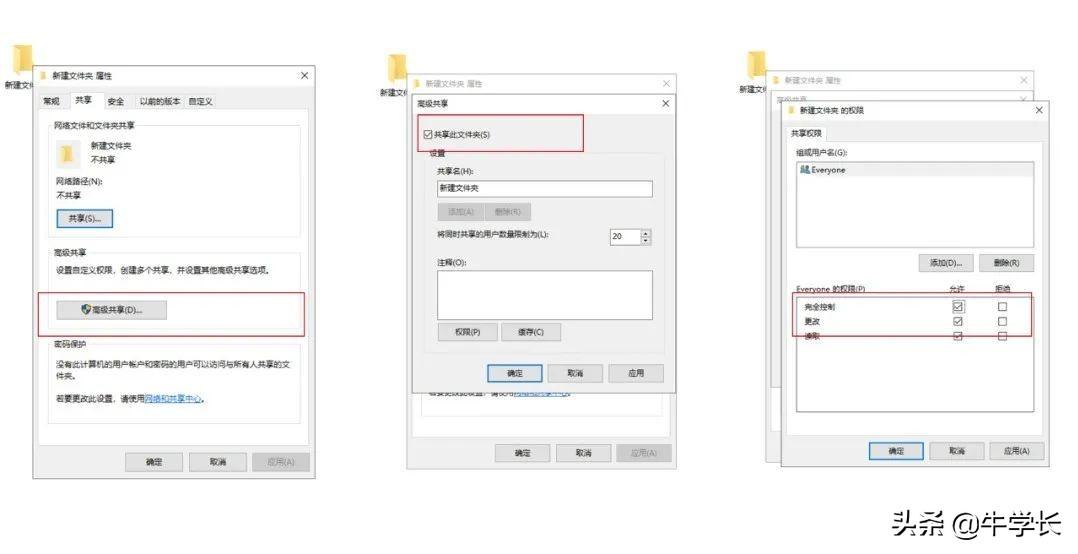
Step 1: Create a folder on the computer, Right-click [Properties]-[Sharing]-[Advanced Sharing], check [Share this folder], click [Permissions], check "Full Control" and "Change", click [Apply], and then click [OK].

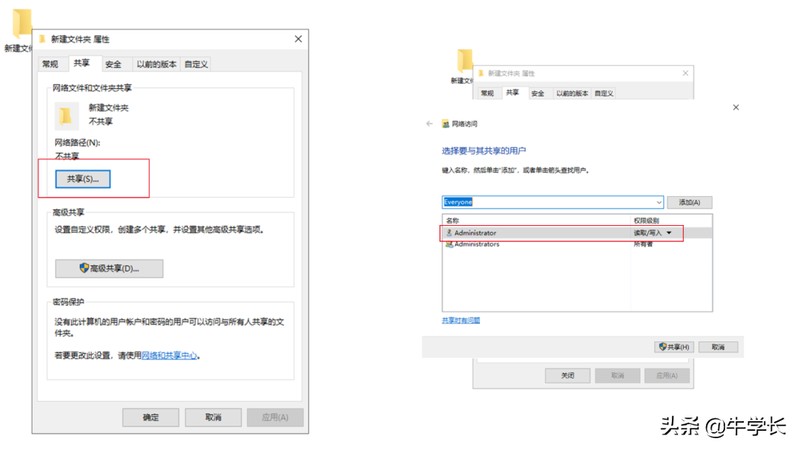
Step 2: Click "Share" under [Properties]-[Sharing], select "Everyone", click Add, change the permission to "Read/Write", and then click Share.

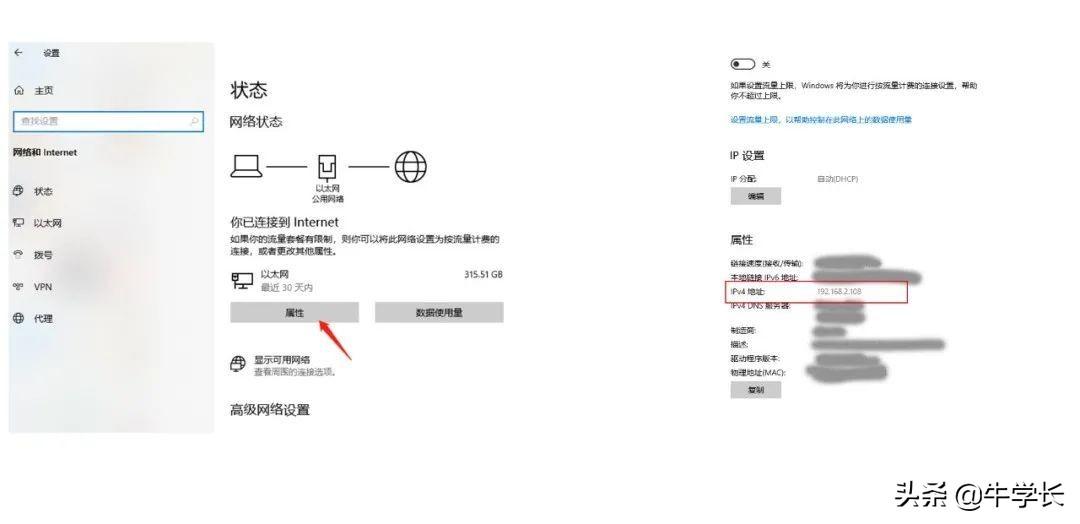
Step 3: Check the IPv4 address of your computer. Click on Network Properties and scroll down to the end to view the computer’s IPv4 address.

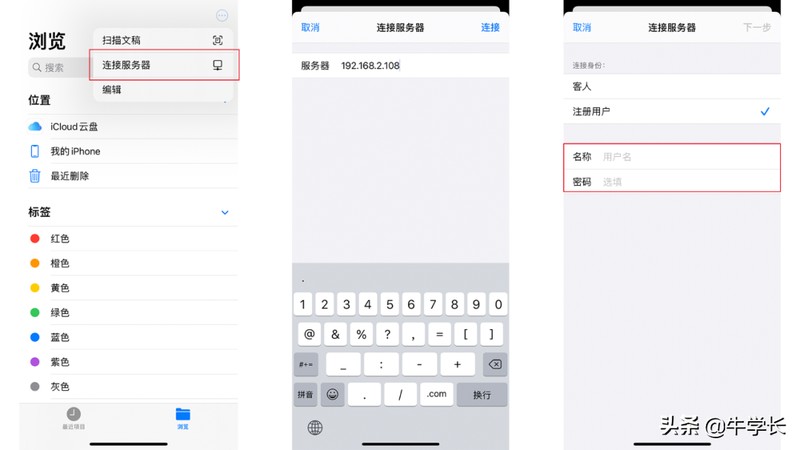
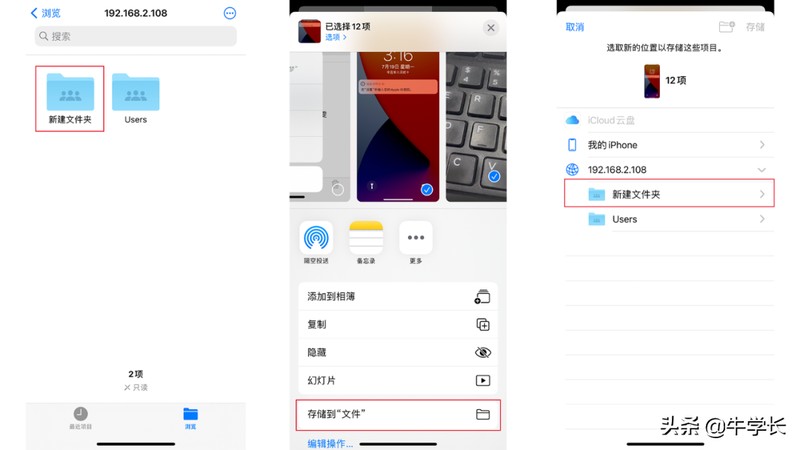
Step 4: Open the [File], [Browse] interface on your phone, click the three dots in the upper right corner, select [Connect to Server], and enter the IPv4 address of the computer. Then enter the user name and password of the computer to complete the creation of the shared folder.


4 ways to transfer iPhone photos/videos to computer, have you learned it?
ok, this article ends here. I hope it can help you. After carefully reading the article "How to Import iPhone Photos into Computer "Detailed Introduction: Importing iPhone Photos into Computer Graphic Tutorial", I feel If it helps you, don’t forget to give it a like! Roses given as gifts leave a lingering fragrance!
The above is the detailed content of How to import iPhone photos to computer Detailed introduction: Graphic tutorial on importing iPhone photos to computer. For more information, please follow other related articles on the PHP Chinese website!
 Apple mobile phone antivirus
 Computer is infected and cannot be turned on
 How to prevent the computer from automatically installing software
 Summary of commonly used computer shortcut keys
 Computer freeze screen stuck
 How to measure internet speed on computer
 How to set the computer to automatically connect to WiFi
 Migrate data from Android phone to Apple phone


