
Some relatively high-performance microcontrollers often have Ethernet interfaces. The network port is considered a relatively complex peripheral in the MCU because it involves the operation of the network protocol stack. Normally, the network protocol stack will run in a real-time operating system (RTOS), so it is difficult for ordinary microcontroller developers to use the network port. Under Linux, the network port is a frequently used interface, because Linux has a mature and complete network communication protocol stack, and the underlying driver has been provided by the manufacturer, so it is relatively convenient to use. This article will briefly summarize the use of network ports under Linux, hoping to be helpful to everyone.
2.1.Hardware
\1) NUC972 development board made by a third party on the Internet:
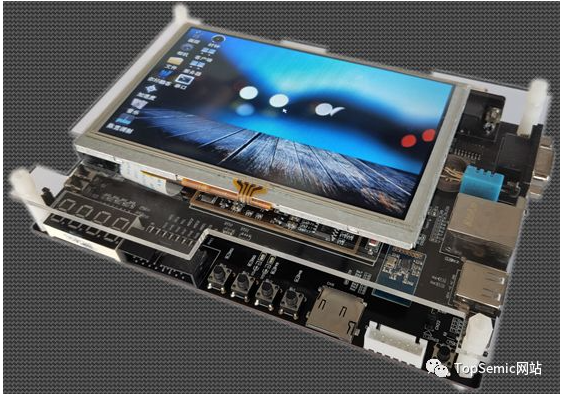
Friends who are interested in purchasing can go to their Taobao store to purchase:
https://s.click.taobao.com/X8mza8w
This article mainly deals with the board’s network port.
\2) 1 USB to RS232 cable, 1 network cable, 1 power cord, 1 Micro USB cable
2.2.Software
\1) We continue to use Uboot and Kernel from the previous article.
\2) We use Buildroot to regenerate Rootfs. The download address of NUC972 Buildroot is: https://github.com/OpenNuvoton/NUC970_Buildroot. The reason for using Buildroot to regenerate Rootfs here is to use the Buildroot tool to add what we want. Things, such as the ssh function we need in this article, will be very convenient, and it is much easier than transplanting it manually. Maybe you don't understand it. If you are interested, you can refer to the online tutorial to manually transplant dropbear to implement the ssh function. By comparing the two methods, you will have a deep understanding.
3) The cross tool chain arm_linux_4.8.tar.gz is still used in the previous article. I guess this tool chain is also generated by Buildroot.
The detailed steps are no longer introduced here. You can refer to an article I posted before "Using Buildroot to Make a Root File System for I.MX6". I will explain a few points here:
\1) After downloading the official Buildroot, enter the corresponding directory and execute the following instructions:
make nuvoton_nuc972_defconfig
make
The first compilation time will be a little long, everyone must be patient, because it will download a lot of files online.
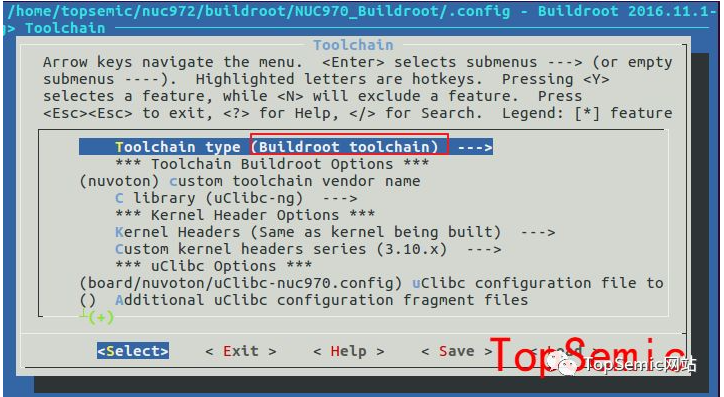
2) Regarding the cross-toolchain issue, the Buildroot toolchain is used. Selecting this Buildroot will create the toolchain from scratch. After the compilation is completed, you can see that there will be a newly made tool chain in the output/host/ directory. I personally guess that the official tool chain comes from this.
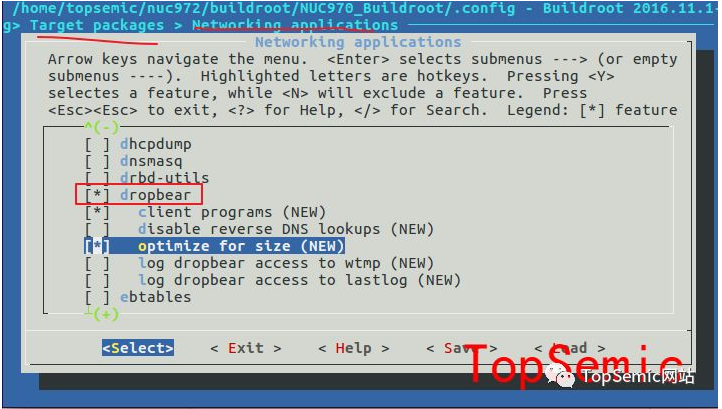
3) Dropbear is not selected in the default configuration, you can select it yourself.
4) After the compilation is completed, the generated rootfs is output/images/rootfs.tar. In order to be able to program it into the NUC972 board, it needs to be decompressed first and then used to generate the .img format file through mkyaffs2.
\5) Re-download Uboot, Kernel, Rootfs, etc. to the board, configure dropbear and network port, and then use it. Use the passwd command to set a password for the root user. The advantage of setting a password is that it can prevent anyone from using it. You can log in to the system directly.
Connect the network cable to the board and computer, set the computer IP to 192.168.0.50, and enter ifconfig eth0 192.168.0.100 in the serial port login interface. In order to ensure that the network is available after booting, add this sentence to /etc/init. d/rcS end of file. In this way, we don't need to connect the serial port later. We can log in to the Linux system using the network port alone. At the same time, we can transfer files to the board. We no longer need to copy them through the U disk as before, and the efficiency will be greatly improved.
4.1.Related commands
Common commands related to the network include ifconfig, which was used when configuring the network card earlier, and ping, which is used to test whether the network is accessible. Others include route, ethtool, etc., which will be introduced later when they are actually used.
4.2.CLanguageExample
The most commonly used ones are udp and tcp communication. The basic introduction to them will not be detailed here. Students who are not sure about it can just read two articles on Baidu. Here we take UDP as an example. Let’s take a look at a very classic example.
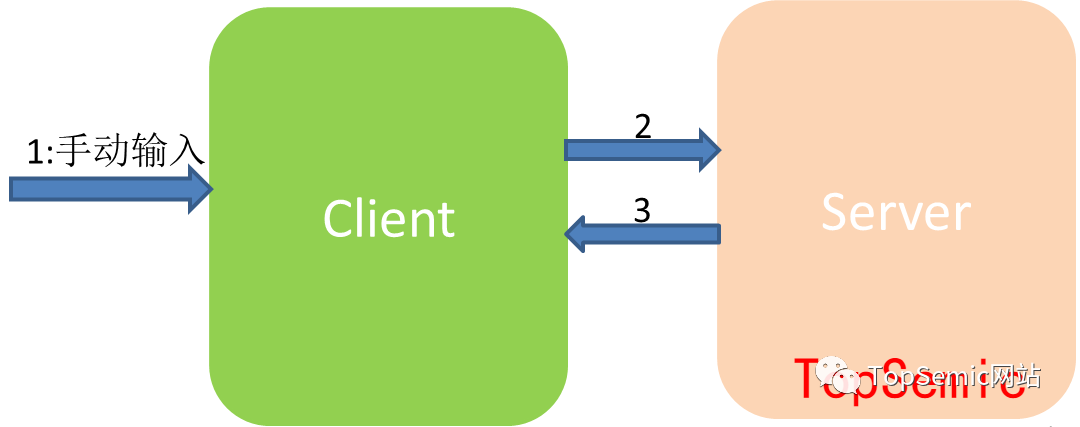
The functions to be implemented are:
\1) Client receives manually entered data
\2) Client sends the above data to Server
\3) Server sends the received data back to Client
Directly upload the code:
/***********************************************
 * @{
 * @file  : udp_client.c
 * @brief :
 * @author: TopSemic
 * @email : topsemic@sina.com
 * @date  : 2019-06-20
***********************************************/

//--------------------------------------------------
// Copyright (c) Topsemic
//--------------------------------------------------
#include
#include
#include
#include
#include
#include
#include
#include
#include
#include
#include
#include
#include
#include

#define SEND_DEST_PORT 8888


int main()
{
  int sockfd;
  int ret;
  struct sockaddr_in addr_sender;
  struct sockaddr_in addr_dest;

  int nlen = sizeof(struct sockaddr);
  int recvlen=0;

    // sender address
    bzero(&addr_sender,sizeof(addr_sender));

  // dest address
  bzero(&addr_dest,sizeof(struct sockaddr_in));//每个字节都用0填充
  addr_dest.sin_family=AF_INET;
    addr_dest.sin_addr.s_addr=inet_addr("127.0.0.1");
     addr_dest.sin_port=htons(SEND_DEST_PORT);

  sockfd=socket(AF_INET,SOCK_DGRAM,0); //udp 创建套接字
  if(sockfd printf("create socket failure,sockfd:%d\n",sockfd);
    return -1;

  }

  //不断获取用户输入并发送给服务器,然后接受服务器数据
  while(1)
  {
    char buff[1024] = {0x00};
    printf("Please Input a string: ");
    fgets(buff,1024,stdin);

    sendto(sockfd, buff, strlen(buff), 0, (struct sockaddr*)&addr_dest, sizeof(struct sockaddr_in));

    recvlen = recvfrom(sockfd,buff,sizeof(buff),0,(struct sockaddr *)&addr_sender,(socklen_t *)&nlen);

      if(recvlen > 0)
    {
      buff[recvlen] = 0x00;
      printf("Message form server: %s\n", buff);
      printf("sender ip:%s port:%d\n",inet_ntoa(addr_sender.sin_addr),ntohs(addr_sender.sin_port));
    }
    printf("**************************************\n");
  }

  close(sockfd);
  return 0;
}
First we use gcc to compile in Ubuntu. Note that we are not cross-compiling arm-linux-gcc. We first run the Server on the PC and then the Client. You can see the effect. It achieves the above-mentioned functions we want.

You can read the above code carefully. There are several points that need explanation:
1) UDP is different from TCP. There is no request connection and acceptance process. Therefore, in practice, there is no clear distinction between the server and the client. The above naming of server and client is just for convenience of description. This is how I understand it: send first The client receives the data (request data) first, and the server receives the data first and then sends the data.
\2) Have you noticed that the bind function is called in the server example, but not in the client example? What is the reason? The reason is this, because the server must first receive data to work. If the port is not bound, there is no way to know where to receive the data. The reason why Client does not need to bind is because it sends first, and can receive data at the sending port immediately after sending.
\3) In actual work, I found that many people, including myself, are often confused by ports. To summarize here, when receiving UDP, you need to bind a port number (the port of this port's own device) before you can receive data from this port. After receiving the data, you will get the other party's IP address and sending port number. Just specify the other party's IP and port when sending. The sending port of this machine is randomly assigned, and there is no need to bind the port.
In order to verify that the port sent without binding the port is randomly assigned, we can do another small experiment. We turn off the Client and reopen it again. We look at the port information printed twice before and after. We can see The port numbers to the two times are different.
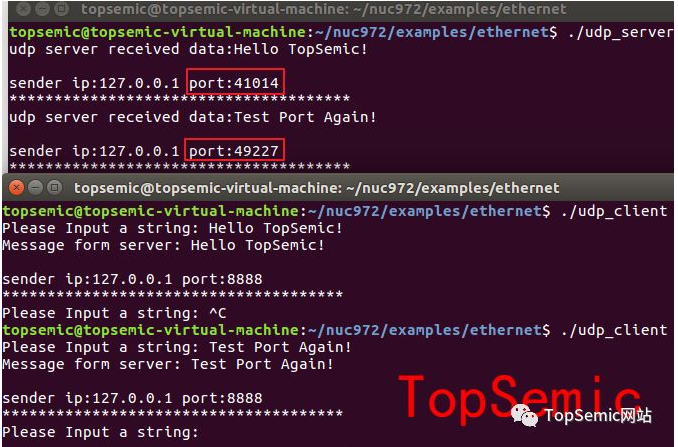
\4) When calling socket to create a socket, the second parameter of the function is passed SOCK_DGRAM, indicating that the UDP protocol is used. If it is TCP, this parameter is SOCK_STREAM.
\5) Use htonl(INADDR_ANY) to automatically obtain the IP address when assigning value to the addr_local member variable.
The advantage of using INADDR_ANY is that when the software runs on other hosts or the host IP address changes, there is no need to change the source code and recompile, and there is no need to manually enter it when starting the software. Moreover, if multiple IP addresses have been assigned to one host, data can be received from different IP addresses as long as the port numbers are consistent.
\6) The IP we set when sending in the Client is 127.0.0.1, which is a special IP address. You can use ifconfig to see it. You can see it under Ubuntu and on the board:

I found an English description from the Internet:
127.0.0.1 is the loopback Internet protocol (IP) address also referred to as the “localhost.” The address is used to establish an IP connection to the same machine or computer being used by the end-user. It can be simply The understanding is to represent the local machine itself.
Next step, we will cross-compile the Client code and put it on the board to run it. We need to make two subtle changes:
The first addr_dest.sin_addr.s_addr=inet_addr(“127.0.0.1”); is changed to:
addr_dest.sin_addr.s_addr=inet_addr(“192.168.0.50”);
192.168.0.50 is the IP address of the PC.
These three sentences in the second while(1)
char buff[1024] = {0x00};
printf(“Please Input a string: “);
fgets(buff,1024,stdin);
changed to:
char buff[1024] = “Hello TopSemic Friends!”;
//printf(“Please Input a string: “);
//fgets(buff,1024,stdin);
The purpose is to allow the client to automatically send and receive data without waiting for the user to input information.
In Ubuntu, use the scp command to directly place the file in the /opt directory of the board
scp udp_client root@192.168.0.100:/opt

In addition, we log in to the Linux system directly through the ssh command under Ubuntu
ssh root@192.168.0.100:/opt

To exit, just enter exit and you can return to the Ubuntu command line window.
In this way, the process of logging in to the board and uploading files to the board can be easily operated in Ubuntu. Compared with the previous Windows serial port login and U disk file transfer, it is much more convenient.
I ran udp_server under Ubuntu with great joy. I logged in to the board with ssh under Ubuntu and ran udp_client. I thought it would run successfully, but something unexpected happened. In fact, there was no result output at all.
But obviously the virtual machine Ubuntu can log in to the board and can ping successfully, and the board can also ping the IP 192.168.0.50, why can't udp get through? Later, after a period of thinking, the problem was solved. The solution is as follows:
The default network setting mode of the virtual machine is the NAT mode shown below,
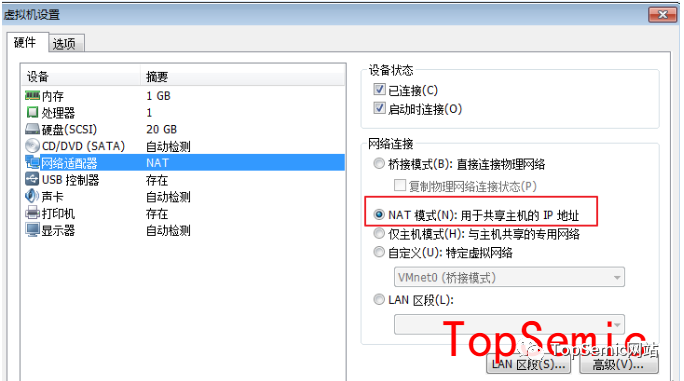
We modify it to the bridge mode shown in the figure below:
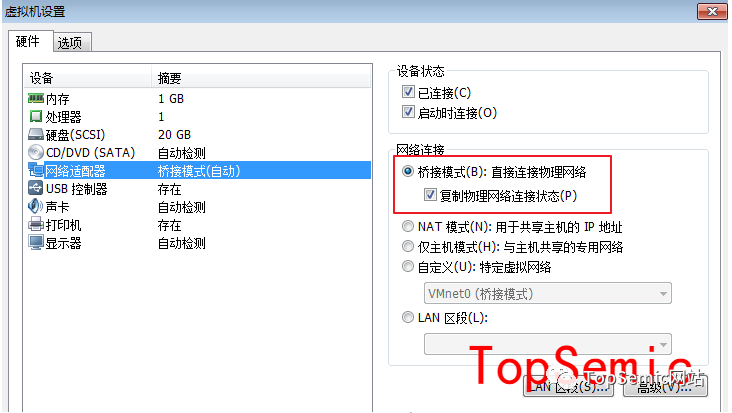
Then enter, unplug the network cable and reconnect it, and modify the network configuration in the Ubuntu virtual machine
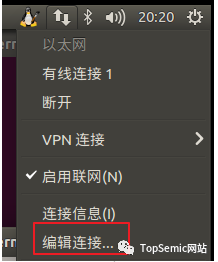
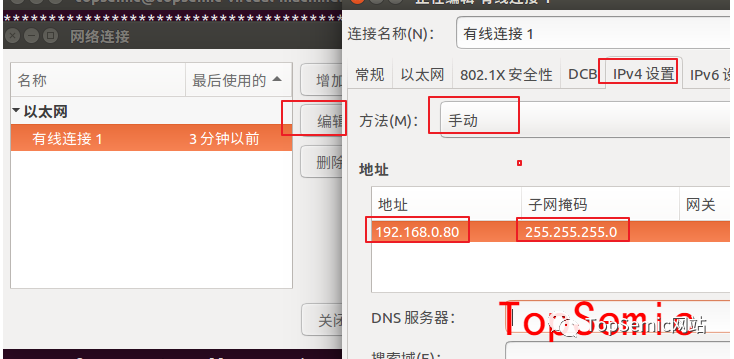
Change the wired connection of the virtual machine to a manually configured fixed IP, 192.168.0.xx network segment (do not conflict with Windows and board IP). You can use ifconfig to verify whether the setting is successful

At this time, log in to the board and ping 192.168.0.80, and the ping can be successful. Previously, I pinged 192.168.0.50. That is the IP of the Windows host. If it can be connected, it does not mean that it can be connected to the virtual machine.
Finally, change the IP in the above code,
addr_dest.sin_addr.s_addr=inet_addr(“192.168.0.80”);
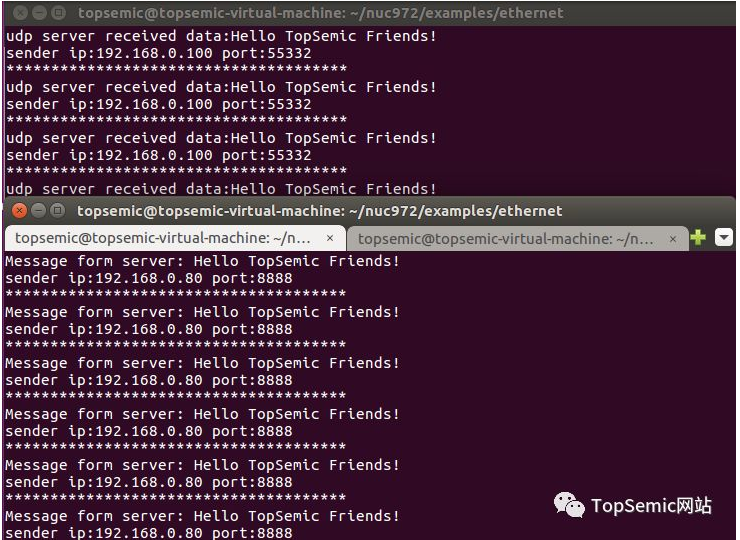
Recompile, download and run once, and it will work normally.
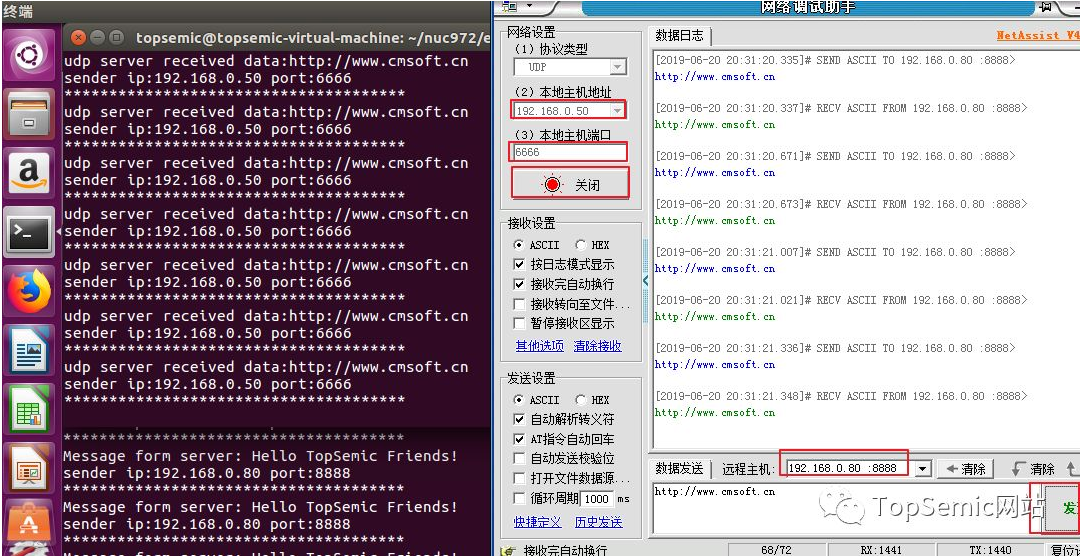
Additional point: When debugging the board, the network debugging assistant under Windows is often used. When using this tool, you only need to correctly configure the protocol type, local host address, local host port, and remote host, and then send it to view. Result.
For example, we can also enable the network debugging assistant in Windows to simulate the communication between the client and the virtual machine server, as follows:
Give me a very common mistake that is easily made in actual work.
Assume that your processor communicates with an external device through the network port and uses udp communication. The normal workflow is as shown below. You first send data, and then the external device responds to you.
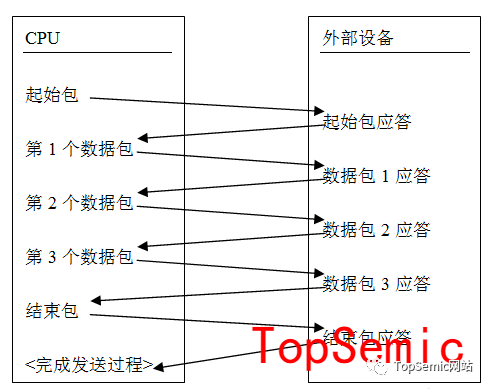
This model is very similar to the above-mentioned Server and Client models. What you want to implement is the Client. That is, call the sendto function to send first, and then call the recvfrom function to receive. Under normal circumstances, there is no problem in writing a program like this, but in practice you have to consider many abnormal situations, such as an external device suddenly powering off and then on or restarting during normal operation (but your CPU device does not power off). This What problems will arise? Because the external device is powered off, the recvfrom function will block because it cannot receive data. Even after the external device is re-powered and initialized, it will not give response data because it has not received the data, causing your recvfrom function to be stuck. Do not move.
If such code is released to the site, it will bring great hidden dangers, because it is normal for the above situation to occur on site. For example, if your CPU device is powered on first and the external device is powered on later, the above problems will also occur. In my previous project, this problem caused customers to complain about product problems. The customer found that if communication failed, the problem could only be solved by powering off the device again.
解决上述问题的办法也很简单,可以设置一个超时,使用setsockopt函数,让接收函数在超时时间内没有接收到数据时就返回就行了。返回后再接着重头发送数据即可,框架如下:
/* 设置阻塞超时 */
struct timeval timeout = {3, 0}; // 设置3s超时
if(setsockopt(sockfd,SOL_SOCKET,SO_RCVTIMEO,(char *)&timeout,sizeof(struct timeval))
{
<code style="display: -webkit-box;font-family: Operator Mono, Consolas, Monaco, Menlo, monospace;border-radius: 0px;font-size: 12px">printf("time out setting failed ");
</code>}
.
.
.
/* 数据阻塞接收 */
int receivePacketLen = recvfrom(sockfd,buffer,sizeof(buffer),0,(struct sockaddr*)& addr_sender,&addrLen);
if(receivePacketLen != -1)
{
//接收到数据
…
}
else if (errno == EAGAIN) //阻塞接收超时
{
<code style="display: -webkit-box;font-family: Operator Mono, Consolas, Monaco, Menlo, monospace;border-radius: 0px;font-size: 12px">printf("udp receive timeout! ");

return -1;
</code>}
为了大家更直观的感受这个问题,我们在上面实验的基础上来模拟这个场景,我们先运行upd_client,后运行udp_server,大家看下现象,结果自然是没有数据输出。
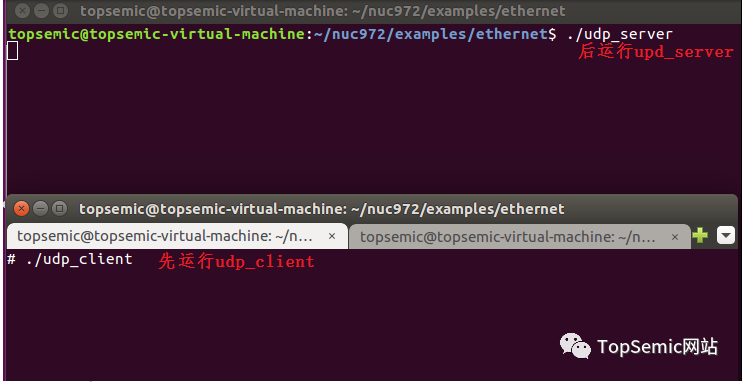
道理不难想明白,client程序运行后,先发送了数据,然后就阻塞在读那里不动了。我们把程序简单修改下:
// Max Recv block timeout in second
#define gMaxRecvBlockTimeout 3
…
…
…
// Set recv timeout
   struct timeval timeout = {gMaxRecvBlockTimeout, 0};
   if(setsockopt(sockfd,SOL_SOCKET,SO_RCVTIMEO,(char *)&timeout,sizeof(struct timeval)) printf("time out setting failed ");
   }


//不断获取用户输入并发送给服务器,然后接受服务器数据
while(1)
{
char buff[1024] = "Hello TopSemic Friends!";
//printf("Please Input a string: ");
//fgets(buff,1024,stdin);


sendto(sockfd, buff, strlen(buff), 0, (struct sockaddr*)&addr_dest, sizeof(struct sockaddr_in));
recvlen = recvfrom(sockfd,buff,sizeof(buff),0,(struct sockaddr *)&addr_sender,(socklen_t *)&nlen);
   if(recvlen > 0)
{
buff[recvlen] = 0x00;
printf("Message form server: %s ", buff);
printf("sender ip:%s port:%d ",inet_ntoa(addr_sender.sin_addr),ntohs(addr_sender.sin_port));
}
else if(errno == EAGAIN) // 阻塞接收超时
       {
           printf("udp receive timeout! ");
       }
printf("************************************** ");
}


close(sockfd);
    return 0;
这时我们先运行client,
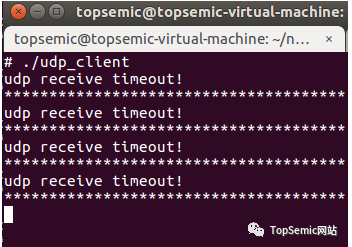
打印如上,然后再运行Server,就可以正常工作了,不会再出现上述问题。
The above is the detailed content of Embedded Linux Series Part 8: Operating Network Ports. For more information, please follow other related articles on the PHP Chinese website!


