
Nowadays, the boot device selection menu can be brought up when the notebook is started, which is much more convenient than setting up in the BIOS. The biggest advantage is that after installing the system, there is no need to enter the BIOS and set it back. The usage method will be explained below for reference.
1. Plug the prepared USB boot disk into the USB interface of the computer (it is recommended to plug it into the USB2.0 port), press the power button to turn on the computer, and when the LOGO appears on the screen, continue to press the F9 key, as shown in the figure below;
2. After pressing the ESC key, you can bring up the startup device selection menu, as shown in the figure below;
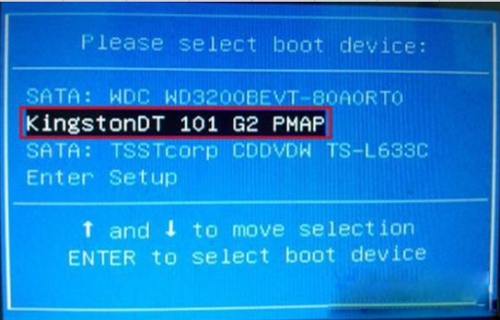
3. Select U disk boot, use the up and down arrow keys to move the cursor to select the name of the boot U disk recognized by the system, press Enter to confirm, and the laptop will enter the U disk boot software interface, as shown in the figure below;
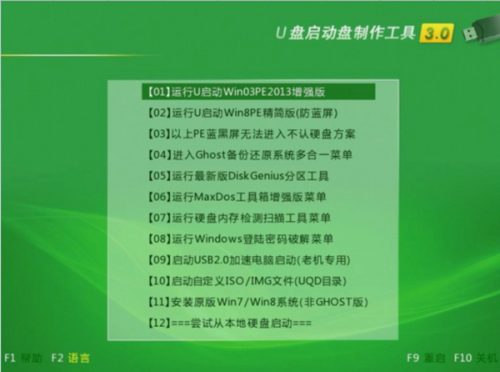
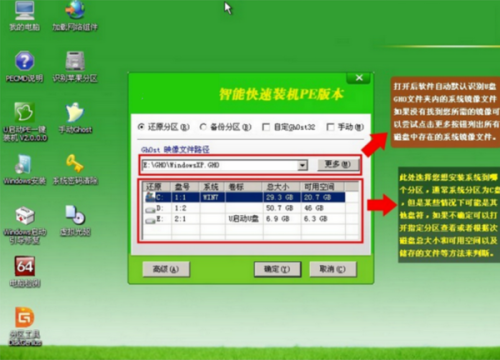
4. Press the "↑↓" up and down keys on the keyboard to select [01], and then press the Enter key to enter u to start the Winpe system. After entering the PE system, you can perform hard disk partitioning, system installation, system maintenance, etc. Operation, see the picture below,
5. Restart the system directly after completion and it will resume normal startup.
The method for HP to set the U disk as the boot item in the BIOS is as follows: (There is a premise: the U disk must be a U disk boot disk)
(1) First insert the USB boot disk, turn on the computer, and immediately press F10 to enter the BIOS for settings:
(Because I don’t know your motherboard BIOS type, so I will tell you one by one) Generally, the motherboard BIOS has three motherboard models: AWARD BIOS and AMI BIOS, phoenix blos. But these two motherboard models in the BIOS: AWARD BIOS and AMI BIOS are most commonly used.) The method of setting boot from USB disk in BIOS is as follows:
The first type is Award 6.0 type motherboard: it is set like this: when the computer has just started: press the "F10" key until the BIOS setting window appears, and then use the arrow keys to find "Advanced BIOS Features--- BOOT Device Priority---1St BOOT Device--USB:Mass Storage Device--enter (OK)), after selecting the startup method, then press F10, an English dialog box will appear, select the "YES" key, and press Enter. The computer automatically restarts, which proves that the changed settings have taken effect. Generally, such settings can enter the USB boot disk. (As shown below)
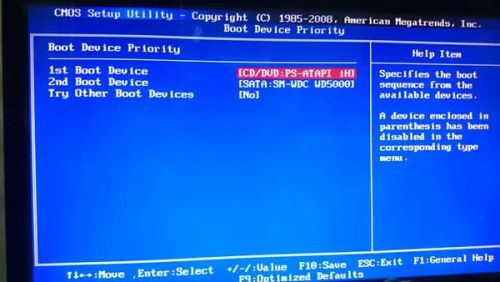
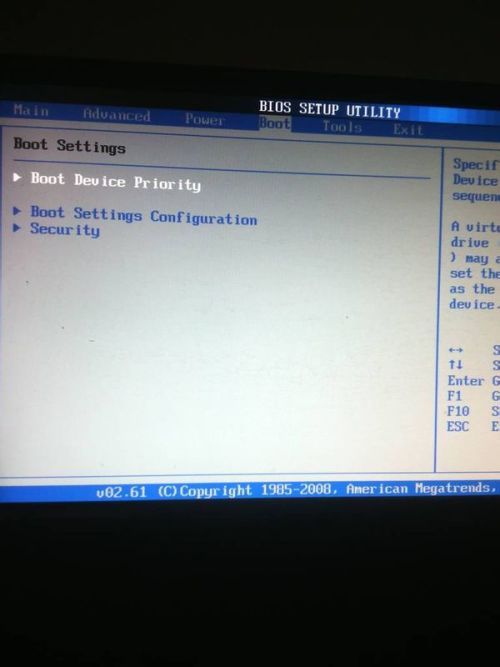
Type 2 AMI 8.0 motherboard: The setting is as follows: when the computer has just started, press and hold the F10 key until the BIOS setting window appears, and then use the arrow keys to find BOOT----boot settings ---boot device priority--enter (OK)--1ST BOOT DEVICE---USB:Mass Storage Device--enter (OK)). After selecting the startup method, press the F10 key and an English dialog box will appear. Select " YES" key (can be omitted) and press Enter. The computer will automatically restart, proving that the changed settings have taken effect. Generally, this setting will allow you to enter the USB boot disk. (As shown below)
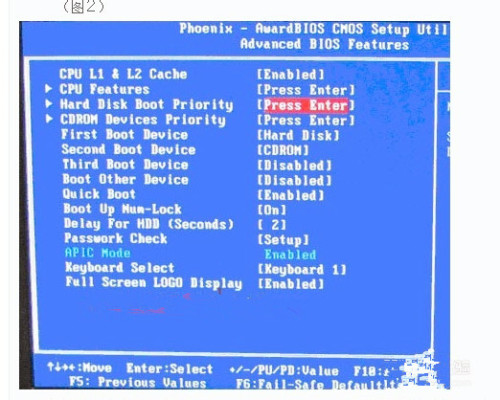
(2) Note: In the BOOT Device Priority of Award-type motherboards or in the BOOT options of AMI-type motherboards, some motherboards have a "hard disk boot priority" setting in the BIOS, while some motherboards do not have a "hard disk boot priority" setting. "Startup priority" setting, the specific method is as follows:
One is that there is no hard disk boot priority "Hard Disk Boot Priority" option, directly select to boot from the U disk in the first boot device "First boot device"; the other is that there is a hard disk boot priority "Hard Disk Boot Priority" option. Disk Boot Priority" option, you must select the U disk as the priority boot device here. The computer uses the U disk as a hard disk at this time; then, select the first boot device in "First Boot Device". USB boot. (As shown below)
The steps for setting up U disk boot (including reinstalling the system) on HP computers are:
1). Make a boot USB flash drive: Go to a physical store to buy a 4-8G USB flash drive (you can ask your boss to help you make a system USB flash drive and you can omit the following steps), search online and download Laomaotao or Chinese cabbage, etc. to boot U disk creation tool, insert the U disk into the computer and run this software to create a bootable U disk.
2). Copy system files: Go online to the System Home website to download the GHO file of operating systems such as WINXP or WIN7, and copy it to a U disk or the U disk folder specified by the startup tool.
3). Set the U disk as the first boot disk: press the DEL key when turning on the computer (usually F2 or other designated hotkeys for notebooks. You can check the bottom line of the screen when starting up the prompt information or the computer manual to confirm) to enter the BIOS setting interface. Enter the BOOT tab to set the USB disk as the first boot item (note: some computers need to insert the USB disk for recognition at this time to set it), then press F10 to save, exit and restart. If you need to reinstall the system, you need to continue to the next step.
4). Start the U disk and reinstall the system: Insert the U disk to start the computer, enter the U disk function menu, select "Install the system clone to Area C", press Enter to confirm and follow the prompts, the computer will automatically run The GHOST software automatically searches for the GHO files on the USB flash drive, clones them, and installs them in Area C. The entire process requires little manual intervention until the system desktop is finally entered.
The above is the detailed content of How to set up an HP desktop computer to use a USB flash drive as the boot device. For more information, please follow other related articles on the PHP Chinese website!
 How to stop setInterval
 oracle database running sql method
 How to remove the border of the text box
 What are the five types of aggregate functions?
 seo page description
 Nodejs implements crawler
 How to check for plagiarism on CNKI Detailed steps for checking for plagiarism on CNKI
 How to close the window opened by window.open


