| Introduction | It is a wonderful thing to be able to use a graphical interface with mouse clicks on Linux...but if your favorite development interactive environment and compiler are terminal windows, Bash and Vim, then you You should work with the terminal as often as I do. |
Even people who don’t use terminals often can benefit a lot from a deep understanding of the terminal environment. For example, take the cp command. According to Wikipedia, the cp (copy) command was part of the first version of Unix. Along with a set of other commands ls, mv, cd, pwd, mkdir, vi, sh, sed, and awk, the mentioned cp was one of the commands I learned when I was introduced to System V Unix systems in 1984. The most common use of the cp command is to make copies of files. like this:
cp sourcefile destfile
Execute this command in the terminal. The above command will copy the file named sourcefile to the file named destfile. If the destfile file does not exist before executing the command, it will be created, if it already exists, it will be overwritten.
I don’t know how many times I have used this command (I don’t want to know), but I know that I often use it when I write test code. In order to retain the current normal version and continue to modify it, I This command will be entered:
cp test1.py test1.bak
I have used this command countless times over the past 30 years. Also, when I decided to write my second version of the test program, I would enter this command:
cp test1.py test2.py
This completes the first step of modifying the program.
I rarely look at the reference documentation for the cp command, but when I was backing up my image folder (using the "file" application in the GUI environment), I started wondering "Is there a parameter in the cp command?" Supports copying only new files or modified files." Sure enough, it does!
Efficient Usage 1: Update your foldersFor example, there is a folder on my computer that stores various files. In addition, I need to add some new files to it from time to time, and I will modify some files from time to time, such as photos or photos downloaded from my mobile phone. music.
Assuming that the files I collect are all valuable to me, I sometimes want to make a copy and save the files on other media like a "snapshot". Of course, there are many programs that support backup, but I want to copy the directory structure to a removable device more accurately, so that I can often use these offline devices or connect them to other computers.
The cp command provides an easy way to do this. Examples are as follows:
In my Pictures folder, I have a folder named Misc. For the sake of illustration, I copied the files to a USB storage device. let's start!
me@desktop:~/Pictures$ cp -r Misc /media/clh/4388-D5FE
me@desktop:~/Pictures$
The above command is copied completely from the terminal window. Some people are not very adaptable to this environment. Before we enter or execute commands, we need to pay attention to the prefix me@mydesktop:~/Pictures. me is the current user, mydesktop is the computer name, ~/Pictures This is the current working directory, which is the abbreviation of the full path of /home/me/Pictures.
I enter this command cp -r Misc /media/clh/4388-D5FE and execute it to copy all the files in the Misc directory (the -r parameter, the full name is "recursive", recursive processing, which means all files in this directory and subdirectories) to the mounting directory of my USB device/media/clh/4388-D5FE.
Return to the previous prompt after executing the command. Most commands inherit the characteristics of Unix. After the command is executed, if there are no exceptions, nothing will be displayed. A prompt like "execution succeeded" will not be displayed before the task ends. information. If you want to get more feedback, use the -v parameter to make the execution results more detailed.
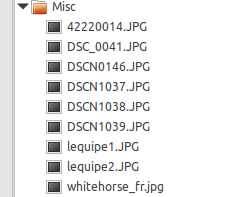
The picture below is the folder Misc that I just copied from my USB device. There are a total of 9 pictures in it.

Image of the new copy of Misc on the USB drive
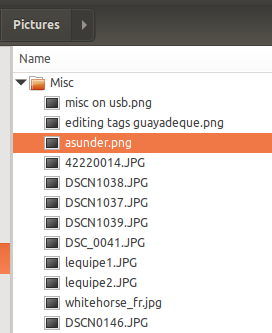
Suppose I want to add some new files under the original copy path ~/Pictures/Misc, like this:

New files added to the master directory
Now I want to copy only the new files to my storage device, so I use the "Update" and "Verbose" options of cp.
me@desktop:~/Pictures$ cp -r -u -v Misc /media/clh/4388-D5FE
'Misc/asunder.png' -> '/media/clh/4388-D5FE/Misc/asunder.png'
'Misc/editing tags guayadeque.png' -> '/media/clh/4388-D5FE/Misc/editing tags guayadeque.png'
'Misc/misc on usb.png' -> '/media/clh/4388-D5FE/Misc/misc on usb.png'
me@desktop:~/Pictures$
The first line above is the cp command and specific parameters (-r is "recursive", -u is "update", -v is "verbose"). The next three lines display information about the copied files, and the last line displays the command line prompt.
Generally speaking, the parameter -r can also be used in the more detailed style --recursive. But in a shorthand way, -ruv can also be used in conjunction with this.
Efficient Usage 2: Version BackupGoing back to the initial example, I regularly back up my code version during development. Then I found another cp parameter that works better.
假设我正在编写一个非常有用的 Python 程序,作为一个喜欢不断修改代码的开发者,我会在一开始编写一个程序简单版本,然后不停的往里面添加各种功能直到它能成功的运行起来。比方说我的第一个版本就是用 Python 程序打印出 “hello world”。这只有一行代码的程序就像这样:
print 'hello world'
然后我将这个代码保存成文件命名为 test1.py。我可以这么运行它:
me@desktop:~/Test$ python test1.py
hello world
me@desktop:~/Test$
现在程序可以运行了,我想在添加新的内容之前进行备份。我决定使用带编号的备份选项,如下:
clh@vancouver:~/Test$ cp --force --backup=numbered test1.py test1.py
clh@vancouver:~/Test$ ls
test1.py  test1.py.~1~
clh@vancouver:~/Test$
所以,上面的做法是什么意思呢?
第一,这个 --backup=numbered 参数意思为“我要做个备份,而且是带编号的连续备份”。所以一个备份就是 1 号,第二个就是 2 号,等等。
第二,如果源文件和目标文件名字是一样的。通常我们使用 cp 命令去拷贝成自己,会得到这样的报错信息:
cp: 'test1.py' and 'test1.py' are the same file
在特殊情况下,如果我们想备份的源文件和目标文件名字相同,我们使用 --force 参数。
第三,我使用 ls (意即 “list”)命令来显示现在目录下的文件,名字为 test1.py 的是原始文件,名字为 test1.py.~1~ 的是备份文件
假如现在我要加上第二个功能,在程序里加上另一行代码,可以打印 “Kilroy was here.”。现在程序文件 test1.py 的内容如下:
print 'hello world'
print 'Kilroy was here'
看到 Python 编程多么简单了吗?不管怎样,如果我再次执行备份的步骤,结果如下:
clh@vancouver:~/Test$ cp --force --backup=numbered test1.py test1.py
clh@vancouver:~/Test$ ls
test1.py test1.py.~1~ test1.py.~2~
clh@vancouver:~/Test$
现在我有有两个备份文件: test1.py.~1~ 包含了一行代码的程序,和 test1.py.~2~ 包含两行代码的程序。
这个很好用的功能,我考虑做个 shell 函数让它变得更简单。
最后总结第一,Linux 手册页,它在大多数桌面和服务器发行版都默认安装了,它提供了更为详细的使用方法和例子,对于 cp 命令,在终端中输入如下命令:
man cp
对于那些想学习如何使用这些命令,但不清楚如何使用的用户应该首先看一下这些说明,然后我建议创建一个测试目录和文件来尝试使用命令和选项。
第二,兴趣是最好的老师。在你最喜欢的搜索引擎中搜索 “linux shell tutorial”,你会获得很多有趣和有用的资源。
第三,你是不是在想,“为什么我要用这么麻烦的方法,图形化界面中有相同的功能,只用点击几下岂不是更简单?”,关于这个问题我有两个理由。首先,在我们工作中需要中断其他工作流程以及大量使用点击动作时,点击动作可就不简单了。其次,如果我们要完成流水线般的重复性工作,通过使用 shell 脚本和 shell 函数以及 shell 重命名等功能就能很轻松的实现。
The above is the detailed content of Efficient usage of two cp commands!. For more information, please follow other related articles on the PHP Chinese website!


