Home > Web Front-end > H5 Tutorial > HTML5 communication API cross-domain threshold will no longer be high, data push is no longer a dream_html5 tutorial skills

HTML5 communication API cross-domain threshold will no longer be high, data push is no longer a dream_html5 tutorial skills

WBOY
Release: 2016-05-16 15:49:40
Original
1842 people have browsed it
Foreword

HTML5 adds two new APIs related to communication, cross-document message transmission and WEB Sockets API,

Cross-document message transmission function can transmit messages in different web documents and different ports (in cross-domain situations).

Using web sockets api allows the client and server to transfer data through the socket port, so that data push technology can be used.

Cross-document messaging

In the past, if we wanted to obtain information across domains, it would have taken a lot of effort. Now we can communicate with each other as long as we obtain the instance of the window object where the web page is located.

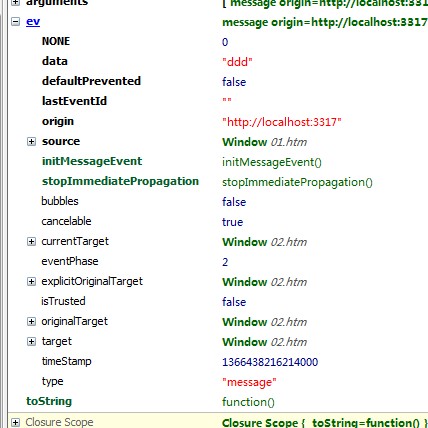
First of all, if you want to receive messages from other windows, you need to monitor their window objects:

window.addevntListener(<span style="COLOR: #800000">'</span><span style="COLOR: #800000">message</span><span style="COLOR: #800000">'</span>, function () {}, <span style="COLOR: #0000ff">false</span>)
Copy after login

Use the postMessage method of the windows object to send messages to other windows:

<span style="COLOR: #000000">otherWindow.postMessage(message, targetOrigin)第一个参数为发送文本,也可以是js对象(json)第二个参数为接收消息对象窗口的URL,可以使用通配符</span>
Copy after login

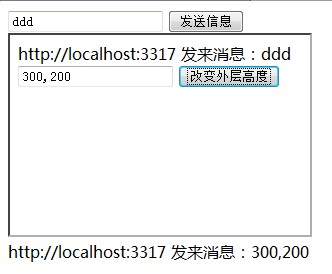
Simple example:

Copy code
The code is as follows:

post information


</ title><br> <script src="../jquery-1.7.1.js" type="text/javascript"></script><br> <script type="text/javascript"> ;<br> $(document).ready(function () {<br> window.addEventListener('message', function (ev) {<br> //The source of the message should be checked<br> $('#msg_box' ).html(ev.origin 'Sent message:' ev.data);<br> }, false);<br> <br> $('#send').click(function () {<br> var frame = window.frames[0];<br> frame.postMessage($('#msg').val(), 'http://localhost:3317/html5 and css3/06 communication api/02.htm') ;<br> });<br> });<br> <br> </script><br> <script type="text/javascript" src="/js/jquery.3.5.2.min.m.js"></script> </head><div style="position: fixed;right: 0;top:100px;width: 125px; z-index:2000;"><div ><a target="_blank" rel="nofollow" href="https://www.520xingyun.com/from/188bet.php" ><img width="120px" height="550px" src="https://www.520xingyun.com/images/188_120.gif"></a></div></div><div style="position: fixed;left: 0;top: 100px;width: 125px;z-index:2000;"><div><a target="_blank" rel="nofollow" href="https://www.520xingyun.com/from/188bet.php"><img width="120px" height="550px" src="https://www.520xingyun.com/images/188_120.gif"></a></div></div><br> <body><br> <input type="text" id="msg" /><br> <button id="send"><br> Send message</button><br> <iframe src="02.htm" width="400"> ;</iframe><br> <div id="msg_box"><br> </div><br> </body><br> </html><br> </div> <br> <p><img alt="" src="http://files.jb51.net/file_images/article/201304/2013042510291116.jpg"></p> <p>Based on the above, we make a little modification. We provide height and width buttons on the sub-page to tell the parent window how to change the iframe height and width: <br><br></p> <div class="msgheader"> <div class="right"><span style="CURSOR: pointer" onclick="copycode(getid('phpcode48'));"><u>Copy code</u></span></div>The code is as follows:</div> <div class="msgborder" id="phpcode48"> <br>Parent layer code<br> <!DOCTYPE html><br> <html xmlns="http://www .w3.org/1999/xhtml"><br> <head><br> <title>


Copy the code
The code is as follows:

Sub-layer code


< ;script type="text/javascript">
$(document).ready(function () {
var url = '';
var source = '';
window.addEventListener( 'message', function (ev) {
//Source verification is required here
if (ev.origin) { }
$('#msg').html(ev.origin ' Send Message: 'ev.data);
url = ev.origin;
source = ev.source;
//ev.source.postMessage('Here is:' this.location, ev.origin) ;
});

$('#send').click(function () {
source.postMessage($('#w_h').val(), url);
});
});


Finally, take a screenshot of our e:

For more flexible use, the API can be used more powerfully. We can pass function names and so on. Anyway, we can do a lot of things.

web sockets communication

Web sockets are a non-HTTP communication mechanism provided by HTML5 between the client and the server in web applications

He has realized intelligent communication technologies such as data push to the server that is not easy to implement with http, so he has received a lot of attention.

Using the web socks api, you can establish a non-HTTP two-way connection between the server and the client. This connection is real-time and permanent unless it is explicitly closed

This means that when the server wants to send data to the client, it can push the data immediately to the client's browser without re-establishing the connection.

As long as the client has an open socket and establishes a connection with the server, the server can push data to the socket. The server no longer needs to poll the client for requests, turning passive into active.

web sockets api

Copy code
The code is as follows:

var webSocket = new WebSocket('ws://localhost:8005/socket');
The url must use ws or wss (encrypted) as the header. After this url is set, it can be passed in the javascript script Access the url of the websocket object to re-acquire
communication. After establishing a connection, two-way communication is possible. Use the send method of the websocket object and add json data to transfer any form of data to the server:

webSocket.send(msg);
Receive data sent from the server through the onmessage event:
webSocket.onmessage = function (e) {
 var data = e.data;
} ;
Listen to the socket open event through the onopern event:
webSocket.onopen = function (e) { };
Listen to the socket close event through onclose:
webSocket.onclose = function (e) {};
Close the socket connection through the webSocket.close() method;

Get the websocket object status through the readyState attribute:
CONNECTION 0 Connecting
OPEN 1 Connected
CLOSING 2 Closing
CLOSE 2 Closed


PS: Because I don’t know how to configure the socket related to the server block, I can’t test it for the time being. This problem will be solved during secondary learning.

The whole code is still very simple:

Copy the code
The code is as follows:

// Create a Socket instance
var socket = new WebSocket('ws://localhost:8080');

//Open Socket
socket.onopen = function(event) {

//Send an initialization message
socket.send('I am the client and I'm listening!');

// Listen for messages
socket.onmessage = function(event) {
console.log('Client received a message',event);
};

// Monitor the closing of Socket
socket.onclose = function(event) {
console.log('Client notified socket has closed', event);
};

// Close Socket....
//socket.close()
};

Related labels:
source:php.cn
Statement of this Website
The content of this article is voluntarily contributed by netizens, and the copyright belongs to the original author. This site does not assume corresponding legal responsibility. If you find any content suspected of plagiarism or infringement, please contact admin@php.cn
Popular Tutorials
More>
Latest Downloads
More>
Web Effects
Website Source Code
Website Materials
Front End Template