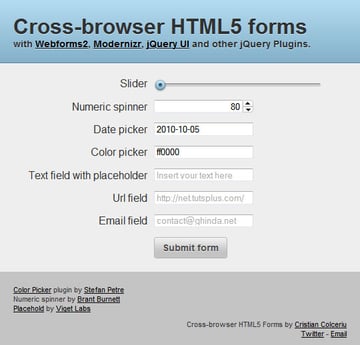

In this tutorial, we will learn how to serve HTML5 forms to modern browsers while using a mix of Webforms2, Modernizr, jQuery UI, and various jQuery plugins.
HTML5-powered forms provide extensive semantic markup and eliminate the need for extensive JavaScript.
块引用>The first effort towards HTML5 was WHATWG's Web Forms 2.0, originally called XForms Basic. The specification introduces new form controls, validation, and more. Later, it was merged into HTML5 and the duplicate model was subsequently removed, resulting in the HTML5 forms we know today.
Unfortunately, the ever-present backwards compatibility issue remains a headache. Developers have to deal with the dreaded Internet Explorer, which, as you might have guessed, doesn't offer much support for the latest advances in forms - even in the latest available beta version of IE9. Older version of IE? Fagetaboutit.
Nonetheless, we want to use these new features, and we will use them! Today, we'll take a look at some of these new elements. We'll check if the browser supports these features and provide a fallback using CSS and JavaScript if not.
Tools: Modern Tools
We will only provide fallbacks to browsers that do not support HTML5 forms or parts of them. But the correct technique is not to rely on browser sniffing, but to use signature detection. We will use the popular Modernizr library.
Modernizr is a small JavaScript library for testing current browsers against a number of HTML5 and CSS3 features.
If you want to learn more about Modernizr, you can check out the "Modernizr Video Crash Course" advanced tutorial available on Tuts Marketplace.
块引用>
Tools: Webforms2
Webforms2 is Weston Ruter's JavaScript library that provides a cross-browser implementation of the "previous" version of HTML5 forms, the "WHATWG Web Forms 2.0" specification.
We will use this to validate and extend the functionality of the current element.
<script type="text/javascript" src="webforms2/webforms2-p.js"></script>Copy after login
Widget: Slider
The specification describes a range input as an inexact control used to set the value of an element to a string representing a number .
<input type="range" name="slider">Copy after loginHere's a preview of it in Opera 10.63:

To provide a fallback for other browsers, we will use jQuery UI's Slider widget.
First, we create the initialization function that creates the slider from the input range elements.
var initSlider = function() {
	$('input[type=range]').each(function() {
		var $input = $(this);
		var $slider = $('<div id="' + $input.attr('id') + '" class="' + $input.attr('class') + '"></div>');
		var step = $input.attr('step');

		$input.after($slider).hide();

		$slider.slider({
			min: $input.attr('min'),
			max: $input.attr('max'),
			step: $input.attr('step'),
			change: function(e, ui) {
				$(this).val(ui.value);
			}
		});
	});
};
Copy after loginWe create a new <
div> element for each range input and call the slider on that node. This is because calling jQuery UI's slider directly on the input element will not work.Note that we get the properties from the input, such as
min, maxandstep,, and then use them as parameters for the slider. This helps our fallback slider functionally mimic a real HTML5 slider.Next, we will use Modernizr to determine whether the current browser supports this input type. Modernizr adds classes to document elements (
html), allowing you to target specific browser features in your stylesheet. It also creates a self-titled global JavaScript object that contains properties for each feature: if the browser supports it, this property will evaluate totrue, if not it will befalse.With this knowledge, to detect support for input types we will use
Modernizr.inputtypes[type].if( !Modernizr.inputtypes.range ){ $(document).ready( initSlider ); };Copy after loginIf range input is not supported, we append the
initSliderfunction to jQuery'sdocument.readyto initialize our function after the page loads.This is how the slider will look in browsers without native support for range inputs.

小部件:数字微调器
引用马克·皮尔格林的话:
询问电话号码比询问电子邮件地址或网址更棘手。
这就是为什么我们提供了一个专门处理数字的单独表单控件:数字微调器,也称为数字步进器。
<input type="number" value="2">Copy after login在撰写本文时,它受到 Opera 和基于 Webkit 的浏览器的支持;这是 Opera 10.6 的快照。

因为 jQuery 不提供数字微调器,所以我们将使用 Brant Burnett 的 jQuery 插件,该插件构建为 jQuery UI 小部件。
我们实现了与之前相同的技术;构建函数来创建微调器,使用 Modernizr 进行测试,并将函数附加到
$(document).ready。var initSpinner = function() { $('input[type=number]').each(function() { var $input = $(this); $input.spinner({ min: $input.attr('min'), max: $input.attr('max'), step: $input.attr('step') }); }); }; if(!Modernizr.inputtypes.number){ $(document).ready(initSpinner); };Copy after login由于数字输入还支持
min、max和step,因此我们从字段中获取属性,并将它们用作初始化数字微调器插件的参数。我们的后备小部件如下所示:

小部件:日期选择器
至少有六种输入类型可用作日期选择器。
- date
- 月
- 一周
- 时间
- 日期时间和
- 和本地日期时间
在撰写本文时,唯一正确支持它们的浏览器是 Opera 9+ 版本。
<input type="date">
<input type="month">
<input type="week">
<input type="time">
<input type="datetime">
<input type="datetime-local">
Copy after login目前,我们将仅使用 jQuery UI Datepicker 为
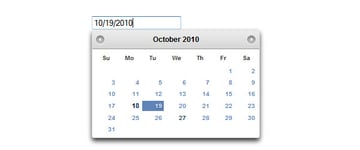
date输入提供后备。请随意使用任何其他插件来完全模仿您的实现中的 HTML5 日期选择器输入的功能。var initDatepicker = function() { $('input[type=date]').each(function() { var $input = $(this); $input.datepicker({ minDate: $input.attr('min'), maxDate: $input.attr('max'), dateFormat: 'yy-mm-dd' }); }); }; if(!Modernizr.inputtypes.date){ $(document).ready(initDatepicker); };Copy after login
小部件:颜色选择器
目前,没有浏览器提供对颜色
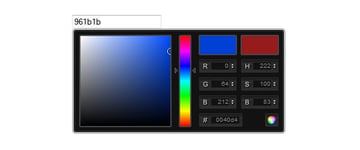
input的支持。因此,在他们赶上之前,他们都需要使用我们的后备技术。<input type="color">Copy after login我们将使用 Stefan Petre 的 ColorPicker jQuery 插件,因为 jQuery UI 尚未提供基础包。
var initColorpicker = function() {
	$('input[type=color]').each(function() {
		var $input = $(this);
		$input.ColorPicker({
			onSubmit: function(hsb, hex, rgb, el) {
				$(el).val(hex);
				$(el).ColorPickerHide();
			}
		});
	});
};

if(!Modernizr.inputtypes.color){
	$(document).ready(initColorpicker);
};
Copy after login我们的结果:

输入类型:搜索
新的
search输入类型隐式用于语义,但将来可以提供许多有趣的功能。<input type="search">Copy after login目前,只有基于 Webkit 的浏览器提供对此功能的支持。该规范还支持
results属性以在下拉列表中显示多个搜索术语。在 OS X 上的 Safari 上,它应该如下所示:

其余浏览器将其显示为标准文本字段,因此您可以放心地将其与标准标记一起使用。
输入类型:URL 和电子邮件
这两种输入类型
url和<input type="email"> <input type="url">Copy after login这些输入类型可以通过Webforms2在其他浏览器中实现。
您可以在新项目中自由使用这些类型,因为它们会回退到简单的文本框。在您的手机上,如果您向输入提供这些类型,您会发现键盘会相应变化。
属性:必填字段
新规范引入了非常方便的
requiredattribute。现在我们可以轻松地使用此属性,而不是使用花哨的 JavaScript 来处理我们的必填字段。<input type="email" required>Copy after login对于不支持该属性的浏览器,我们可以再次使用Webforms2。因此,由于我们从一开始就将其包含在内,因此无需担心。
注意:请务必将 a
name属性分配给您的表单元素,否则 required 属性将不会生效。
属性:模式
pattern属性用于字段验证,并且仅当值与使用正则表达式定义的特定格式匹配时才接受值。如果输入的值与模式不匹配,表单将不会提交。例如,要验证电话号码,我们必须使用以下
pattern或正则表达式:<input type="text" name="Tel" pattern="^0[1-689][0-9]{8}$">Copy after login
pattern属性可以通过使用 Webforms2 在不支持它的浏览器中实现。
属性:自动对焦
autofocusattribute 正如它所说:自动聚焦我们的控件之一。目前基于 Webkit 的浏览器(Safari、Chrome 等)和 Opera 支持它。请记住:只有一个表单控件可以接收此属性。<input type="email" autofocus>Copy after loginWebforms2 负责在不支持的浏览器中实现。
属性:占位符
placeholder属性是我们多年来一直使用 JavaScript 做的事情。它添加了有关该字段的一条信息,例如简短的描述,当该字段获得焦点时该信息就会消失。<input name="name" placeholder="First Name">Copy after login最新的 Beta Firefox 和 Webkit 浏览器支持此属性。
为了模仿旧版浏览器中的行为,我们将使用 Viget 设计实验室提供的 Placehold jQuery 插件。
var initPlaceholder = function() {
	$('input[placeholder]').placehold();
};

if(!Modernizr.input.placeholder){
	$(document).ready(initPlaceholder);
};
Copy after login
属性:最小值、最大值和步长
min、max和step输入属性指定某些表单控件的约束,例如日期选择器、数字和范围。您肯定可以从min和max的名称中猜出它们的用途。step属性指定每次单击或“步骤”的多个范围。例如,如果步长值为 2,则可接受的值可以是 0、2、4 等。<input type="range" name="slider" min="0" max="20" step="5" value="0">Copy after login这些属性目前仅受 Opera 和 Webkit 浏览器支持,并由 Webforms2 实现,作为其他浏览器的后备。
结论
今天我们了解到,创建表单并为大多数新添加的内容提供后备是一项相当简单的任务。如果今天人们仍然试图吓唬您不要使用 HTML5,请不要理会他们;立即开始使用您可以使用的出色工具!
Be sure to check out Zoltan "Du Lac" Hawryluk's excellent html5Widgets, which provides a similar solution as well as native JavaScript widgets.
Further reading
- 28 HTML5 Features, Tips, and Techniques You Must Know
- HTML5 and CSS3: Technologies you'll be using soon /a>
- The Forms section of Mark Pilgrim's Dive Into HTML5
- HTML5 Forms in Mozilla Developer Center
- W3C HTML5 Forms Specification Working Draft
- Comparison of layout engines (HTML5) on Wikipedia
The above is the detailed content of Create HTML5 forms that run on different browsers. For more information, please follow other related articles on the PHP Chinese website!


