Like most content management systems, PyroCMS uses front-end themes. Although PyroCMS themes are built slightly differently than themes from other systems you may be used to, they are still easy to create. In fact, they're so simple that very little PHP experience is required to assemble them!
PyroCMS themes consist of HTML, images, CSS, and JavaScript arranged in the following supported folders:
While these folders will no doubt look familiar to you, the "views" folder makes the most sense in an MVC context. When building a theme for PyroCMS, you are actually building the views (including assets) of an MVC pattern application. These views consist of a main layout file and multiple partial files (i.e. header.html or footer.html) that share presentation logic between different layouts. We'll discuss this shortly.
To start building your first PyroCMS theme, create a supported folder structure in one of two locations within your PyroCMS instance:
addons/shared_addons/themes (for themes available to all sites)
or:
addons/[site-name]/themes (for themes available to only one specific site)
After creating the base theme folder with a supported folder structure, the first file you want to add to your theme is theme.php.
addons/shared_addons/themes/[my-theme-name]/theme.php
This theme.php file contains all the important details of the theme including its name, author, version, etc. In a way, this file is similar to a WordPress theme’s style.css file. Here is a basic example of a theme.php file for a PyroCMS theme:
<?php defined('BASEPATH') OR exit('No direct script access allowed');

class Theme_Foo extends Theme
{
    public $name = 'Foo';
    public $author = 'Zac Vineyard';
    public $author_website = 'https://zacvineyard.com';
    public $website = 'http://example.com/themes/foo';
    public $description = 'The antithesis theme to your Bar theme.';
    public $version = '1.0';
}

 /* End of file theme.php */
Please note that this file extends a PyroCMS class named Theme. Also, since you are declaring your PHP classes in this file, you need to make sure to use the name of the folder that contains your theme in the class declaration. So, if the folder containing the theme is named "foo", the class created in theme.php should be named Theme_Foo (instead of Theme_Custom, as shown in the example in the PyroCMS documentation).
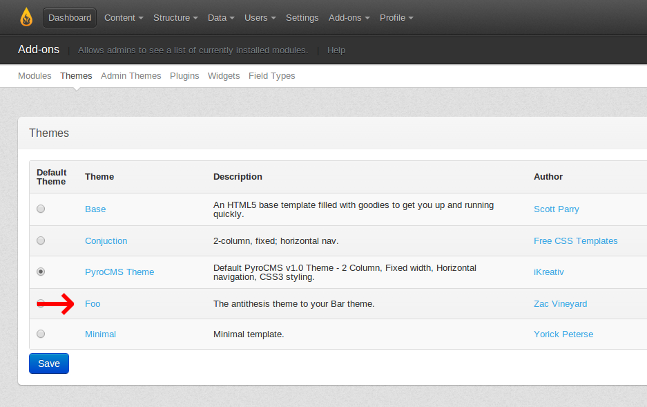
After creating the theme.php file, you can log into the PyroCMS control panel and view the themes listed in the Themes module.

All layout files for a PyroCMS theme exist in one of two locations:
addons/[site-ref]/themes/[my-theme-name]/views/layouts/
or:
addons/shared_addons/themes/[my-theme-name]/views/layouts/
Every theme should have a layout file named "default.html" located in one of the locations listed above. Additional layout files are optional; I'll show you how to add more layout files later. First, it's important to check the contents of the layout file.
Layout files in PyroCMS are built using HTML and a tag parser (called the Lex tag parser). This is what a very basic PyroCMS layout file looks like:
<!DOCTYPE html>
<html>
<head>
    <title>{{ template:title }}</title>
    {{ template:metadata }}
</head>
<body>
    <h1>{{ template:title }}</h1>
    {{ template:body }}
</body>
</html>
The special tag you see in this HTML is the Lex parser tag. If you've ever used Smarty templates in PHP, these templates may look somewhat familiar. The main benefit of using Lex parser tags in your layout files is that you don't have to put PHP directly into the view (remember, we are using MVC), which gives you the ability to create patterns that follow < 的 PyroCMS 主题的最佳机会em>Don't Repeat Yourself .
Of course, the example I gave above is simple, but Lex parser tags are very powerful. They can loop through data, manipulate properties, and more. Learn more about the Lex parser in the PyroCMS documentation.
A more complex PyroCMS layout file looks like this:
<!DOCTYPE html>
<html>
<head>
    <title>{{ template:title }}</title>
    {{ template:metadata }}
    {{ theme:favicon file="favicon.png" }}
    {{ theme:css file="style.css" }}
    {{ theme:js file="site.js" }}
</head>
<body>
    <div class="header">
        <div class="logo">
            {{ theme:image file="logo.jpg" alt="Your Cool Logo" }}
        </div>
        <div class="nav">
            {{ navigation:links group="header" }}
        </div>
    </div>
    <div class="content">
        <h1>{{ template:title }}</h1>
        {{ template:body }}
    </div>
</body>
</html>
You will notice that this layout file using Lex contains resources such as CSS, JavaScript, and images. Using Lex tags and HTML allows PyroCMS developers to build layout files very quickly.
Partials in PyroCMS represent partial layouts, allowing you to break your layout into reusable parts or sections. These sections can then be loaded via different layout files. This prevents you from typing the same code (header, footer, etc.) in multiple layout files.
Depending on where you place your theme files, some content will be created in one of two locations:
addons/[site-ref]/themes/[my-theme-name]/views/partials/
or:
addons/shared_addons/themes/[my-theme-name]/views/partials/
Use this Lex tag to load some content into the layout:
{{ theme:partial name="partialname" }}
This Lex tag operates exactly like a PHP include statement - similar to what you would find in WordPress or other themes. The code below is a simple example of a partial PyroCMS layout.
{{ theme:partial name="header" }}

    <div class="content">
        <h1>{{ template:title }}</h1>
        {{ template:body }}
    </div>

{{ theme:partial name="footer" }}
header.html section and the footer.html file are of course the HTML we need to reuse from the template in the code example above. A quick tip: There is no limit to the number of sections you can use in a layout. Additionally, some files may contain any combination of valid HTML and Lex.
要向 PyroCMS 实例添加另一个布局,请在主题的 views/layouts/ 目录中再创建一个布局文件。该文件可以使用任何名称,但最好尽可能具有描述性地命名 - 例如 about.html。
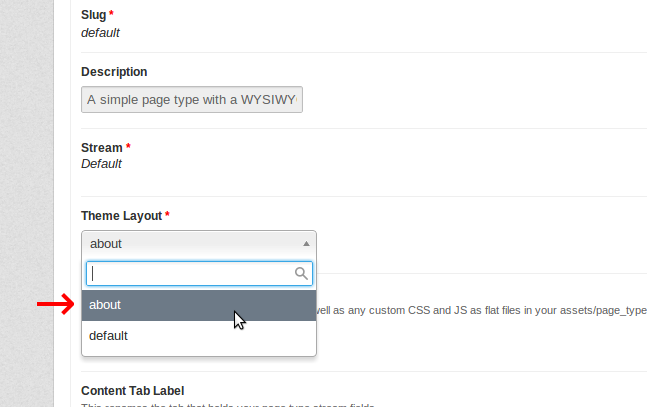
为了增加灵活性,您可以使用任意数量的布局文件。当您在 PyroCMS 控制面板(控制面板→页面→页面类型)中编辑或创建页面类型并从下拉列表中选择所需文件时,您的所有布局主题的布局文件将可供使用。

PyroCMS 能够轻松显示移动设备和桌面设备的单独布局。要使用此功能,请将布局文件移动到 views 文件夹中名为“web”的文件夹中,以便您的默认布局位于此处:
[your-theme]/views/web/layouts/default.html
当用户使用桌面浏览器访问您的网站时,将使用此位置的主要布局文件。如果用户使用移动设备浏览器访问您的网站,则会向用户提供您在此位置创建的移动布局:
[your-theme]/views/mobile/layouts/default.html
此功能适用于多个布局文件。
请注意 PyroCMS 文档中的警告:“PyroCMS 不认为 iPad 是移动设备,因此如果用户使用 iPad 访问您的网站,它不会加载您的移动布局。”但是,如果在您的网站上,您希望将 iPad 识别为移动设备,则可以更改 config/ 目录中的“user_agent.php”文件,以使 iPad 识别为移动设备。移动设备。
使用本文作为指南,您可以看到在 PyroCMS 中创建主题是多么容易。提供的代码示例非常简单,因此我鼓励您探索 PyroCMS 文档,以便对 PyroCMS 中的布局、移动布局、部分和 Lex 解析器有更丰富的经验。玩得开心!
The above is the detailed content of Creating a PyroCMS Theme: A Step-by-Step Guide. For more information, please follow other related articles on the PHP Chinese website!
 How to export project in phpstorm
 How to solve the problem that this copy of windows is not genuine
 linux view system information
 Ethereum today's market price
 Solution to java success and javac failure
 Why disabling automatic updates in Windows 11 is invalid
 The difference between fprintf and printf
 window.setinterval


