
Today let’s talk to you about some very useful points of Nginx in our actual applications.
The early business was based on single node deployment. Since the access traffic was not large in the early stage, the single structure could also meet the demand. However, as the business grows, the traffic becomes larger and larger. Then Eventually, the access pressure on a single server will gradually increase. Over time, the performance of a single server cannot keep up with business growth, which will cause frequent online downtime, eventually causing the system to be paralyzed and unable to continue processing user requests.
From the above description, there are two main problems:
①The deployment method of the single structure cannot carry the growing business traffic.
②When the backend node goes down, the entire system will be paralyzed, making the entire project unavailable.
Therefore, in this context, the benefits that the introduction of load balancing technology can bring:
OK~, since the introduction of load balancing technology can bring us such huge benefits, what options are there to choose from? There are two main load solutions,"Hardware level and software level". The more commonly used hardware loads includeA10, F5, etc., but these machines often cost tens of thousands or even tens of thousands. The cost is RMB 100,000, so generally large enterprises will adopt this solution, such as banks, state-owned enterprises, central enterprises, etc. If the cost is limited, but you still want to do a load balancing project, you can implement it at the software level, such as the typicalNginx, etc. The load of the software layer is also the focus of this article. After all,BossOne of the principles is:""If it can be achieved with technology, try not to spend money.""
Java Developer Online Question-Brushing Artifact
Nginxis currently the mainstream solution in load balancing technology, almost most of which All projects will use it.Nginxis a lightweight and high-performanceHTTPreverse proxy server. It is also a general-purpose proxy server that supports most protocols, such asTCP, UDP, SMTP, HTTPS, etc.
Nginxis the same as Redis and is a product built based on the multiplexing model, so it has the same ## capabilities asRedis#""Low resource usage and high concurrency support""Features: In theory, a single node'sNginxsupports5Wconcurrent connections, but in the actual production environment, the hardware With the basics in place and simple tuning, this value can indeed be achieved.
Nginxis introduced:
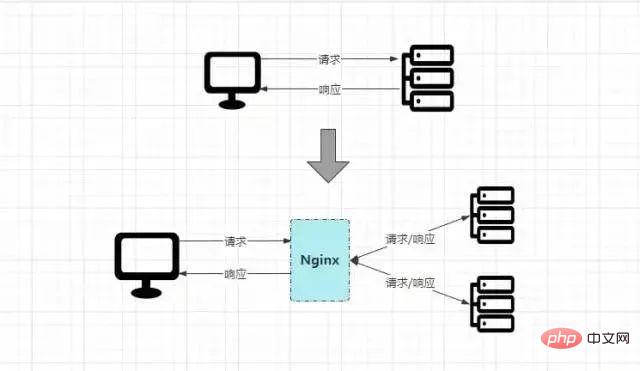
Originally, the client directly requested the target server, and the target server directly completed the request processing. However, after addingNginx, all requests will first go throughNginxis then distributed to the specific server for processing. After the processing is completed,Nginxis returned. Finally,Nginxreturns the final response result to the client.
After understanding the basic concepts ofNginx, let’s quickly set up the environment and learn about some ofNginx’s advanced features, such as dynamic and static separation, resource compression, cache configuration,IPBlacklist, high availability guarantee, etc.
❶First create the directory ofNginxand enter:
[root@localhost]# mkdir /soft && mkdir /soft/nginx/ [root@localhost]# cd /soft/nginx/
❷Download the installation package ofNginx. You can upload the offline environment package through theFTPtool, or you can obtain the installation package online through thewgetcommand:
[root@localhost]# wget https://nginx.org/download/nginx-1.21.6.tar.gz
没有wget命令的可通过yum命令安装:
[root@localhost]# yum -y install wget
❸解压Nginx的压缩包:
[root@localhost]# tar -xvzf nginx-1.21.6.tar.gz
❹下载并安装Nginx所需的依赖库和包:
[root@localhost]# yum install --downloadonly --downloaddir=/soft/nginx/ gcc-c++ [root@localhost]# yum install --downloadonly --downloaddir=/soft/nginx/ pcre pcre-devel4 [root@localhost]# yum install --downloadonly --downloaddir=/soft/nginx/ zlib zlib-devel [root@localhost]# yum install --downloadonly --downloaddir=/soft/nginx/ openssl openssl-devel
也可以通过yum命令一键下载(推荐上面哪种方式):
[root@localhost]# yum -y install gcc zlib zlib-devel pcre-devel openssl openssl-devel
执行完成后,然后ls查看目录文件,会看一大堆依赖:

紧接着通过rpm命令依次将依赖包一个个构建,或者通过如下指令一键安装所有依赖包:
[root@localhost]# rpm -ivh --nodeps *.rpm
❺进入解压后的nginx目录,然后执行Nginx的配置脚本,为后续的安装提前配置好环境,默认位于/usr/local/nginx/目录下(可自定义目录):
[root@localhost]# cd nginx-1.21.6 [root@localhost]# ./configure --prefix=/soft/nginx/
❻编译并安装Nginx:
[root@localhost]# make && make install
❼最后回到前面的/soft/nginx/目录,输入ls即可看见安装nginx完成后生成的文件。
❽修改安装后生成的conf目录下的nginx.conf配置文件:
[root@localhost]# vi conf/nginx.conf 修改端口号:listen 80; 修改IP地址:server_name 你当前机器的本地IP(线上配置域名);
❾制定配置文件并启动Nginx:
[root@localhost]# sbin/nginx -c conf/nginx.conf [root@localhost]# ps aux | grep nginx
Nginx其他操作命令:
sbin/nginx -t -c conf/nginx.conf # 检测配置文件是否正常 sbin/nginx -s reload -c conf/nginx.conf # 修改配置后平滑重启 sbin/nginx -s quit # 优雅关闭Nginx,会在执行完当前的任务后再退出 sbin/nginx -s stop # 强制终止Nginx,不管当前是否有任务在执行
❿开放80端口,并更新防火墙:
[root@localhost]# firewall-cmd --zone=public --add-port=80/tcp --permanent [root@localhost]# firewall-cmd --reload [root@localhost]# firewall-cmd --zone=public --list-ports
⓫在Windows/Mac的浏览器中,直接输入刚刚配置的IP地址访问Nginx:
最终看到如上的Nginx欢迎界面,代表Nginx安装完成。
首先通过SpringBoot+Freemarker快速搭建一个WEB项目:springboot-web-nginx,然后在该项目中,创建一个IndexNginxController.java文件,逻辑如下:
@Controller public class IndexNginxController { @Value("${server.port}") private String port; @RequestMapping("/") public ModelAndView index(){ ModelAndView model = new ModelAndView(); model.addObject("port", port); model.setViewName("index"); return model; } }
在该Controller类中,存在一个成员变量:port,它的值即是从application.properties配置文件中获取server.port值。当出现访问/资源的请求时,跳转前端index页面,并将该值携带返回。
前端的index.ftl文件代码如下:
从上可以看出其逻辑并不复杂,仅是从响应中获取了port输出。
OK~,前提工作准备就绪后,再简单修改一下nginx.conf的配置即可:
upstream nginx_boot{ # 30s内检查心跳发送两次包,未回复就代表该机器宕机,请求分发权重比为1:2 server 192.168.0.000:8080 weight=100 max_fails=2 fail_timeout=30s; server 192.168.0.000:8090 weight=200 max_fails=2 fail_timeout=30s; # 这里的IP请配置成你WEB服务所在的机器IP } server { location / { root html; # 配置一下index的地址,最后加上index.ftl。 index index.html index.htm index.jsp index.ftl; proxy_set_header Host $host; proxy_set_header X-Real-IP $remote_addr; proxy_set_header X-Forwarded-For $proxy_add_x_forwarded_for; # 请求交给名为nginx_boot的upstream上 proxy_pass http://nginx_boot; } }
至此,所有的前提工作准备就绪,紧接着再启动Nginx,然后再启动两个web服务,第一个WEB服务启动时,在application.properties配置文件中,将端口号改为8080,第二个WEB服务启动时,将其端口号改为8090。
最终来看看效果:
 负载均衡效果-动图演示
因为配置了请求分发的权重,8080、8090的权重比为2:1,因此请求会根据权重比均摊到每台机器,也就是8080一次、8090两次、8080一次......
Java开发者在线刷题神器
The request issued by the client192.168.12.129will eventually be transformed into:http:/ /192.168.12.129:80/, and then initiate a request to the targetIP. The process is as follows:
 Principle of request distribution
Nginxlistens on the
80port of
192.168.12.129, the request will eventually find
NginxProcess;
Nginxwill first be matched according to the configured
locationrules, and based on the client’s request path
/, will locate
location /{}Rules;
nginx_bootwill be found based on the
proxy_passconfigured in the
location
upstream;
upstream, the request is forwarded to the machine running the
WEBservice for processing , since multiple
WEBservices are configured and weight values are configured,
Nginxwill distribute requests in sequence according to the weight ratio.
The dynamic and static separation should be a performance optimization solution that is listened to more times, then Think about a question first:""Why is it necessary to separate dynamic and static? What are the benefits it brings?""In fact, this question is not difficult to answer. When you understand the essence of the website, it will naturally You understand the importance of separation of movement and stillness. Let’s take Taobao as an example to analyze:
 Taobao homepage
When the browser enterswww.taobao.comto access the Taobao homepage, open the developer The debugging tool can clearly see that the number of requests100will appear when loading the homepage. During normal project development, static resources will generally be placed in theresources/static/directory:
 IDEA Project Structure
When the project is deployed online, these static resources will be packaged together. Then think about a question at this time:""Assuming Taobao does this, then where will the request when the home page is loaded be processed? ?””The answer is undoubtedly that all requests for the homepage100will come to the machine where theWEBservice is deployed for processing. That means that when a client requests the Taobao homepage, it will Causes100concurrent requests to the backend server. There is no doubt that this puts great pressure on the back-end server.
But at this time, you might as well analyze and see if at least60of the100requests on the homepage belong to*.js, *.css, What about requests for static resources such as *.html, *.jpg....? The answer isYes.
Since there are so many requests that are static, and these resources will most likely not change for a long time, why should these requests be processed by the backend? Can it be dealt with before then? Of courseOK, so after analysis, we can make it clear:""After dynamic and static separation, at least the concurrency of the back-end service can be reduced by more than half.""At this point, everyone You should understand how much performance gains the separation of dynamic and static can bring.
OK~, after understanding the necessity of dynamic and static separation, how to achieve dynamic and static separation? It's actually very simple, just try it out in practice.
①First create a directorystatic_resourcesunder theNginxdirectory on the machine whereNginxis deployed:
mkdir static_resources
②将项目中所有的静态资源全部拷贝到该目录下,而后将项目中的静态资源移除重新打包。
③稍微修改一下nginx.conf的配置,增加一条location匹配规则:
location ~ .*\.(html|htm|gif|jpg|jpeg|bmp|png|ico|txt|js|css){ root /soft/nginx/static_resources; expires 7d; }
然后照常启动nginx和移除了静态资源的WEB服务,你会发现原本的样式、js效果、图片等依旧有效,如下:

其中static目录下的nginx_style.css文件已被移除,但效果依旧存在(绿色字体+蓝色大边框):
 移除后效果动图
最后解读一下那条location规则:
location ~ .*\.(html|htm|gif|jpg|jpeg|bmp|png|ico|txt|js|css)
~代表匹配时区分大小写
.*代表任意字符都可以出现零次或多次,即资源名不限制
\.代表匹配后缀分隔符.
(html|...|css)代表匹配括号里所有静态资源类型
综上所述,简单一句话概述:该配置表示匹配以.html~.css为后缀的所有资源请求。
「最后提一嘴,也可以将静态资源上传到文件服务器中,然后location中配置一个新的upstream指向。」
Java开发者在线刷题神器
建立在动静分离的基础之上,如果一个静态资源的Size越小,那么自然传输速度会更快,同时也会更节省带宽,因此我们在部署项目时,也可以通过Nginx对于静态资源实现压缩传输,一方面可以节省带宽资源,第二方面也可以加快响应速度并提升系统整体吞吐。
在Nginx也提供了三个支持资源压缩的模块ngx_http_gzip_module、ngx_http_gzip_static_module、ngx_http_gunzip_module,其中ngx_http_gzip_module属于内置模块,代表着可以直接使用该模块下的一些压缩指令,后续的资源压缩操作都基于该模块,先来看看压缩配置的一些参数/指令:
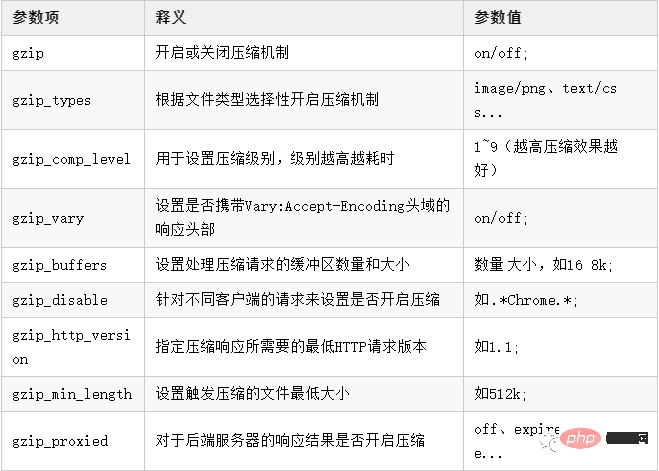
了解了Nginx中的基本压缩配置后,接下来可以在Nginx中简单配置一下:
http{ # 开启压缩机制 gzip on; # 指定会被压缩的文件类型(也可自己配置其他类型) gzip_types text/plain application/javascript text/css application/xml text/javascript image/jpeg image/gif image/png; # 设置压缩级别,越高资源消耗越大,但压缩效果越好 gzip_comp_level 5; # 在头部中添加Vary: Accept-Encoding(建议开启) gzip_vary on; # 处理压缩请求的缓冲区数量和大小 gzip_buffers 16 8k; # 对于不支持压缩功能的客户端请求不开启压缩机制 gzip_disable "MSIE [1-6]\."; # 低版本的IE浏览器不支持压缩 # 设置压缩响应所支持的HTTP最低版本 gzip_http_version 1.1; # 设置触发压缩的最小阈值 gzip_min_length 2k; # 关闭对后端服务器的响应结果进行压缩 gzip_proxied off; }
在上述的压缩配置中,最后一个gzip_proxied选项,可以根据系统的实际情况决定,总共存在多种选项:
off: Turn off
Nginxto compress the response results of the background server.
expired: If the response header contains
Expiresinformation, enable compression.
no-cache: If the response header contains
Cache-Control:no-cacheinformation, enable compression.
no-store: If the response header contains
Cache-Control:no-storeinformation, enable compression.
private: If the response header contains
Cache-Control:privateinformation, enable compression.
no_last_modified: If the response header does not contain
Last-Modifiedinformation, enable compression.
no_etag:如果响应头中不包含
ETag信息,则开启压缩。
auth:如果响应头中包含
Authorization信息,则开启压缩。
any:无条件对后端的响应结果开启压缩机制。
OK~,简单修改好了Nginx的压缩配置后,可以在原本的index页面中引入一个jquery-3.6.0.js文件:
分别来对比下压缩前后的区别:
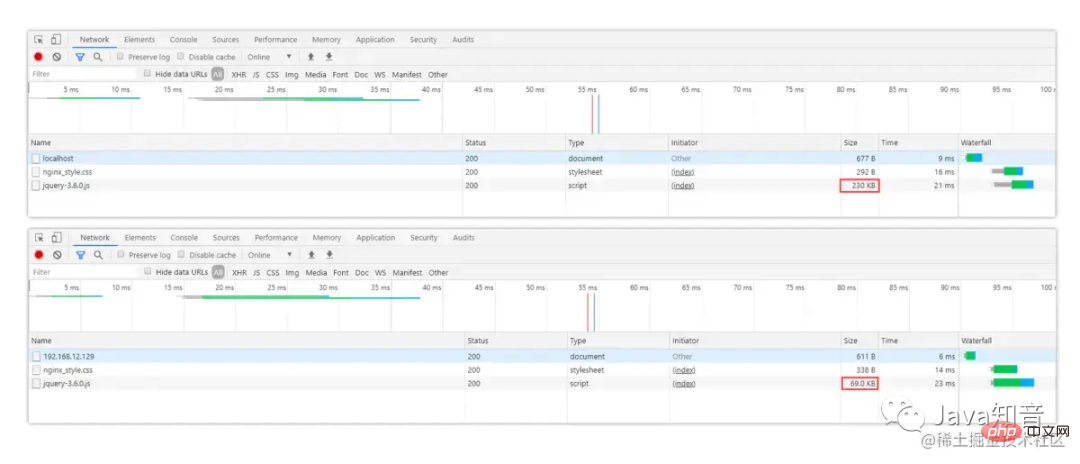
从图中可以很明显看出,未开启压缩机制前访问时,js文件的原始大小为230K,当配置好压缩后再重启Nginx,会发现文件大小从230KB→69KB,效果立竿见影!
Notes: ① For image and video type data, the compression mechanism will be enabled by default, so there is generally no need to enable compression again. ②For.jsfiles, you need to specify the compression type asapplication/javascript, nottext/javascript, application/x-javascript.
Let’s think about a problem first. The general request process for projects accessingNginxis : "Client→Nginx→Server", there are two connections in this process: "Client→Nginx,Nginx→Server", If the two different connection speeds are inconsistent, it will affect the user experience (for example, the loading speed of the browser cannot keep up with the response speed of the server).
In fact, it is similar to the fact that the memory of a computer cannot keep up with the speed ofCPU, so the user experience is extremely poor, so three levels are added to the design ofCPUHigh-speed buffer is used to alleviate the contradiction betweenCPUand memory speed. There is also a buffer mechanism inNginx. The main purpose is:"To solve the problem caused by the speed mismatch between the two connections"", with the buffer ,NginxThe proxy can temporarily store the response from the backend, and then provide data to the client on demand. Let’s first take a look at some configuration items about the buffer:
proxy_buffering: Whether to enable the buffering mechanism, the default isonoff.
client_body_buffer_size: Set the memory size for buffering client request data.
proxy_buffers: Set the number and size of buffers for each request/connection, default4 4k/8k.
proxy_buffer_size: Set the buffer size used to store response headers.
##proxy_busy_buffers_size: When the backend data is not completely received,NginxcanbusyThe status buffer is returned to the client. This parameter is used to set the specific size of thebufferin thebusystatus. The default isproxy_buffer_size*2.
proxy_temp_path: When the memory buffer is full, the data can be temporarily stored on the disk. This parameter is to set the directory where the buffered data is stored.
pathis the path to the temporary directory.
proxy_temp_path path;path is the path to the temporary directory
proxy_temp_file_write_size: Set the size limit for writing data to a temporary file each time.
proxy_max_temp_file_size: Set the maximum storage capacity allowed in the temporary buffer directory.
Non-buffered parameter items:
proxy_connect_timeout:设置与后端服务器建立连接时的超时时间。
proxy_read_timeout:设置从后端服务器读取响应数据的超时时间。
proxy_send_timeout:设置向后端服务器传输请求数据的超时时间。
具体的nginx.conf配置如下:
http{ proxy_connect_timeout 10; proxy_read_timeout 120; proxy_send_timeout 10; proxy_buffering on; client_body_buffer_size 512k; proxy_buffers 4 64k; proxy_buffer_size 16k; proxy_busy_buffers_size 128k; proxy_temp_file_write_size 128k; proxy_temp_path /soft/nginx/temp_buffer; }
上述的缓冲区参数,是基于每个请求分配的空间,而并不是所有请求的共享空间。当然,具体的参数值还需要根据业务去决定,要综合考虑机器的内存以及每个请求的平均数据大小。
最后提一嘴:使用缓冲也可以减少即时传输带来的带宽消耗。
对于性能优化而言,缓存是一种能够大幅度提升性能的方案,因此几乎可以在各处都能看见缓存,如客户端缓存、代理缓存、服务器缓存等等,Nginx的缓存则属于代理缓存的一种。对于整个系统而言,加入缓存带来的优势额外明显:
那么在Nginx中,又该如何配置代理缓存呢?先来看看缓存相关的配置项:
「proxy_cache_path」:代理缓存的路径。
语法:
proxy_cache_path path [levels=levels] [use_temp_path=on|off] keys_zone=name:size [inactive=time] [max_size=size] [manager_files=number] [manager_sleep=time] [manager_threshold=time] [loader_files=number] [loader_sleep=time] [loader_threshold=time] [purger=on|off] [purger_files=number] [purger_sleep=time] [purger_threshold=time];
是的,你没有看错,就是这么长....,解释一下每个参数项的含义:
path: The cached path address.
levels: Cache storage hierarchy, allowing up to three levels of directories.
use_temp_path: Whether to use a temporary directory.
keys_zone: Specify a shared memory space to store hotspot keys (1M can store 8000 keys).
inactive: Set how long the cache has not been accessed before it is deleted (default is ten minutes).
max_size: The maximum storage space allowed for cache. When exceeded, the cache will be removed based on the LRU algorithm. Nginx will create a Cache manager process to remove the data. It can be done through purge.
manager_files: The upper limit of the number of cache files removed by the manager process each time.
manager_sleep: The maximum time limit for the manager process to remove cached files each time.
manager_threshold: The interval between each time the manager process removes the cache.
loader_files: When restarting Nginx to load the cache, the number of files loaded each time is 100 by default.
loader_sleep:每次载入时,允许的最大时间上限,默认200ms。
loader_threshold:一次载入后,停顿的时间间隔,默认50ms。
purger:是否开启purge方式移除数据。
purger_files:每次移除缓存文件时的数量。
purger_sleep:每次移除时,允许消耗的最大时间。
purger_threshold:每次移除完成后,停顿的间隔时间。
「proxy_cache」:开启或关闭代理缓存,开启时需要指定一个共享内存区域。
语法:
proxy_cache zone | off;
zone为内存区域的名称,即上面中keys_zone设置的名称。
「proxy_cache_key」:定义如何生成缓存的键。
语法:
proxy_cache_key string;
string为生成Key的规则,如$scheme$proxy_host$request_uri。
「proxy_cache_valid」:缓存生效的状态码与过期时间。
语法:
proxy_cache_valid [code ...] time;
code为状态码,time为有效时间,可以根据状态码设置不同的缓存时间。
例如:proxy_cache_valid 200 302 30m;
「proxy_cache_min_uses」:设置资源被请求多少次后被缓存。
语法:
proxy_cache_min_uses number;
number为次数,默认为1。
「proxy_cache_use_stale」:当后端出现异常时,是否允许Nginx返回缓存作为响应。
语法:
proxy_cache_use_stale error;
error为错误类型,可配置timeout|invalid_header|updating|http_500...。
「proxy_cache_lock」:对于相同的请求,是否开启锁机制,只允许一个请求发往后端。
语法:
proxy_cache_lock on | off;
「proxy_cache_lock_timeout」:配置锁超时机制,超出规定时间后会释放请求。
proxy_cache_lock_timeout time;
「proxy_cache_methods」:设置对于那些HTTP方法开启缓存。
语法:
proxy_cache_methods method;
method为请求方法类型,如GET、HEAD等。
「proxy_no_cache」:定义不存储缓存的条件,符合时不会保存。
语法:
proxy_no_cache string...;
string为条件,例如$cookie_nocache $arg_nocache $arg_comment;
「proxy_cache_bypass」:定义不读取缓存的条件,符合时不会从缓存中读取。
语法:
proxy_cache_bypass string...;
和上面proxy_no_cache的配置方法类似。
「add_header」:往响应头中添加字段信息。
语法:
add_header fieldName fieldValue;
「$upstream_cache_status」:记录了缓存是否命中的信息,存在多种情况:
MISS:请求未命中缓存。
HIT:请求命中缓存。
EXPIRED:请求命中缓存但缓存已过期。
STALE:请求命中了陈旧缓存。
REVALIDDATED:Nginx验证陈旧缓存依然有效。
UPDATING:命中的缓存内容陈旧,但正在更新缓存。
BYPASS:响应结果是从原始服务器获取的。
PS:这个和之前的不同,之前的都是参数项,这个是一个Nginx内置变量。
OK~,对于Nginx中的缓存配置项大概了解后,接着来配置一下Nginx代理缓存:
http{ # 设置缓存的目录,并且内存中缓存区名为hot_cache,大小为128m, # 三天未被访问过的缓存自动清楚,磁盘中缓存的最大容量为2GB。 proxy_cache_path /soft/nginx/cache levels=1:2 keys_zone=hot_cache:128m inactive=3d max_size=2g; server{ location / { # 使用名为nginx_cache的缓存空间 proxy_cache hot_cache; # 对于200、206、304、301、302状态码的数据缓存1天 proxy_cache_valid 200 206 304 301 302 1d; # 对于其他状态的数据缓存30分钟 proxy_cache_valid any 30m; # 定义生成缓存键的规则(请求的url+参数作为key) proxy_cache_key $host$uri$is_args$args; # 资源至少被重复访问三次后再加入缓存 proxy_cache_min_uses 3; # 出现重复请求时,只让一个去后端读数据,其他的从缓存中读取 proxy_cache_lock on; # 上面的锁超时时间为3s,超过3s未获取数据,其他请求直接去后端 proxy_cache_lock_timeout 3s; # 对于请求参数或cookie中声明了不缓存的数据,不再加入缓存 proxy_no_cache $cookie_nocache $arg_nocache $arg_comment; # 在响应头中添加一个缓存是否命中的状态(便于调试) add_header Cache-status $upstream_cache_status; } } }
接着来看一下效果,如下:
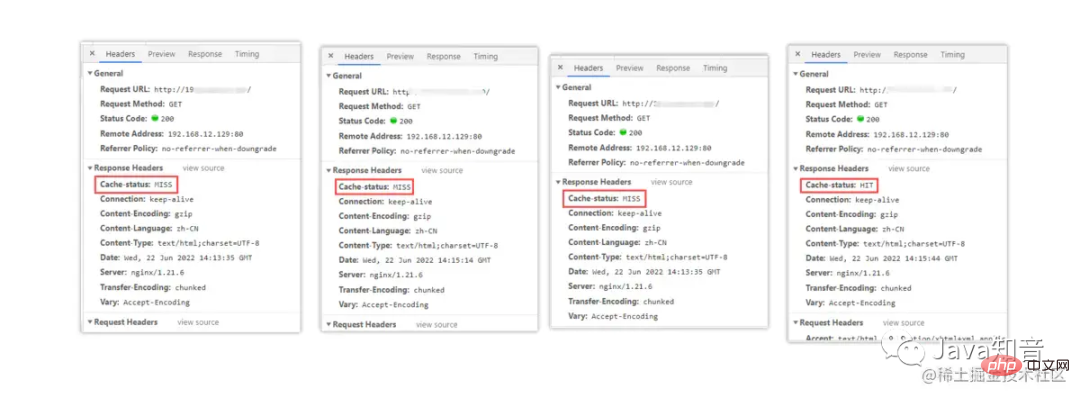
第一次访问时,因为还没有请求过资源,所以缓存中没有数据,因此没有命中缓存。第二、三次,依旧没有命中缓存,直至第四次时才显示命中,这是为什么呢?因为在前面的缓存配置中,我们配置了加入缓存的最低条件为:「「资源至少要被请求三次以上才会加入缓存。」」这样可以避免很多无效缓存占用空间。
当缓存过多时,如果不及时清理会导致磁盘空间被“吃光”,因此我们需要一套完善的缓存清理机制去删除缓存,在之前的proxy_cache_path参数中有purger相关的选项,开启后可以帮我们自动清理缓存,但遗憾的是:**purger系列参数只有商业版的NginxPlus才能使用,因此需要付费才可使用。**
不过天无绝人之路,我们可以通过强大的第三方模块ngx_cache_purge来替代,先来安装一下该插件:①首先去到Nginx的安装目录下,创建一个cache_purge目录:
[root@localhost]# mkdir cache_purge && cd cache_purge
②通过wget指令从github上拉取安装包的压缩文件并解压:
[root@localhost]# wget https://github.com/FRiCKLE/ngx_cache_purge/archive/2.3.tar.gz [root@localhost]# tar -xvzf 2.3.tar.gz
③再次去到之前Nginx的解压目录下:
[root@localhost]# cd /soft/nginx/nginx1.21.6
④重新构建一次Nginx,通过--add-module的指令添加刚刚的第三方模块:
[root@localhost]# ./configure --prefix=/soft/nginx/ --add-module=/soft/nginx/cache_purge/ngx_cache_purge-2.3/
⑤重新根据刚刚构建的Nginx,再次编译一下,「但切记不要make install」:
[root@localhost]# make
⑥删除之前Nginx的启动文件,不放心的也可以移动到其他位置:
[root@localhost]# rm -rf /soft/nginx/sbin/nginx
⑦从生成的objs目录中,重新复制一个Nginx的启动文件到原来的位置:
[root@localhost]# cp objs/nginx /soft/nginx/sbin/nginx
至此,第三方缓存清除模块ngx_cache_purge就安装完成了,接下来稍微修改一下nginx.conf配置,再添加一条location规则:
location ~ /purge(/.*) { # 配置可以执行清除操作的IP(线上可以配置成内网机器) # allow 127.0.0.1; # 代表本机 allow all; # 代表允许任意IP清除缓存 proxy_cache_purge $host$1$is_args$args; }
然后再重启Nginx,接下来即可通过http://xxx/purge/xx的方式清除缓存。
有时候往往有些需求,可能某些接口只能开放给对应的合作商,或者购买/接入API的合作伙伴,那么此时就需要实现类似于IP白名单的功能。而有时候有些恶意攻击者或爬虫程序,被识别后需要禁止其再次访问网站,因此也需要实现IP黑名单。那么这些功能无需交由后端实现,可直接在Nginx中处理。
Nginx做黑白名单机制,主要是通过allow、deny配置项来实现:
allow xxx.xxx.xxx.xxx; # 允许指定的IP访问,可以用于实现白名单。 deny xxx.xxx.xxx.xxx; # 禁止指定的IP访问,可以用于实现黑名单。
要同时屏蔽/开放多个IP访问时,如果所有IP全部写在nginx.conf文件中定然是不显示的,这种方式比较冗余,那么可以新建两个文件BlocksIP.conf、WhiteIP.conf:
# --------黑名单:BlocksIP.conf--------- deny 192.177.12.222; # 屏蔽192.177.12.222访问 deny 192.177.44.201; # 屏蔽192.177.44.201访问 deny 127.0.0.0/8; # 屏蔽127.0.0.1到127.255.255.254网段中的所有IP访问 # --------白名单:WhiteIP.conf--------- allow 192.177.12.222; # 允许192.177.12.222访问 allow 192.177.44.201; # 允许192.177.44.201访问 allow 127.45.0.0/16; # 允许127.45.0.1到127.45.255.254网段中的所有IP访问 deny all; # 除开上述IP外,其他IP全部禁止访问
分别将要禁止/开放的IP添加到对应的文件后,可以再将这两个文件在nginx.conf中导入:
http{ # 屏蔽该文件中的所有IP include /soft/nginx/IP/BlocksIP.conf; server{ location xxx { # 某一系列接口只开放给白名单中的IP include /soft/nginx/IP/blockip.conf; } } }
对于文件具体在哪儿导入,这个也并非随意的,如果要整站屏蔽/开放就在http中导入,如果只需要一个域名下屏蔽/开放就在sever中导入,如果只需要针对于某一系列接口屏蔽/开放IP,那么就在location中导入。
当然,上述只是最简单的IP黑/白名单实现方式,同时也可以通过ngx_http_geo_module、ngx_http_geo_module第三方库去实现(这种方式可以按地区、国家进行屏蔽,并且提供了IP库)。
跨域问题在之前的单体架构开发中,其实是比较少见的问题,除非是需要接入第三方SDK时,才需要处理此问题。但随着现在前后端分离、分布式架构的流行,跨域问题也成为了每个Java开发必须要懂得解决的一个问题。
产生跨域问题的主要原因就在于「同源策略」,为了保证用户信息安全,防止恶意网站窃取数据,同源策略是必须的,否则cookie可以共享。由于http无状态协议通常会借助cookie来实现有状态的信息记录,例如用户的身份/密码等,因此一旦cookie被共享,那么会导致用户的身份信息被盗取。
同源策略主要是指三点相同,「「协议+域名+端口」」相同的两个请求,则可以被看做是同源的,但如果其中任意一点存在不同,则代表是两个不同源的请求,同源策略会限制了不同源之间的资源交互。
弄明白了跨域问题的产生原因,接下来看看Nginx中又该如何解决跨域呢?其实比较简单,在nginx.conf中稍微添加一点配置即可:
location / { # 允许跨域的请求,可以自定义变量$http_origin,*表示所有 add_header 'Access-Control-Allow-Origin' *; # 允许携带cookie请求 add_header 'Access-Control-Allow-Credentials' 'true'; # 允许跨域请求的方法:GET,POST,OPTIONS,PUT add_header 'Access-Control-Allow-Methods' 'GET,POST,OPTIONS,PUT'; # 允许请求时携带的头部信息,*表示所有 add_header 'Access-Control-Allow-Headers' *; # 允许发送按段获取资源的请求 add_header 'Access-Control-Expose-Headers' 'Content-Length,Content-Range'; # 一定要有!!!否则Post请求无法进行跨域! # 在发送Post跨域请求前,会以Options方式发送预检请求,服务器接受时才会正式请求 if ($request_method = 'OPTIONS') { add_header 'Access-Control-Max-Age' 1728000; add_header 'Content-Type' 'text/plain; charset=utf-8'; add_header 'Content-Length' 0; # 对于Options方式的请求返回204,表示接受跨域请求 return 204; } }
在nginx.conf文件加上如上配置后,跨域请求即可生效了。
但如果后端是采用分布式架构开发的,有时候RPC调用也需要解决跨域问题,不然也同样会出现无法跨域请求的异常,因此可以在你的后端项目中,通过继承HandlerInterceptorAdapter类、实现WebMvcConfigurer接口、添加@CrossOrgin注解的方式实现接口之间的跨域配置。
First of all, let’s understand what hotlinking is:""Hotlinking refers to the introduction of hotlinks into the current website by external websites. Resource external display"", let's give a simple example to understand:
is like the wallpaper websiteXstation,Ystation,Xstation It is a way to purchase copyrights and sign contracts with authors bit by bit, thereby accumulating a large amount of wallpaper materials. However, due to various reasons such as funding,Ystation directly uses
Xsite and then provides them to users for download.
So if we are theBossof thisXsite, we must feel unhappy, so how should we block this kind of problem at this time? Then the""Anti-hotlinking""that I'm going to talk about next is here!
Nginx的防盗链机制实现,跟一个头部字段:Referer有关,该字段主要描述了当前请求是从哪儿发出的,那么在Nginx中就可获取该值,然后判断是否为本站的资源引用请求,如果不是则不允许访问。Nginx中存在一个配置项为valid_referers,正好可以满足前面的需求,语法如下:
valid_referers none | blocked | server_names | string ...;
none:表示接受没有
Referer字段的
HTTP请求访问。
blocked:表示允许
http://或
https//以外的请求访问。
server_names:资源的白名单,这里可以指定允许访问的域名。
string:可自定义字符串,支配通配符、正则表达式写法。
简单了解语法后,接下来的实现如下:
# 在动静分离的location中开启防盗链机制 location ~ .*\.(html|htm|gif|jpg|jpeg|bmp|png|ico|txt|js|css){ # 最后面的值在上线前可配置为允许的域名地址 valid_referers blocked 192.168.12.129; if ($invalid_referer) { # 可以配置成返回一张禁止盗取的图片 # rewrite ^/ http://xx.xx.com/NO.jpg; # 也可直接返回403 return 403; } root /soft/nginx/static_resources; expires 7d; }
根据上述中的内容配置后,就已经通过Nginx实现了最基本的防盗链机制,最后只需要额外重启一下就好啦!当然,对于防盗链机制实现这块,也有专门的第三方模块ngx_http_accesskey_module实现了更为完善的设计,感兴趣的小伙伴可以自行去看看。
PS:防盗链机制也无法解决爬虫伪造
referers信息的这种方式抓取数据。
在某些业务场景中需要传输一些大文件,但大文件传输时往往都会会出现一些Bug,比如文件超出限制、文件传输过程中请求超时等,那么此时就可以在Nginx稍微做一些配置,先来了解一些关于大文件传输时可能会用的配置项:

在传输大文件时,client_max_body_size、client_header_timeout、proxy_read_timeout、proxy_send_timeout这四个参数值都可以根据自己项目的实际情况来配置。
The above configuration only needs to be configured as a proxy layer, because in the end the client still interacts directly with the backend when transferring files, here we just need to adjust theNginxconfiguration as the gateway layer to a higher level. The extent to which "accommodating large files" are transferred. Of course,Nginxcan also be used as a file server, but a special third-party modulenginx-upload-moduleis required. If file uploading does not have much use in the project, Then it is recommended to build it throughNginx. After all, it can save the resources of a file server. However, if file uploads/downloads are frequent, it is recommended to set up an additional file server and leave the upload/download functions to the backend for processing.
As more and more websites accessHTTPS, therefore It is not enough to configureHTTPinNginx. It is often necessary to listen for requests on the443port.HTTPSIn order to ensure communication security, the server The corresponding digital certificate needs to be configured. When the project usesNginxas the gateway, the certificate also needs to be configured inNginx. Next, let’s briefly talk about theSSLcertificate. Configuration process:
①First go to the CA organization or apply for the correspondingSSLcertificate from the cloud console. After passing the review, download theNginxversion of the certificate.
②After downloading the digital certificate, there are a total of three complete files:.crt, .key, .pem:
. crt: digital certificate file,
.crtis the expansion file of
.pem, so some people may not have it after downloading it.
.key: The server’s private key file and asymmetrically encrypted private key, used to decrypt the data transmitted by the public key.
.pem: Source certificate text file in
Base64-encodedencoded format. You can modify the extension name according to your own needs.
③Create a newcertificatedirectory under theNginxdirectory, and upload the downloaded certificate/private key and other files to the directory.
④Finally modify thenginx.conffile, as follows:
# ----------HTTPS配置----------- server { # 监听HTTPS默认的443端口 listen 443; # 配置自己项目的域名 server_name www.xxx.com; # 打开SSL加密传输 ssl on; # 输入域名后,首页文件所在的目录 root html; # 配置首页的文件名 index index.html index.htm index.jsp index.ftl; # 配置自己下载的数字证书 ssl_certificate certificate/xxx.pem; # 配置自己下载的服务器私钥 ssl_certificate_key certificate/xxx.key; # 停止通信时,加密会话的有效期,在该时间段内不需要重新交换密钥 ssl_session_timeout 5m; # TLS握手时,服务器采用的密码套件 ssl_ciphers ECDHE-RSA-AES128-GCM-SHA256:ECDHE:ECDH:AES:HIGH:!NULL:!aNULL:!MD5:!ADH:!RC4; # 服务器支持的TLS版本 ssl_protocols TLSv1 TLSv1.1 TLSv1.2; # 开启由服务器决定采用的密码套件 ssl_prefer_server_ciphers on; location / { .... } } # ---------HTTP请求转HTTPS------------- server { # 监听HTTP默认的80端口 listen 80; # 如果80端口出现访问该域名的请求 server_name www.xxx.com; # 将请求改写为HTTPS(这里写你配置了HTTPS的域名) rewrite ^(.*)$ https://www.xxx.com; }
OK~,根据如上配置了Nginx后,你的网站即可通过https://的方式访问,并且当客户端使用http://的方式访问时,会自动将其改写为HTTPS请求。
线上如果采用单个节点的方式部署Nginx,难免会出现天灾人祸,比如系统异常、程序宕机、服务器断电、机房爆炸、地球毁灭....哈哈哈,夸张了。但实际生产环境中确实存在隐患问题,由于Nginx作为整个系统的网关层接入外部流量,所以一旦Nginx宕机,最终就会导致整个系统不可用,这无疑对于用户的体验感是极差的,因此也得保障Nginx高可用的特性。
接下来则会通过keepalived的VIP机制,实现Nginx的高可用。VIP并不是只会员的意思,而是指Virtual IP,即虚拟IP。
keepalived在之前单体架构开发时,是一个用的较为频繁的高可用技术,比如MySQL、Redis、MQ、Proxy、Tomcat等各处都会通过keepalived提供的VIP机制,实现单节点应用的高可用。
①首先创建一个对应的目录并下载keepalived到Linux中并解压:
[root@localhost]# mkdir /soft/keepalived && cd /soft/keepalived [root@localhost]# wget https://www.keepalived.org/software/keepalived-2.2.4.tar.gz [root@localhost]# tar -zxvf keepalived-2.2.4.tar.gz
②进入解压后的keepalived目录并构建安装环境,然后编译并安装:
[root@localhost]# cd keepalived-2.2.4 [root@localhost]# ./configure --prefix=/soft/keepalived/ [root@localhost]# make && make install
③进入安装目录的/soft/keepalived/etc/keepalived/并编辑配置文件:
[root@localhost]# cd /soft/keepalived/etc/keepalived/ [root@localhost]# vi keepalived.conf
④编辑主机的keepalived.conf核心配置文件,如下:
global_defs { # 自带的邮件提醒服务,建议用独立的监控或第三方SMTP,也可选择配置邮件发送。 notification_email { root@localhost } notification_email_from root@localhost smtp_server localhost smtp_connect_timeout 30 # 高可用集群主机身份标识(集群中主机身份标识名称不能重复,建议配置成本机IP) router_id 192.168.12.129 } # 定时运行的脚本文件配置 vrrp_script check_nginx_pid_restart { # 之前编写的nginx重启脚本的所在位置 script "/soft/scripts/keepalived/check_nginx_pid_restart.sh" # 每间隔3秒执行一次 interval 3 # 如果脚本中的条件成立,重启一次则权重-20 weight -20 } # 定义虚拟路由,VI_1为虚拟路由的标示符(可自定义名称) vrrp_instance VI_1 { # 当前节点的身份标识:用来决定主从(MASTER为主机,BACKUP为从机) state MASTER # 绑定虚拟IP的网络接口,根据自己的机器的网卡配置 interface ens33 # 虚拟路由的ID号,主从两个节点设置必须一样 virtual_router_id 121 # 填写本机IP mcast_src_ip 192.168.12.129 # 节点权重优先级,主节点要比从节点优先级高 priority 100 # 优先级高的设置nopreempt,解决异常恢复后再次抢占造成的脑裂问题 nopreempt # 组播信息发送间隔,两个节点设置必须一样,默认1s(类似于心跳检测) advert_int 1 authentication { auth_type PASS auth_pass 1111 } # 将track_script块加入instance配置块 track_script { # 执行Nginx监控的脚本 check_nginx_pid_restart } virtual_ipaddress { # 虚拟IP(VIP),也可扩展,可配置多个。 192.168.12.111 } }
⑤克隆一台之前的虚拟机作为从(备)机,编辑从机的keepalived.conf文件,如下:
global_defs { # 自带的邮件提醒服务,建议用独立的监控或第三方SMTP,也可选择配置邮件发送。 notification_email { root@localhost } notification_email_from root@localhost smtp_server localhost smtp_connect_timeout 30 # 高可用集群主机身份标识(集群中主机身份标识名称不能重复,建议配置成本机IP) router_id 192.168.12.130 } # 定时运行的脚本文件配置 vrrp_script check_nginx_pid_restart { # 之前编写的nginx重启脚本的所在位置 script "/soft/scripts/keepalived/check_nginx_pid_restart.sh" # 每间隔3秒执行一次 interval 3 # 如果脚本中的条件成立,重启一次则权重-20 weight -20 } # 定义虚拟路由,VI_1为虚拟路由的标示符(可自定义名称) vrrp_instance VI_1 { # 当前节点的身份标识:用来决定主从(MASTER为主机,BACKUP为从机) state BACKUP # 绑定虚拟IP的网络接口,根据自己的机器的网卡配置 interface ens33 # 虚拟路由的ID号,主从两个节点设置必须一样 virtual_router_id 121 # 填写本机IP mcast_src_ip 192.168.12.130 # 节点权重优先级,主节点要比从节点优先级高 priority 90 # 优先级高的设置nopreempt,解决异常恢复后再次抢占造成的脑裂问题 nopreempt # 组播信息发送间隔,两个节点设置必须一样,默认1s(类似于心跳检测) advert_int 1 authentication { auth_type PASS auth_pass 1111 } # 将track_script块加入instance配置块 track_script { # 执行Nginx监控的脚本 check_nginx_pid_restart } virtual_ipaddress { # 虚拟IP(VIP),也可扩展,可配置多个。 192.168.12.111 } }
⑥新建scripts目录并编写Nginx的重启脚本,check_nginx_pid_restart.sh:
[root@localhost]# mkdir /soft/scripts /soft/scripts/keepalived [root@localhost]# touch /soft/scripts/keepalived/check_nginx_pid_restart.sh [root@localhost]# vi /soft/scripts/keepalived/check_nginx_pid_restart.sh #!/bin/sh # 通过ps指令查询后台的nginx进程数,并将其保存在变量nginx_number中 nginx_number=`ps -C nginx --no-header | wc -l` # 判断后台是否还有Nginx进程在运行 if [ $nginx_number -eq 0 ];then # 如果后台查询不到`Nginx`进程存在,则执行重启指令 /soft/nginx/sbin/nginx -c /soft/nginx/conf/nginx.conf # 重启后等待1s后,再次查询后台进程数 sleep 1 # 如果重启后依旧无法查询到nginx进程 if [ `ps -C nginx --no-header | wc -l` -eq 0 ];then # 将keepalived主机下线,将虚拟IP漂移给从机,从机上线接管Nginx服务 systemctl stop keepalived.service fi fi
⑦编写的脚本文件需要更改编码格式,并赋予执行权限,否则可能执行失败:
[root@localhost]# vi /soft/scripts/keepalived/check_nginx_pid_restart.sh :set fileformat=unix # 在vi命令里面执行,修改编码格式 :set ff # 查看修改后的编码格式 [root@localhost]# chmod +x /soft/scripts/keepalived/check_nginx_pid_restart.sh
⑧由于安装keepalived时,是自定义的安装位置,因此需要拷贝一些文件到系统目录中:
[root@localhost]# mkdir /etc/keepalived/ [root@localhost]# cp /soft/keepalived/etc/keepalived/keepalived.conf /etc/keepalived/ [root@localhost]# cp /soft/keepalived/keepalived-2.2.4/keepalived/etc/init.d/keepalived /etc/init.d/ [root@localhost]# cp /soft/keepalived/etc/sysconfig/keepalived /etc/sysconfig/
⑨将keepalived加入系统服务并设置开启自启动,然后测试启动是否正常:
[root@localhost]# chkconfig keepalived on [root@localhost]# systemctl daemon-reload [root@localhost]# systemctl enable keepalived.service [root@localhost]# systemctl start keepalived.service
其他命令:
systemctl disable keepalived.service # 禁止开机自动启动 systemctl restart keepalived.service # 重启keepalived systemctl stop keepalived.service # 停止keepalived tail -f /var/log/messages # 查看keepalived运行时日志
⑩最后测试一下VIP是否生效,通过查看本机是否成功挂载虚拟IP:
[root@localhost]# ip addr
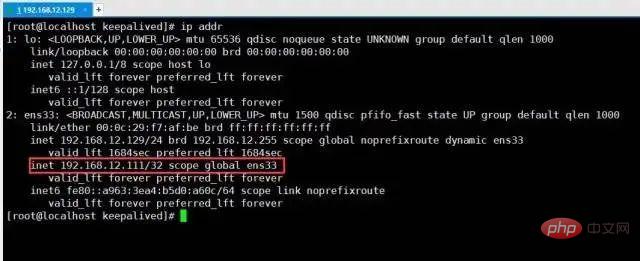 虚拟IP-VIP
You can clearly see from the above picture that the virtualIPhas been successfully mounted, but another machine192.168.12.130will not mount this virtualIP, only when the host goes offline, the slave192.168.12.130will come online and take overVIP. Finally, test whether the external network can communicate withVIPnormally, that is, directlyping VIPinWindows:
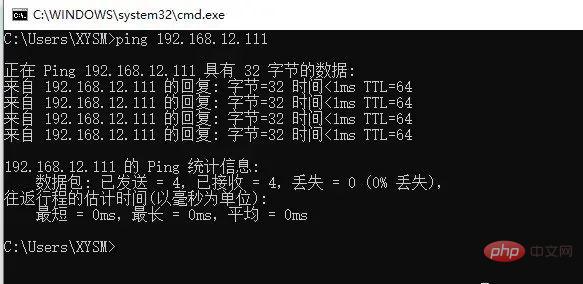 Ping-VIP
When communicating externally throughVIP,Pingcan also be communicated normally, which means that the virtualIPis configured successfully.
After the above steps, theVIPmechanism ofkeepalivedhas been The construction was successful. In the previous stage, several main things were done:
Nginx的机器挂载了
VIP。
keepalived搭建了主从双机热备。
keepalived实现了
Nginx宕机重启。
由于前面没有域名的原因,因此最初server_name配置的是当前机器的IP,所以需稍微更改一下nginx.conf的配置:
sever{ listen 80; # 这里从机器的本地IP改为虚拟IP server_name 192.168.12.111; # 如果这里配置的是域名,那么则将域名的映射配置改为虚拟IP }
最后来实验一下效果:
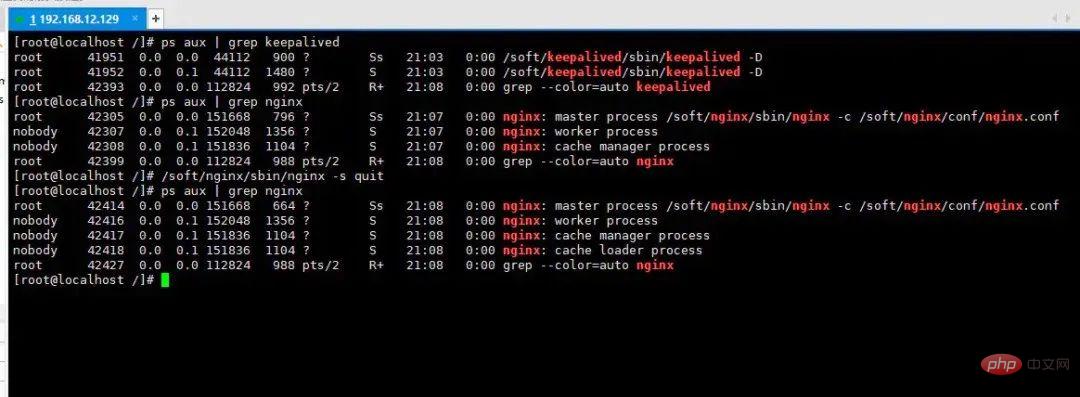
在上述过程中,首先分别启动了keepalived、nginx服务,然后通过手动停止nginx的方式模拟了Nginx宕机情况,过了片刻后再次查询后台进程,我们会发现nginx依旧存活。
It is not difficult to find from this process thatkeepalivedhas implemented for us the function ofNginxautomatically restarting after a crash. Then let’s simulate the situation when the server fails:
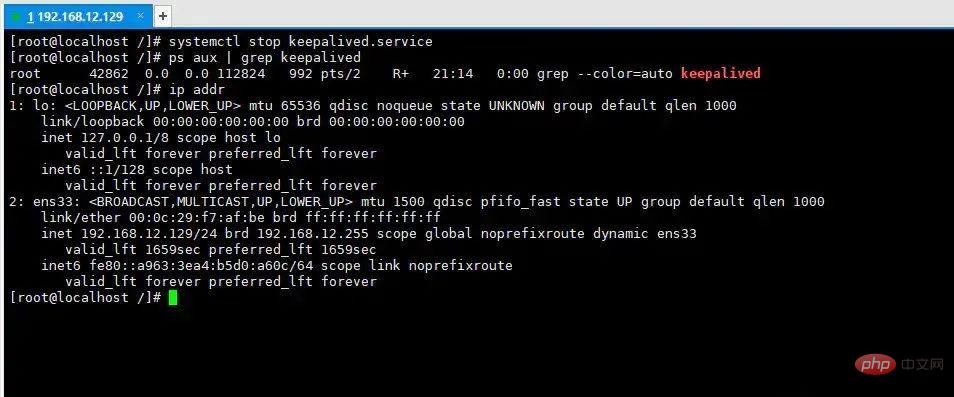
In the above process, we simulated machine power outage, hardware damage, etc. by manually shutting down thekeepalivedservice (because of machine power outage, etc.= Thekeepalivedprocess in the host disappears), and then check theIPinformation of the machine again. It is obvious thatVIPhas disappeared!
Now switch to another machine:192.168.12.130Let’s take a look at the situation:

At this moment we will find that in After the host192.168.12.129goes down, the VIP automatically moves from the host to the slave192.168.12.130, and at this time the client's request will eventually come to130On this machineNginx.
""In the end, after using Keepalived to implement master-slave hot backup for Nginx, whether it encounters various types of faults such as online downtime or power outage in the computer room, it can ensure that the application system can Users are provided with 24/7 service.""
到这里文章的篇幅较长了,最后再来聊一下关于Nginx的性能优化,主要就简单说说收益最高的几个优化项,在这块就不再展开叙述了,毕竟影响性能都有多方面原因导致的,比如网络、服务器硬件、操作系统、后端服务、程序自身、数据库服务等。
通常Nginx作为代理服务,负责分发客户端的请求,那么建议开启HTTP长连接,用户减少握手的次数,降低服务器损耗,具体如下:
upstream xxx { # 长连接数 keepalive 32; # 每个长连接提供的最大请求数 keepalived_requests 100; # 每个长连接没有新的请求时,保持的最长时间 keepalive_timeout 60s; }
零拷贝这个概念,在大多数性能较为不错的中间件中都有出现,例如Kafka、Netty等,而Nginx中也可以配置数据零拷贝技术,如下:
sendfile on; # 开启零拷贝机制
零拷贝读取机制与传统资源读取机制的区别:
从上述这个过程对比,很轻易就能看出两者之间的性能区别。
在Nginx中有两个较为关键的性能参数,即tcp_nodelay、tcp_nopush,开启方式如下:
tcp_nodelay on; tcp_nopush on;
TCP/IP协议中默认是采用了Nagle算法的,即在网络数据传输过程中,每个数据报文并不会立马发送出去,而是会等待一段时间,将后面的几个数据包一起组合成一个数据报文发送,但这个算法虽然提高了网络吞吐量,但是实时性却降低了。
因此你的项目属于交互性很强的应用,那么可以手动开启tcp_nodelay配置,让应用程序向内核递交的每个数据包都会立即发送出去。但这样会产生大量的TCP报文头,增加很大的网络开销。
相反,有些项目的业务对数据的实时性要求并不高,追求的则是更高的吞吐,那么则可以开启tcp_nopush配置项,这个配置就类似于“塞子”的意思,首先将连接塞住,使得数据先不发出去,等到拔去塞子后再发出去。设置该选项后,内核会尽量把小数据包拼接成一个大的数据包(一个MTU)再发送出去.
当然若一定时间后(一般为200ms),内核仍然没有积累到一个MTU的量时,也必须发送现有的数据,否则会一直阻塞。
tcp_nodelay、tcp_nopush两个参数是“互斥”的,如果追求响应速度的应用推荐开启tcp_nodelay参数,如IM、金融等类型的项目。如果追求吞吐量的应用则建议开启tcp_nopush参数,如调度系统、报表系统等。
注意:①tcp_nodelay一般要建立在开启了长连接模式的情况下使用。②tcp_nopush参数是必须要开启sendfile参数才可使用的。
Nginx启动后默认只会开启一个Worker工作进程处理客户端请求,而我们可以根据机器的CPU核数开启对应数量的工作进程,以此来提升整体的并发量支持,如下:
# 自动根据CPU核心数调整Worker进程数量 worker_processes auto;
工作进程的数量最高开到8个就OK了,8个之后就不会有再大的性能提升。
同时也可以稍微调整一下每个工作进程能够打开的文件句柄数:
# 每个Worker能打开的文件描述符,最少调整至1W以上,负荷较高建议2-3W worker_rlimit_nofile 20000;
操作系统内核(kernel)都是利用文件描述符来访问文件,无论是打开、新建、读取、写入文件时,都需要使用文件描述符来指定待操作的文件,因此该值越大,代表一个进程能够操作的文件越多(但不能超出内核限制,最多建议3.8W左右为上限)。
对于并发编程较为熟悉的伙伴都知道,因为进程/线程数往往都会远超出系统CPU的核心数,因为操作系统执行的原理本质上是采用时间片切换机制,也就是一个CPU核心会在多个进程之间不断频繁切换,造成很大的性能损耗。
而CPU亲和机制则是指将每个Nginx的工作进程,绑定在固定的CPU核心上,从而减小CPU切换带来的时间开销和资源损耗,开启方式如下:
worker_cpu_affinity auto;
在最开始就提到过:Nginx、Redis都是基于多路复用模型去实现的程序,但最初版的多路复用模型select/poll最大只能监听1024个连接,而epoll则属于select/poll接口的增强版,因此采用该模型能够大程度上提升单个Worker的性能,如下:
events { # 使用epoll网络模型 use epoll; # 调整每个Worker能够处理的连接数上限 worker_connections 10240; }
这里对于select/poll/epoll模型就不展开细说了,后面的IO模型文章中会详细剖析。
至此,Nginx的大部分内容都已阐述完毕,关于最后一小节的性能优化内容,其实在前面就谈到的动静分离、分配缓冲区、资源缓存、防盗链、资源压缩等内容,也都可归纳为性能优化的方案。
The above is the detailed content of 14 Nginx core function points, recommended to collect!. For more information, please follow other related articles on the PHP Chinese website!


