

There is a lot of content today, so I won’t talk nonsense and will go straight to the practical stuff.
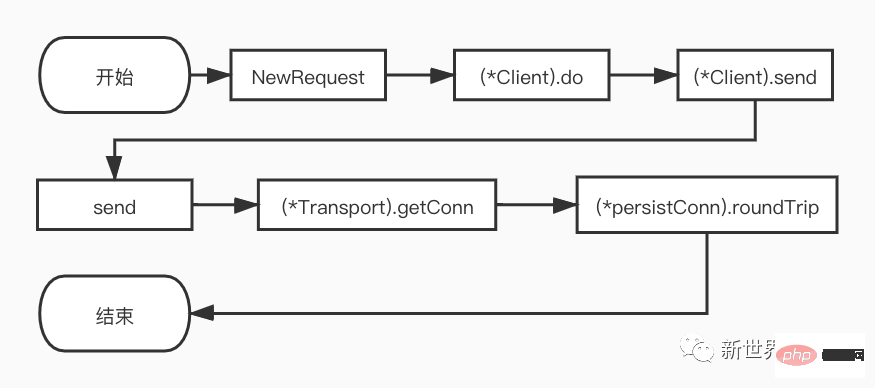
Next, the author will gradually expand and analyze functions other than NewRequest according to the flow chart
for {
// For all but the first request, create the next
// request hop and replace req.
if len(reqs) > 0 {
		loc := resp.Header.Get("Location")
// ...此处省略代码...
		err = c.checkRedirect(req, reqs)
// ...此处省略很多代码...
	}

	reqs = append(reqs, req)
var err error
var didTimeout func() bool
if resp, didTimeout, err = c.send(req, deadline); err != nil {
// c.send() always closes req.Body
		reqBodyClosed = true
// ...此处省略代码...
return nil, uerr(err)
	}

var shouldRedirect bool
	redirectMethod, shouldRedirect, includeBody = redirectBehavior(req.Method, resp, reqs[0])
if !shouldRedirect {
return resp, nil
	}

	req.closeBody()
}c.send will be called. After getting the response, it will be judged whether the request needs to be redirected. If redirection is needed, the loop will continue, otherwise it will return. response.
进入重定向流程后, 这里笔者简单介绍一下checkRedirect函数:
func defaultCheckRedirect(req *Request, via []*Request) error {
if len(via) >= 10 {
return errors.New("stopped after 10 redirects")
	}
return nil
}
// ...
func (c *Client) checkRedirect(req *Request, via []*Request) error {
	fn := c.CheckRedirect
if fn == nil {
		fn = defaultCheckRedirect
	}
return fn(req, via)
}由上可知, 用户可以自己定义重定向的检查规则。如果用户没有自定义检查规则, 则重定向次数不能超过10次。
(*Client).send方法逻辑较为简单, 主要看用户有没有为http.Client的Jar字段实现CookieJar接口。主要流程如下:
如果实现了CookieJar接口, 为Request添加保存的cookie信息。
调用send函数。
如果实现了CookieJar接口, 将Response中的cookie信息保存下来。
// didTimeout is non-nil only if err != nil.
func (c *Client) send(req *Request, deadline time.Time) (resp *Response, didTimeout func() bool, err error) {
if c.Jar != nil {
for _, cookie := range c.Jar.Cookies(req.URL) {
			req.AddCookie(cookie)
		}
	}
	resp, didTimeout, err = send(req, c.transport(), deadline)
if err != nil {
return nil, didTimeout, err
	}
if c.Jar != nil {
if rc := resp.Cookies(); len(rc) > 0 {
			c.Jar.SetCookies(req.URL, rc)
		}
	}
return resp, nil, nil
}另外, 我们还需要关注c.transport()的调用。如果用户未对http.Client指定Transport则会使用go默认的DefaultTransport。
该Transport实现RoundTripper接口。在go中RoundTripper的定义为“执行单个HTTP事务的能力,获取给定请求的响应”。
func (c *Client) transport() RoundTripper {
if c.Transport != nil {
return c.Transport
	}
return DefaultTransport
}send函数会检查request的URL,以及参数的rt, 和header值。如果URL和rt为nil则直接返回错误。同时, 如果请求中设置了用户信息, 还会检查并设置basic的验证头信息,最后调用rt.RoundTrip得到请求的响应。
func send(ireq *Request, rt RoundTripper, deadline time.Time) (resp *Response, didTimeout func() bool, err error) {
	req := ireq // req is either the original request, or a modified fork
// ...此处省略代码...
if u := req.URL.User; u != nil && req.Header.Get("Authorization") == "" {
		username := u.Username()
		password, _ := u.Password()
		forkReq()
		req.Header = cloneOrMakeHeader(ireq.Header)
		req.Header.Set("Authorization", "Basic "+basicAuth(username, password))
	}

if !deadline.IsZero() {
		forkReq()
	}
	stopTimer, didTimeout := setRequestCancel(req, rt, deadline)

	resp, err = rt.RoundTrip(req)
if err != nil {
// ...此处省略代码...
return nil, didTimeout, err
	}
// ...此处省略代码...
return resp, nil, nil
}(*Transport).RoundTrip的逻辑很简单,它会调用(*Transport).roundTrip方法,因此本节实际上是对(*Transport).roundTrip方法的分析。
func (t *Transport) RoundTrip(req *Request) (*Response, error) {
return t.roundTrip(req)
}
func (t *Transport) roundTrip(req *Request) (*Response, error) {
// ...此处省略校验header头和headervalue的代码以及其他代码...

for {
select {
case <-ctx.Done():
			req.closeBody()
return nil, ctx.Err()
default:
		}

// treq gets modified by roundTrip, so we need to recreate for each retry.
		treq := &transportRequest{Request: req, trace: trace}
		cm, err := t.connectMethodForRequest(treq)
// ...此处省略代码...
		pconn, err := t.getConn(treq, cm)
if err != nil {
			t.setReqCanceler(req, nil)
			req.closeBody()
return nil, err
		}

var resp *Response
if pconn.alt != nil {
// HTTP/2 path.
			t.setReqCanceler(req, nil) // not cancelable with CancelRequest
			resp, err = pconn.alt.RoundTrip(req)
		} else {
			resp, err = pconn.roundTrip(treq)
		}
if err == nil {
return resp, nil
		}

// ...此处省略判断是否重试请求的代码逻辑...
	}
}由上可知, 每次for循环, 会判断请求上下文是否已经取消, 如果没有取消则继续进行后续的流程。
先调用t.getConn方法获取一个persistConn。
因为本篇主旨是http1.1,所以我们直接看http1.1的执行分支。根据源码中的注释和实际的debug结果,获取到连接后, 会继续调用pconn.roundTrip。
笔者认为这一步在http请求中是非常核心的一个步骤,因为只有和server端建立连接后才能进行后续的通信。
func (t *Transport) getConn(treq *transportRequest, cm connectMethod) (pc *persistConn, err error) {
	req := treq.Request
	trace := treq.trace
	ctx := req.Context()
// ...此处省略代码...
	w := &wantConn{
		cm:         cm,
		key:        cm.key(),
		ctx:        ctx,
		ready:      make(chan struct{}, 1),
		beforeDial: testHookPrePendingDial,
		afterDial:  testHookPostPendingDial,
	}
// ...此处省略代码...
// Queue for idle connection.
if delivered := t.queueForIdleConn(w); delivered {
		pc := w.pc
// ...此处省略代码...
return pc, nil
	}

	cancelc := make(chan error, 1)
	t.setReqCanceler(req, func(err error) { cancelc <- err })

// Queue for permission to dial.
	t.queueForDial(w)

// Wait for completion or cancellation.
select {
case <-w.ready:
// Trace success but only for HTTP/1.
// HTTP/2 calls trace.GotConn itself.
if w.pc != nil && w.pc.alt == nil && trace != nil && trace.GotConn != nil {
			trace.GotConn(httptrace.GotConnInfo{Conn: w.pc.conn, Reused: w.pc.isReused()})
		}
// ...此处省略代码...
return w.pc, w.err
case <-req.Cancel:
return nil, errRequestCanceledConn
case <-req.Context().Done():
return nil, req.Context().Err()
case err := <-cancelc:
if err == errRequestCanceled {
			err = errRequestCanceledConn
		}
return nil, err
	}
}由上能够清楚的知道, 获取连接分为以下几个步骤:
调用t.queueForIdleConn获取一个空闲且可复用的连接,如果获取成功则直接返回该连接。
如果未获取到空闲连接则调用t.queueForDial开始新建一个连接。
等待w.ready关闭,则可以返回新的连接。
(*Transport).queueForIdleConn方法会根据请求的connectMethodKey从t.idleConn获取一个[]*persistConn切片, 并从切片中,根据算法获取一个有效的空闲连接。如果未获取到空闲连接,则将wantConn结构体变量放入t.idleConnWait[w.key]等待队列,此处wantConn结构体变量就是前面提到的w。
connectMethodKey定义和queueForIdleConn部分关键代码如下:
type connectMethodKey struct {
	proxy, scheme, addr string
	onlyH1              bool
}

func (t *Transport) queueForIdleConn(w *wantConn) (delivered bool) {
// ...此处省略代码...
// Look for most recently-used idle connection.
if list, ok := t.idleConn[w.key]; ok {
		stop := false
		delivered := false
for len(list) > 0 && !stop {
			pconn := list[len(list)-1]

// See whether this connection has been idle too long, considering
// only the wall time (the Round(0)), in case this is a laptop or VM
// coming out of suspend with previously cached idle connections.
			tooOld := !oldTime.IsZero() && pconn.idleAt.Round(0).Before(oldTime)
// ...此处省略代码...
			delivered = w.tryDeliver(pconn, nil)
if delivered {
// ...此处省略代码...
			}
			stop = true
		}
if len(list) > 0 {
			t.idleConn[w.key] = list
		} else {
delete(t.idleConn, w.key)
		}
if stop {
return delivered
		}
	}

// Register to receive next connection that becomes idle.
if t.idleConnWait == nil {
		t.idleConnWait = make(map[connectMethodKey]wantConnQueue)
	}
	q := t.idleConnWait[w.key]
	q.cleanFront()
	q.pushBack(w)
	t.idleConnWait[w.key] = q
return false
}其中w.tryDeliver方法主要作用是将连接协程安全的赋值给w.pc,并关闭w.ready管道。此时我们便可以和(*Transport).getConn中调用queueForIdleConn成功后的返回值对应上。
(*Transport).queueForDial method contains three steps:
If t.MaxConnsPerHost is less than or equal to 0, execute go t.dialConnFor(w)and return. Among them, MaxConnsPerHost represents the maximum number of connections for each host. If it is less than or equal to 0, it means no limit.
If the number of connections to the current host does not exceed t.MaxConnsPerHost, set the number of connections to the current host to 1, then execute go t.dialConnFor(w) and return.
If the number of connections to the current host is equal to t.MaxConnsPerHost, put the wantConn structure variable into t.connsPerHostWait[w.key]Waiting queue, the wantConn structure variable here is the w mentioned earlier. In addition, variables in the queue that have expired or are no longer waiting will be cleared before being placed in the waiting queue.
func (t *Transport) queueForDial(w *wantConn) {
	w.beforeDial()
if t.MaxConnsPerHost <= 0 {
go t.dialConnFor(w)
return
	}

	t.connsPerHostMu.Lock()
defer t.connsPerHostMu.Unlock()

if n := t.connsPerHost[w.key]; n < t.MaxConnsPerHost {
if t.connsPerHost == nil {
			t.connsPerHost = make(map[connectMethodKey]int)
		}
		t.connsPerHost[w.key] = n + 1
go t.dialConnFor(w)
return
	}

if t.connsPerHostWait == nil {
		t.connsPerHostWait = make(map[connectMethodKey]wantConnQueue)
	}
	q := t.connsPerHostWait[w.key]
	q.cleanFront()
	q.pushBack(w)
	t.connsPerHostWait[w.key] = q
}(*Transport).dialConnFor方法调用t.dialConn获取一个真正的*persistConn。并将这个连接传递给w, 如果w已经获取到了连接,则会传递失败,此时调用t.putOrCloseIdleConn将连接放回空闲连接池。
如果连接获取错误则会调用t.decConnsPerHost减少当前host的连接数。
func (t *Transport) dialConnFor(w *wantConn) {
defer w.afterDial()

	pc, err := t.dialConn(w.ctx, w.cm)
	delivered := w.tryDeliver(pc, err)
if err == nil && (!delivered || pc.alt != nil) {
// pconn was not passed to w,
// or it is HTTP/2 and can be shared.
// Add to the idle connection pool.
		t.putOrCloseIdleConn(pc)
	}
if err != nil {
		t.decConnsPerHost(w.key)
	}
}(*Transport).putOrCloseIdleConn方法
func (t *Transport) putOrCloseIdleConn(pconn *persistConn) {
if err := t.tryPutIdleConn(pconn); err != nil {
		pconn.close(err)
	}
}
func (t *Transport) tryPutIdleConn(pconn *persistConn) error {
if t.DisableKeepAlives || t.MaxIdleConnsPerHost < 0 {
return errKeepAlivesDisabled
	}
// ...此处省略代码...
	t.idleMu.Lock()
defer t.idleMu.Unlock()
// ...此处省略代码...

// Deliver pconn to goroutine waiting for idle connection, if any.
// (They may be actively dialing, but this conn is ready first.
// Chrome calls this socket late binding.
// See https://insouciant.org/tech/connection-management-in-chromium/.)
	key := pconn.cacheKey
if q, ok := t.idleConnWait[key]; ok {
		done := false
if pconn.alt == nil {
// HTTP/1.
// Loop over the waiting list until we find a w that isn't done already, and hand it pconn.
for q.len() > 0 {
				w := q.popFront()
if w.tryDeliver(pconn, nil) {
					done = true
break
				}
			}
		} else {
// HTTP/2.
// Can hand the same pconn to everyone in the waiting list,
// and we still won't be done: we want to put it in the idle
// list unconditionally, for any future clients too.
for q.len() > 0 {
				w := q.popFront()
				w.tryDeliver(pconn, nil)
			}
		}
if q.len() == 0 {
delete(t.idleConnWait, key)
		} else {
			t.idleConnWait[key] = q
		}
if done {
return nil
		}
	}

if t.closeIdle {
return errCloseIdle
	}
if t.idleConn == nil {
		t.idleConn = make(map[connectMethodKey][]*persistConn)
	}
	idles := t.idleConn[key]
if len(idles) >= t.maxIdleConnsPerHost() {
return errTooManyIdleHost
	}
// ...此处省略代码...
	t.idleConn[key] = append(idles, pconn)
	t.idleLRU.add(pconn)
// ...此处省略代码...
// Set idle timer, but only for HTTP/1 (pconn.alt == nil).
// The HTTP/2 implementation manages the idle timer itself
// (see idleConnTimeout in h2_bundle.go).
if t.IdleConnTimeout > 0 && pconn.alt == nil {
if pconn.idleTimer != nil {
			pconn.idleTimer.Reset(t.IdleConnTimeout)
		} else {
			pconn.idleTimer = time.AfterFunc(t.IdleConnTimeout, pconn.closeConnIfStillIdle)
		}
	}
	pconn.idleAt = time.Now()
return nil
}
func (t *Transport) maxIdleConnsPerHost() int {
if v := t.MaxIdleConnsPerHost; v != 0 {
return v
	}
return DefaultMaxIdleConnsPerHost // 2
}由上可知,将连接放入t.idleConn前,先检查t.idleConnWait的数量。如果有请求在等待空闲连接, 则将连接复用,没有空闲连接时,才将连接放入t.idleConn。连接放入t.idleConn后,还会重置连接的可空闲时间。
另外在t.putOrCloseIdleConn函数中还需要注意两点:
如果用户自定义了http.client,且将DisableKeepAlives设置为true,或者将MaxIdleConnsPerHost设置为负数,则连接不会放入t.idleConn即连接不能复用。
在判断已有空闲连接数量时, 如果MaxIdleConnsPerHost 不等于0, 则返回用户设置的数量,否则返回默认值2,详见上面的(*Transport).maxIdleConnsPerHost 函数。
综上, 我们知道对于部分有连接数限制的业务, 我们可以为http.Client自定义一个Transport, 并设置Transport的MaxConnsPerHost,MaxIdleConnsPerHost,IdleConnTimeout和DisableKeepAlives从而达到即限制连接数量,又能保证一定的并发。
(*Transport).decConnsPerHost方法
func (t *Transport) decConnsPerHost(key connectMethodKey) {
// ...此处省略代码...
	t.connsPerHostMu.Lock()
defer t.connsPerHostMu.Unlock()
	n := t.connsPerHost[key]
// ...此处省略代码...

// Can we hand this count to a goroutine still waiting to dial?
// (Some goroutines on the wait list may have timed out or
// gotten a connection another way. If they're all gone,
// we don't want to kick off any spurious dial operations.)
if q := t.connsPerHostWait[key]; q.len() > 0 {
		done := false
for q.len() > 0 {
			w := q.popFront()
if w.waiting() {
go t.dialConnFor(w)
				done = true
break
			}
		}
if q.len() == 0 {
delete(t.connsPerHostWait, key)
		} else {
// q is a value (like a slice), so we have to store
// the updated q back into the map.
			t.connsPerHostWait[key] = q
		}
if done {
return
		}
	}

// Otherwise, decrement the recorded count.
if n--; n == 0 {
delete(t.connsPerHost, key)
	} else {
		t.connsPerHost[key] = n
	}
}由上可知, decConnsPerHost方法主要干了两件事:
判断是否有请求在等待拨号, 如果有则执行go t.dialConnFor(w)。
如果没有请求在等待拨号, 则减少当前host的连接数量。
根据http.Client的默认配置和实际的debug结果,(*Transport).dialConn方法主要逻辑如下:
调用t.dial(ctx, "tcp", cm.addr())创建TCP连接。
如果是https的请求, 则对请求建立安全的tls传输通道。
为persistConn创建读写buffer, 如果用户没有自定义读写buffer的大小, 根据writeBufferSize和readBufferSize方法可知, 读写bufffer的大小默认为4096。
执行go pconn.readLoop()和go pconn.writeLoop()开启读写循环然后返回连接。
func (t *Transport) dialConn(ctx context.Context, cm connectMethod) (pconn *persistConn, err error) {
	pconn = &persistConn{
		t:             t,
		cacheKey:      cm.key(),
		reqch:         make(chan requestAndChan, 1),
		writech:       make(chan writeRequest, 1),
		closech:       make(chan struct{}),
		writeErrCh:    make(chan error, 1),
		writeLoopDone: make(chan struct{}),
	}
// ...此处省略代码...
if cm.scheme() == "https" && t.hasCustomTLSDialer() {
// ...此处省略代码...
	} else {
		conn, err := t.dial(ctx, "tcp", cm.addr())
if err != nil {
return nil, wrapErr(err)
		}
		pconn.conn = conn
if cm.scheme() == "https" {
var firstTLSHost string
if firstTLSHost, _, err = net.SplitHostPort(cm.addr()); err != nil {
return nil, wrapErr(err)
			}
if err = pconn.addTLS(firstTLSHost, trace); err != nil {
return nil, wrapErr(err)
			}
		}
	}

// Proxy setup.
switch { // ...此处省略代码... }

if cm.proxyURL != nil && cm.targetScheme == "https" {
// ...此处省略代码...
	}

if s := pconn.tlsState; s != nil && s.NegotiatedProtocolIsMutual && s.NegotiatedProtocol != "" {
// ...此处省略代码...
	}

	pconn.br = bufio.NewReaderSize(pconn, t.readBufferSize())
	pconn.bw = bufio.NewWriterSize(persistConnWriter{pconn}, t.writeBufferSize())

go pconn.readLoop()
go pconn.writeLoop()
return pconn, nil
}
func (t *Transport) writeBufferSize() int {
if t.WriteBufferSize > 0 {
return t.WriteBufferSize
	}
return 4 << 10
}

func (t *Transport) readBufferSize() int {
if t.ReadBufferSize > 0 {
return t.ReadBufferSize
	}
return 4 << 10
}(*persistConn).roundTrip方法是http1.1请求的核心之一,该方法在这里获取真实的Response并返回给上层。
func (pc *persistConn) roundTrip(req *transportRequest) (resp *Response, err error) {
// ...此处省略代码...

	gone := make(chan struct{})
defer close(gone)
// ...此处省略代码...
const debugRoundTrip = false

// Write the request concurrently with waiting for a response,
// in case the server decides to reply before reading our full
// request body.
	startBytesWritten := pc.nwrite
	writeErrCh := make(chan error, 1)
	pc.writech <- writeRequest{req, writeErrCh, continueCh}

	resc := make(chan responseAndError)
	pc.reqch <- requestAndChan{
		req:        req.Request,
		ch:         resc,
		addedGzip:  requestedGzip,
		continueCh: continueCh,
		callerGone: gone,
	}

var respHeaderTimer <-chan time.Time
	cancelChan := req.Request.Cancel
	ctxDoneChan := req.Context().Done()
for {
		testHookWaitResLoop()
select {
case err := <-writeErrCh:
// ...此处省略代码...
if err != nil {
				pc.close(fmt.Errorf("write error: %v", err))
return nil, pc.mapRoundTripError(req, startBytesWritten, err)
			}
// ...此处省略代码...
case <-pc.closech:
// ...此处省略代码...
return nil, pc.mapRoundTripError(req, startBytesWritten, pc.closed)
case <-respHeaderTimer:
// ...此处省略代码...
return nil, errTimeout
case re := <-resc:
if (re.res == nil) == (re.err == nil) {
panic(fmt.Sprintf("internal error: exactly one of res or err should be set; nil=%v", re.res == nil))
			}
if debugRoundTrip {
				req.logf("resc recv: %p, %T/%#v", re.res, re.err, re.err)
			}
if re.err != nil {
return nil, pc.mapRoundTripError(req, startBytesWritten, re.err)
			}
return re.res, nil
case <-cancelChan:
			pc.t.CancelRequest(req.Request)
			cancelChan = nil
case <-ctxDoneChan:
			pc.t.cancelRequest(req.Request, req.Context().Err())
			cancelChan = nil
			ctxDoneChan = nil
		}
	}
}由上可知, (*persistConn).roundTrip方法可以分为三步:
向连接的writech写入writeRequest: pc.writech <- writeRequest{req, writeErrCh, continueCh}, 参考(*Transport).dialConn可知pc.writech是一个缓冲大小为1的管道,所以会立马写入成功。
向连接的reqch写入requestAndChan: pc.reqch <- requestAndChan, pc.reqch和pc.writech一样都是缓冲大小为1的管道。其中requestAndChan.ch是一个无缓冲的responseAndError管道,(*persistConn).roundTrip就通过这个管道读取到真实的响应。
开启for循环select, 等待响应或者超时等信息。
(*persistConn).writeLoop 写循环
(*persistConn).writeLoop方法主体逻辑相对简单,把用户的请求写入连接的写缓存buffer, 最后再flush就可以了。
func (pc *persistConn) writeLoop() {
defer close(pc.writeLoopDone)
for {
select {
case wr := <-pc.writech:
			startBytesWritten := pc.nwrite
			err := wr.req.Request.write(pc.bw, pc.isProxy, wr.req.extra, pc.waitForContinue(wr.continueCh))
if bre, ok := err.(requestBodyReadError); ok {
				err = bre.error
				wr.req.setError(err)
			}
if err == nil {
				err = pc.bw.Flush()
			}
if err != nil {
				wr.req.Request.closeBody()
if pc.nwrite == startBytesWritten {
					err = nothingWrittenError{err}
				}
			}
			pc.writeErrCh <- err // to the body reader, which might recycle us
			wr.ch <- err         // to the roundTrip function
if err != nil {
				pc.close(err)
return
			}
case <-pc.closech:
return
		}
	}
}(*persistConn).readLoop 读循环
(*persistConn).readLoop有较多的细节, 我们先看代码, 然后再逐步分析。
func (pc *persistConn) readLoop() {
	closeErr := errReadLoopExiting // default value, if not changed below
defer func() {
		pc.close(closeErr)
		pc.t.removeIdleConn(pc)
	}()

	tryPutIdleConn := func(trace *httptrace.ClientTrace) bool {
if err := pc.t.tryPutIdleConn(pc); err != nil {
// ...此处省略代码...
		}
// ...此处省略代码...
return true
	}
// ...此处省略代码...
	alive := true
for alive {
// ...此处省略代码...
	    rc := <-pc.reqch
	    trace := httptrace.ContextClientTrace(rc.req.Context())

var resp *Response
if err == nil {
			resp, err = pc.readResponse(rc, trace)
		} else {
			err = transportReadFromServerError{err}
			closeErr = err
		}

// ...此处省略代码...
		bodyWritable := resp.bodyIsWritable()
		hasBody := rc.req.Method != "HEAD" && resp.ContentLength != 0

if resp.Close || rc.req.Close || resp.StatusCode <= 199 || bodyWritable {
// Don't do keep-alive on error if either party requested a close
// or we get an unexpected informational (1xx) response.
// StatusCode 100 is already handled above.
			alive = false
		}

if !hasBody || bodyWritable {
// ...此处省略代码...
continue
		}

		waitForBodyRead := make(chan bool, 2)
		body := &bodyEOFSignal{
			body: resp.Body,
			earlyCloseFn: func() error {
				waitForBodyRead <- false
				<-eofc // will be closed by deferred call at the end of the function
return nil

			},
			fn: func(err error) error {
				isEOF := err == io.EOF
				waitForBodyRead <- isEOF
if isEOF {
					<-eofc // see comment above eofc declaration
				} else if err != nil {
if cerr := pc.canceled(); cerr != nil {
return cerr
					}
				}
return err
			},
		}

		resp.Body = body
// ...此处省略代码...

select {
case rc.ch <- responseAndError{res: resp}:
case <-rc.callerGone:
return
		}

// Before looping back to the top of this function and peeking on
// the bufio.Reader, wait for the caller goroutine to finish
// reading the response body. (or for cancellation or death)
select {
case bodyEOF := <-waitForBodyRead:
			pc.t.setReqCanceler(rc.req, nil) // before pc might return to idle pool
			alive = alive &&
				bodyEOF &&
				!pc.sawEOF &&
				pc.wroteRequest() &&
				tryPutIdleConn(trace)
if bodyEOF {
				eofc <- struct{}{}
			}
case <-rc.req.Cancel:
			alive = false
			pc.t.CancelRequest(rc.req)
case <-rc.req.Context().Done():
			alive = false
			pc.t.cancelRequest(rc.req, rc.req.Context().Err())
case <-pc.closech:
			alive = false
		}

		testHookReadLoopBeforeNextRead()
	}
}由上可知, 只要连接处于活跃状态, 则这个读循环会一直开启, 直到 连接不活跃或者产生其他错误才会结束读循环。
在上述源码中,pc.readResponse(rc,trace)会从连接的读buffer中获取一个请求对应的Response。
读到响应之后判断请求是否是HEAD请求或者响应内容为空,如果是HEAD请求或者响应内容为空则将响应写入rc.ch,并将连接放入idleConn(此处因为篇幅的原因省略了源码内容, 正常请求的逻辑也有写响应和将连接放入idleConn两个步骤)。
如果不是HEAD请求并且响应内容不为空即!hasBody || bodyWritable为false:
创建一个缓冲大小为2的等待响应被读取的管道waitForBodyRead: waitForBodyRead := make(chan bool, 2)
Modify the response Body to the bodyEOFSignal structure. From the above source code, we can know that there are two functions earlyCloseFn and fn in resp.Body at this time. The earlyCloseFn function will write false to the waitForBodyRead pipe. The fn function will determine whether the response has been read. If it has been read, it will write true to waitForBodyRead. Otherwise, it will write false##. #.
rc.ch. Among them, rc.ch is obtained from rc := <-pc.reqch, and pc.reqch is exactly the requestAndChan# written by the previous (*persistConn).roundTrip function. ##. requestAndChan.ch is an unbuffered responseAndError pipe, (*persistConn).roundTrip reads the real response through this pipe.
) to put the connection into idleConn to reuse the connection.
func (es *bodyEOFSignal) Read(p []byte) (n int, err error) {
// ...此处省略代码...
	n, err = es.body.Read(p)
if err != nil {
		es.mu.Lock()
defer es.mu.Unlock()
if es.rerr == nil {
			es.rerr = err
		}
		err = es.condfn(err)
	}
return
}

func (es *bodyEOFSignal) Close() error {
	es.mu.Lock()
defer es.mu.Unlock()
if es.closed {
return nil
	}
	es.closed = true
if es.earlyCloseFn != nil && es.rerr != io.EOF {
return es.earlyCloseFn()
	}
	err := es.body.Close()
return es.condfn(err)
}

// caller must hold es.mu.
func (es *bodyEOFSignal) condfn(err error) error {
if es.fn == nil {
return err
	}
	err = es.fn(err)
	es.fn = nil
return err
}由上述源码可知, 只有当调用方完整的读取了响应,该连接才能够被复用。因此在http1.1中,一个连接上的请求,只有等前一个请求处理完之后才能继续下一个请求。如果前面的请求处理较慢, 则后面的请求必须等待, 这就是http1.1中的线头阻塞。
根据上面的逻辑, 我们GoPher在平时的开发中如果遇到了不关心响应的请求, 也一定要记得把响应body读完以保证连接的复用性。笔者在这里给出一个demo:
io.CopyN(ioutil.Discard, resp.Body, 2 << 10)
resp.Body.Close()
以上,就是笔者整理的HTTP1.1的请求流程。
笔者本着严谨的态度, 特此提醒:
上述流程中笔者对很多细节并未详细提及或者仅一笔带过,希望读者酌情参考。
在go中发起http1.1的请求时, 如果遇到不关心响应的请求,请务必完整读取响应内容以保证连接的复用性。
If you encounter a business that has restrictions on the number of connections, you can customize the Transport of http.Client and set the Transport's MaxConnsPerHost, MaxIdleConnsPerHost, The values of IdleConnTimeout and DisableKeepAlives are used to control the number of connections.
If you have needs for redirection business logic, you can customize CheckRedirect of http.Client.
In http1.1, a request on a connection can only continue to the next request after the previous request is processed. If the previous request is processed slowly, the subsequent request must wait. This is head-of-line blocking in http1.1.
The above is the detailed content of HTTP requests in Go - HTTP1.1 request process analysis. For more information, please follow other related articles on the PHP Chinese website!


 0
0 1
1 238
238


![[Web front-end] Node.js quick start](https://img.php.cn/upload/course/000/000/067/662b5d34ba7c0227.png)


