I just tried chrome’s drag and drop API today. It is very simple to put local images into the browser for preview. Just imagine what happens when we drag and drop a text image into the browser. Your browser tries to open a new page and load the image. Now I don’t want the browser to help me process images like this. I want the image I drag to be immediately placed at my predetermined location and echoed quickly. This requires the two functions stopPropergation() and preventDefault() of the event object in JavaScript. . The former will prevent the event from bubbling, and the latter will prevent the browser's default behavior.
Here we define an ignoreDrag function to implement the above functions:
Html code
var ignoreDrag = function(e){
     e.originalEvent.stopPropagation();
     e.originalEvent.preventDefault();
     }
Then use jquery to bind the event
Html code
$('#drop')
.bind('dragenter',dragenter)
.bind('dragover',dragover)
.bind('drop',drop);
It is best to use jquery to bind events here, because jquery helps us encapsulate the event object very well, so that we can use the stopPropagation and preventDefault functions without any scruples.
Define dragover and dragenter event functions at the same time
Html code
var dragover = function(e){
     ignoreDrag(e);
   }
   var dragenter = function(e){
     ignoreDrag(e);
   }
This must be defined, otherwise the browser’s default behavior will still not be prevented.
Finally define the drop function, which is the function that is triggered when we place the image at the specified location
Html code
var drop = function(e){
    ignoreDrag(e);
    var dt = e.originalEvent.dataTransfer;
    var files = dt.files;
    var fr = new FileReader();
    fr.onload = function(e){
      var image = new Image();
      image.src = e.target.result;
      $('#drop').append(image)
    }
    fr.readAsDataURL(files[0]);
   }
This function is the key to the entire function. Some features of html5, dataTransfer and FileReader are used here.
dataTransfer is an attribute of the event parameter of the drop event. It contains some information about the dropped file. The array of files can be obtained through the files attribute of dataTransfer. The elements in the array are the dropped file objects. The files can be obtained respectively by name, type, and size. The name, type and size of the file; the file content must be read with FileReader. The instance of the FileReader object has 4 methods, 3 of which are used to read the file and the other is used to interrupt the reading. The following table lists These methods and their functions are mentioned. Note that no matter whether the reading is successful or not, the function will not return the reading result. The result is stored in the result attribute:
 |
readAsText: This method has two parameters, the second parameter is the encoding method of the text, and the default value is UTF-8. This method is very easy to understand. The file is read in text mode, and the read result is the content of the text file.
readAsBinaryString: It reads the file as a binary string, usually we transfer it to the backend, and the backend can store the file through this string.
readAsDataURL: This is the method used in the example program. This method reads the file as a string starting with data:. The essence of this string is Data URI. Data URI is a way to directly convert small files into Scheme for embedding documents. Small files here usually refer to files in formats such as images and html.
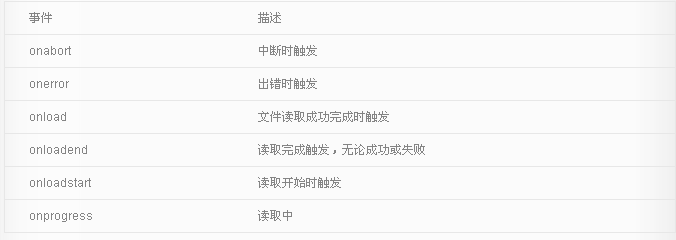
FileReader also contains a series of event models, as shown in the following table:

Here is an additional introduction to the drag-and-drop event. The table is as follows:
 |
Back to the topic, read the image through the readAsDataURL function of FileReader, and define the onload function on the FileReader object. When the image is loaded, obtain the base64-encoded content of the file through event.target.result. I have already talked about it in the previous blog The data type URL can be written directly in the src of the img tag, and the browser will parse it without loading it from the outside. Through this feature, the obtained image content is assigned to the src of the img tag, and the image object is added to In the designated area, the required functions can be achieved.
Html code
<html>
 <head>
 <meta http-equiv="content-type" content="text/html;charset=utf-8">
  <style type="text/css">
   #drop{
    width:500px;
    height:300px;
    border:1px solid grey;
    line-height:300px;
    text-align:center;
    overflow:auto;
   }
  </style>
  <script type="text/javascript" src="jquery-1.7.1.min.js"></script>
  <script type="text/javascript">
   var ignoreDrag = function(e){
     e.originalEvent.stopPropagation();
     e.originalEvent.preventDefault();
     }
   var dragover = function(e){
     ignoreDrag(e);
   }
   var dragenter = function(e){
     ignoreDrag(e);
   }
   var drop = function(e){
    ignoreDrag(e);
    var dt = e.originalEvent.dataTransfer;
    var files = dt.files;
    var fr = new FileReader();
    fr.onload = function(e){
      var image = new Image();
      image.src = e.target.result;
      $('#drop').append(image)
    }
    fr.readAsDataURL(files[0]);
   }
   $( function(){
     $('#drop').bind('dragenter',dragenter).bind('dragover',dragover).bind('drop',drop);
   });
  </script>
 </head>
 <body>
  <div id="drop" >
  请将图片放到这里!
  </div>
 </body>
</html> The above content is all about using drag-and-drop to realize image browser preview. I hope you like it.
 What software is premiere
 Why can't I access the Ethereum browser?
 python packaged into executable file
 The difference between UCOS and linux
 what does os mean
 0x00000006 What to do if the printer cannot be connected?
 Top ten currency trading software apps ranking list
 How to solve the problem that Ethernet cannot connect to the internet


