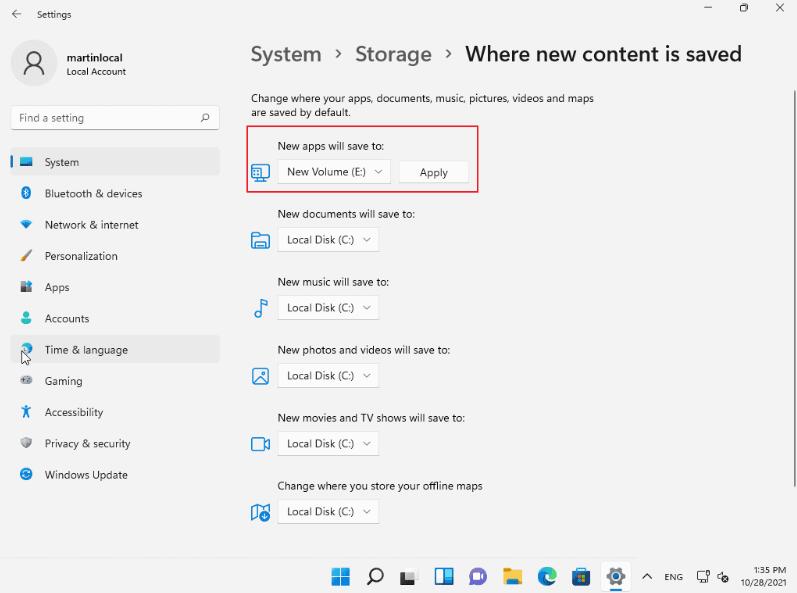
How to change the storage location in win11? We all know that the default storage path of the computer is generally on the C drive, but long-term use will burden the memory space of the C drive, which will affect the operation of the computer. In this regard, we can try to change the computer's default storage path, as follows Let’s take a look at this graphic tutorial on changing the default storage location in Win11 system!

Click Start and select Settings from the Start menu to open the Settings application.
Navigate to System > Storage > Advanced Storage Settings.
Select where to save the new content.
The page that opens displays options for saving the default save directory for the following content types:
New applications.
New file.
New music.
New photos and videos.
New movies and TV shows.
Offline map.
The c: drive is selected by default. You can change it to any other drive currently connected to your PC. Note that if you delete a removable drive, files may become unavailable. As a rule of thumb, it is recommended to only select drives that are permanently attached to the system.

Select the Apply button after switching drives to set the new drive as the default save location for new files.
Please note: Windows will create a new folder named username on the root of the selected drive. The new default folder is a subfolder of this folder. If user Martin moves the default New Documents folder to drive d:, then from that moment on, files will be saved to d:/Martin/Documents/.
If you check the list of supported content types, you will notice that the download folder is not listed. Windows 11 and previous versions of Windows also support different systems for downloads folders and other default folders such as Documents, Music, or Photos. This option is not available in the Settings application.
How to do it:
Open File Explorer on your device.
Find the Quick Access folder in the left sidebar. If you don't see these, expand This PC.
Right-click on Downloads (or any other folder that appears there) and select Properties.
Switch to the Location tab.
Change the path of the current location, such as c:/users/martinlocal/Downloads to d:/downloads/.
If the destination folder does not exist, Windows 11 will prompt you. You need to create it.
The Move button moves all existing files in the folder to the location you specify. If you don't use it, all existing files and folders will remain in the default location.
You can repeat this process for all content types, such as documents or videos. There is also a Restore Defaults button to restore the default position without manual input.
The main advantage of this method is that you can manually specify the new destination drive and folder.
The above is the detailed content of How to change the storage location in win11. For more information, please follow other related articles on the PHP Chinese website!
 How to restore videos that have been officially removed from Douyin
 js method to generate random numbers
 How high will Ethereum go?
 How to recover deleted files on computer
 How many years do you have to pay for medical insurance to enjoy lifelong medical insurance?
 What to do if there is no cursor when clicking on the input box
 What should I do if English letters appear when I turn on the computer and the computer cannot be turned on?
 How to create virtual wifi in win7


