


Business scenario:
Several major businesses of the company have been independent and placed on different database servers, but one business needs to be associated with multiple business libraries for joint query statistics. . At this time, it is necessary to synchronize different business database data to a slave database for statistics. According to the mysql master-slave synchronization principle, the solution of multiple slaves and one master is used. The main library uses the innodb engine, and the slave library uses the myisam engine to open multiple instances and synchronize the data of multiple instances to the same directory, and access the data of other instances in one instance through flush tables.
Solution:
1. Use the innodb engine for the main database, and set sql_mode to no_auto_create_user
2. Open multiple instances from the slave library and combine multiple master libraries The data inside is synchronized to the same data directory through master-slave replication. Each instance of the slave library corresponds to a master library. Multiple instances use the same data directory.
3. Use the myisam engine from the database and close the default innodb engine from the database. The myisam engine can access tables of other instances in the same data directory.
4. Each instance of the slave library needs to execute flush tables to see the data changes in other instance tables. You can set the crontab task schedule to refresh the table on the first instance every minute so that the default instance connected to the program can see the table. real-time changes.
5. Set the sql_mode of both the main library and the slave library to no_auto_create_user. Only in this way can the SQL of the innodb engine of the main library be synchronized to the slave library to be executed successfully.
Scheme architecture diagram:
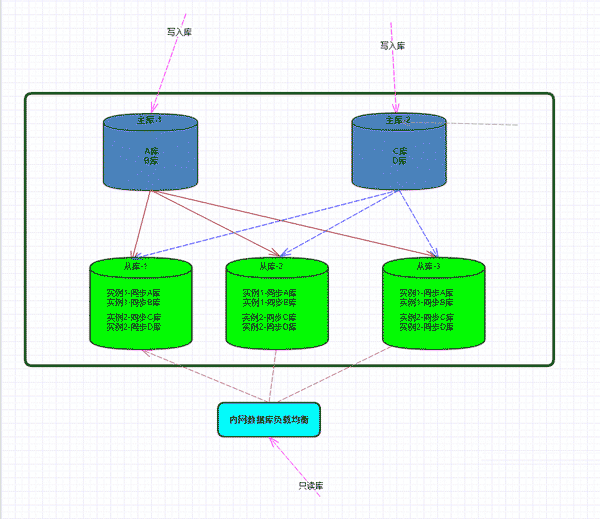
##Environment description:
Main Library-1: 192.168.1.1Main library-2: 192.168.1.2
Slave library-3: 192.168.1.3
Slave library-3: 192.168.1.4
Slave library-3: 192.168. 1.5
Implementation steps: (mysql installation steps are not described here)
1. Main database configuration file. Multiple main database configuration files cannot be the same except server-id. it's the same.[root@masterdb01 ~]#cat /etc/my.cnf [client] port= 3306 socket= /tmp/mysql.sock [mysqld] port = 3306 basedir = /usr/local/mysql datadir = /data/mysql character-set-server = utf8mb4 default-storage-engine = innodb socket = /tmp/mysql.sock skip-name-resolv = 1 open_files_limit = 65535 back_log = 103 max_connections = 512 max_connect_errors = 100000 table_open_cache = 2048 tmp-table-size = 32m max-heap-table-size = 32m #query-cache-type = 0 query-cache-size = 0 external-locking = false max_allowed_packet = 32m sort_buffer_size = 2m join_buffer_size = 2m thread_cache_size = 51 query_cache_size = 32m tmp_table_size = 96m max_heap_table_size = 96m query_cache_type=1 log-error=/data/logs/mysqld.log slow_query_log = 1 slow_query_log_file = /data/logs/slow.log long_query_time = 0.1 # binary logging # server-id = 1 log-bin = /data/binlog/mysql-bin log-bin-index =/data/binlog/mysql-bin.index expire-logs-days = 14 sync_binlog = 1 binlog_cache_size = 4m max_binlog_cache_size = 8m max_binlog_size = 1024m log_slave_updates #binlog_format = row binlog_format = mixed //这里使用的混合模式复制 relay_log_recovery = 1 #不需要同步的表 replicate-wild-ignore-table=mydb.sp_counter #不需要同步的库 replicate-ignore-db = mysql,information_schema,performance_schema key_buffer_size = 32m read_buffer_size = 1m read_rnd_buffer_size = 16m bulk_insert_buffer_size = 64m myisam_sort_buffer_size = 128m myisam_max_sort_file_size = 10g myisam_repair_threads = 1 myisam_recover transaction_isolation = repeatable-read innodb_additional_mem_pool_size = 16m innodb_buffer_pool_size = 5734m innodb_buffer_pool_load_at_startup = 1 innodb_buffer_pool_dump_at_shutdown = 1 innodb_data_file_path = ibdata1:1024m:autoextend innodb_flush_log_at_trx_commit = 2 innodb_log_buffer_size = 32m innodb_log_file_size = 2g innodb_log_files_in_group = 2 innodb_io_capacity = 4000 innodb_io_capacity_max = 8000 innodb_max_dirty_pages_pct = 50 innodb_flush_method = o_direct innodb_file_format = barracuda innodb_file_format_max = barracuda innodb_lock_wait_timeout = 10 innodb_rollback_on_timeout = 1 innodb_print_all_deadlocks = 1 innodb_file_per_table = 1 innodb_locks_unsafe_for_binlog = 0 [mysqldump] quick max_allowed_packet = 32m
[root@slavedb01 ~]# cat /etc/my.cnf [client] port= 3306 socket= /tmp/mysql.sock [mysqld_multi] # 指定相关命令的路径 mysqld = /usr/local/mysql/bin/mysqld_safe mysqladmin = /usr/local/mysql/bin/mysqladmin ##复制主库1的数据## [mysqld2] port = 3306 basedir = /usr/local/mysql datadir = /data/mysql character-set-server = utf8mb4 #指定实例1的sock文件和pid文件 socket = /tmp/mysql.sock pid-file=/data/mysql/mysql.pid skip-name-resolv = 1 open_files_limit = 65535 back_log = 103 max_connections = 512 max_connect_errors = 100000 table_open_cache = 2048 tmp-table-size = 32m max-heap-table-size = 32m query-cache-size = 0 external-locking = false max_allowed_packet = 32m sort_buffer_size = 2m join_buffer_size = 2m thread_cache_size = 51 query_cache_size = 32m tmp_table_size = 96m max_heap_table_size = 96m query_cache_type=1 #指定第一个实例的错误日志和慢查询日志路径 log-error=/data/logs/mysqld.log slow_query_log = 1 slow_query_log_file = /data/logs/slow.log long_query_time = 0.1 # binary logging# # 指定实例1的binlog和relaylog路径为/data/binlog目录 # 每个从库和每个实例的server_id不能一样。 server-id = 2 log-bin = /data/binlog/mysql-bin log-bin-index =/data/binlog/mysql-bin.index relay_log = /data/binlog/mysql-relay-bin relay_log_index = /data/binlog/mysql-relay.index master-info-file = /data/mysql/master.info relay_log_info_file = /data/mysql/relay-log.info read_only = 1 expire-logs-days = 14 sync_binlog = 1 #需要同步的库,如果不设置,默认同步所有库。 #replicate-do-db = xxx #不需要同步的表 replicate-wild-ignore-table=mydb.sp_counter #不需要同步的库 replicate-ignore-db = mysql,information_schema,performance_schema binlog_cache_size = 4m max_binlog_cache_size = 8m max_binlog_size = 1024m log_slave_updates =1 #binlog_format = row binlog_format = mixed relay_log_recovery = 1 key_buffer_size = 32m read_buffer_size = 1m read_rnd_buffer_size = 16m bulk_insert_buffer_size = 64m myisam_sort_buffer_size = 128m myisam_max_sort_file_size = 10g myisam_repair_threads = 1 myisam_recover #设置默认引擎为myisam,下面这些参数一定要加上。 default-storage-engine=myisam default-tmp-storage-engine=myisam #关闭innodb引擎 skip-innodb innodb = off disable-innodb #设置sql_mode模式为no_auto_create_user sql_mode = no_auto_create_user #关闭innodb引擎 loose-skip-innodb loose-innodb-trx=0 loose-innodb-locks=0 loose-innodb-lock-waits=0 loose-innodb-cmp=0 loose-innodb-cmp-per-index=0 loose-innodb-cmp-per-index-reset=0 loose-innodb-cmp-reset=0 loose-innodb-cmpmem=0 loose-innodb-cmpmem-reset=0 loose-innodb-buffer-page=0 loose-innodb-buffer-page-lru=0 loose-innodb-buffer-pool-stats=0 loose-innodb-metrics=0 loose-innodb-ft-default-stopword=0 loose-innodb-ft-inserted=0 loose-innodb-ft-deleted=0 loose-innodb-ft-being-deleted=0 loose-innodb-ft-config=0 loose-innodb-ft-index-cache=0 loose-innodb-ft-index-table=0 loose-innodb-sys-tables=0 loose-innodb-sys-tablestats=0 loose-innodb-sys-indexes=0 loose-innodb-sys-columns=0 loose-innodb-sys-fields=0 loose-innodb-sys-foreign=0 loose-innodb-sys-foreign-cols=0 ##复制主库2的数据## [mysqld3] port = 3307 basedir = /usr/local/mysql datadir = /data/mysql character-set-server = utf8mb4 #指定实例2的sock文件和pid文件 socket = /tmp/mysql3.sock pid-file=/data/mysql/mysql3.pid skip-name-resolv = 1 open_files_limit = 65535 back_log = 103 max_connections = 512 max_connect_errors = 100000 table_open_cache = 2048 tmp-table-size = 32m max-heap-table-size = 32m query-cache-size = 0 external-locking = false max_allowed_packet = 32m sort_buffer_size = 2m join_buffer_size = 2m thread_cache_size = 51 query_cache_size = 32m tmp_table_size = 96m max_heap_table_size = 96m query_cache_type=1 log-error=/data/logs/mysqld3.log slow_query_log = 1 slow_query_log_file = /data/logs/slow3.log long_query_time = 0.1 # binary logging # # 这里一定要注意,不能把两个实例的binlog和relaylog放到同一个目录, # 这里指定实例2的binlog日志为/data/binlog2目录 # 每个从库和每个实例的server_id不能一样。 server-id = 22 log-bin = /data/binlog2/mysql-bin log-bin-index =/data/binlog2/mysql-bin.index relay_log = /data/binlog2/mysql-relay-bin relay_log_index = /data/binlog2/mysql-relay.index master-info-file = /data/mysql/master3.info relay_log_info_file = /data/mysql/relay-log3.info read_only = 1 expire-logs-days = 14 sync_binlog = 1 #不需要复制的库 replicate-ignore-db = mysql,information_schema,performance_schema binlog_cache_size = 4m max_binlog_cache_size = 8m max_binlog_size = 1024m log_slave_updates =1 #binlog_format = row binlog_format = mixed relay_log_recovery = 1 key_buffer_size = 32m read_buffer_size = 1m read_rnd_buffer_size = 16m bulk_insert_buffer_size = 64m myisam_sort_buffer_size = 128m myisam_max_sort_file_size = 10g myisam_repair_threads = 1 myisam_recover #设置默认引擎为myisam default-storage-engine=myisam default-tmp-storage-engine=myisam #关闭innodb引擎 skip-innodb innodb = off disable-innodb #设置sql_mode模式为no_auto_create_user sql_mode = no_auto_create_user #关闭innodb引擎,下面这些参数一定要加上。 loose-skip-innodb loose-innodb-trx=0 loose-innodb-locks=0 loose-innodb-lock-waits=0 loose-innodb-cmp=0 loose-innodb-cmp-per-index=0 loose-innodb-cmp-per-index-reset=0 loose-innodb-cmp-reset=0 loose-innodb-cmpmem=0 loose-innodb-cmpmem-reset=0 loose-innodb-buffer-page=0 loose-innodb-buffer-page-lru=0 loose-innodb-buffer-pool-stats=0 loose-innodb-metrics=0 loose-innodb-ft-default-stopword=0 loose-innodb-ft-inserted=0 loose-innodb-ft-deleted=0 loose-innodb-ft-being-deleted=0 loose-innodb-ft-config=0 loose-innodb-ft-index-cache=0 loose-innodb-ft-index-table=0 loose-innodb-sys-tables=0 loose-innodb-sys-tablestats=0 loose-innodb-sys-indexes=0 loose-innodb-sys-columns=0 loose-innodb-sys-fields=0 loose-innodb-sys-foreign=0 loose-innodb-sys-foreign-cols=0 [mysqldump] quick max_allowed_packet = 32m ```
# cat /etc/init.d/mysqld #other_args="$*" # uncommon, but needed when called from an rpm upgrade action # expected: "--skip-networking --skip-grant-tables" # they are not checked here, intentionally, as it is the resposibility # of the "spec" file author to give correct arguments only. #将上面默认的#other_args开启后改为 other_args="--sql-mode=no_auto_create_user"
#主库 service mysqld start #开启从库的二个实例 /usr/local/mysql/bin/mysqld_multi start 2 /usr/local/mysql/bin/mysqld_multi start 3
#需要授权三个从库的ip可以同步 mysql> grant replication slave on *.* to rep@'192.168.1.3' identified by 'rep123'; mysql> grant replication slave on *.* to rep@'192.168.1.4' identified by 'rep123'; mysql> grant replication slave on *.* to rep@'192.168.1.5' identified by 'rep123'; mysql> flush privileges;
#进入第一个实例执行 $ mysql -s /tmp/mysql.sock mysql> change master to master_host='192.168.1.1',master_user='rep',master_password='rep123',master_log_file='mysql-bin.000001',master_log_pos=112; #进入第二个实例执行 $ mysql -s /tmp/mysql3.sock mysql> change master to master_host='192.168.1.2',master_user='rep',master_password='rep123',master_log_file='mysql-bin.000001',master_log_pos=112;
# crontab -l */1 * * * * mysql -s /tmp/mysql.sock -e 'flush tables;'
Mysql5.6 pitfalls of multiple masters and one slave
1. The default engine of mysql5.6 is innodb. When synchronizing by default, you must turn off the no_engine_substitution parameter in the sql_mode mode of the master and slave. If you do not turn off the innodb synchronization to the sql on the slave database, the innodb engine will not be found and the synchronization will fail. 2. When multiple instances are enabled in mysql5.6, the my.cnf configuration file will be generated in the installation directory of your database (/usr/local/mysql/) when it is started for the first time. By default, it will take priority. Read the configuration file in the database installation directory. As a result, multiple instances do not take effect.The above is the detailed content of How to configure Mysql multiple masters and one slave in Centos7. For more information, please follow other related articles on the PHP Chinese website!


![[Web front-end] Node.js quick start](https://img.php.cn/upload/course/000/000/067/662b5d34ba7c0227.png)


