

| 序号 | ID | 版本 |
|---|---|---|
| 1 | 操作系统 | CentOS7 |
| 2 | redis | 5.0.12 |
redis下载地址:
我们这里使用的是5.0.12
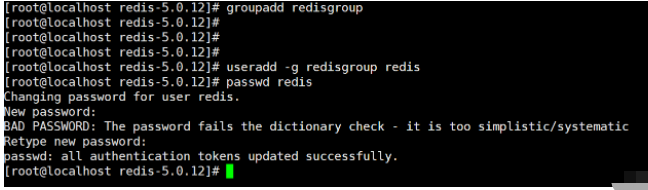
1)、使用root登录我们的系统
2)、新建组:groupadd redisgroup
3)、新建用户:useradd -g redisgroup redis
4)、设置密码:passwd redis 自己输入密码即可
groupadd redisgroupuseradd -g redisgroup redispasswd redis
1)、使用root用户,新建目录:mkdir -p /usr/local/src/redis
2)、解压压缩包:tar -zxvf redis-5.0.12.tar.gz
如下:
mkdir -p /usr/local/src/redistar -zxvf redis-5.0.12.tar.gz

切换到redis用户并在其目录下创建一个名为redis的文件夹
mkdir rediscd redismkdir datamkdir etc
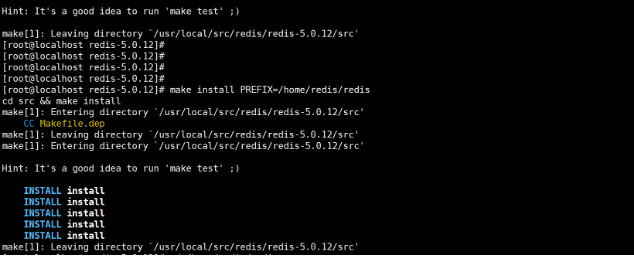
使用root用户操作
1)、编译:cd redis-5.0.12
make
2)、安装:
make install PREFIX=/home/redis/redis
1)、将
/usr/local/src/redis/redis-5.0.12下的redis.conf文件复制到/home/redis/redis/etc目录下2)、如果复制不了就用root赋权限,chmod 777 redis.conf
3)、复制过来之后,改一下文件的所属组和用户
chown redis redis.confchgrp redisgroup redis.conf
修改配置文件我们主要修改三个地方:
1)、修改为后台运行
2)、修改支持其他机器连接
下面的三个键值,直接在配置文件中修改即可
# yes-后台模式运行,no-前台模式运行,默认daemonize yes# 下面的这里给注释掉,默认是放开的#bind 127.0.0.1# 下面的这个值改为no,默认是yesprotected-mode no
1)、使用
redis用户登录,我们在用户目录下新建一个目录bin2)、在
bin目录下新建一个redctl脚本,并授予可执行的权限,chmod a+x redisctl3)、将
~/bin目录加到用户的环境变量中去修改用户目录下的
.bash_profile文件,在倒数第二行增加
PATH=$PATH:~/bin完整内容如下:
# .bash_profile# Get the aliases and functionsif [ -f ~/.bashrc ]; then. ~/.bashrcfi# User specific environment and startup programsPATH=$PATH:$HOME/.local/bin:$HOME/bin

PATH=$PATH:~/binexport PATH
编写的redctl脚本,支持redis启动,停止,重启以及状态查看,详细内容如下:
redctl
#!/bin/bash#check paramif [ $# -lt 1 ]; thenecho "USAGE: redctl start|stop|restart|status"exit 8fipid=0
ACTION=$1REDIS_HOME=$HOME/redis# Here define some functiongetpid(){pid=`ps -ef | grep redis-server | grep -v grep |awk '{print $2}'`}start(){getpidif [ ! -n "$pid" ]; thencd $REDIS_HOME/bin
        ./redis-server ../etc/redis.conf
        getpidif [ ! -n "$pid" ]; thenecho "redis-server start failed, please check your commond"elseecho "redis-server start success, PID: $pid"fielseecho "redis-server is running PID: $pid"fi}stop(){getpidif [ ! -n "$pid" ]; thenecho "redis-server is not running"elsekill -9 $pidecho "redis-server has been stopped"fi}restart(){stopsleep 1s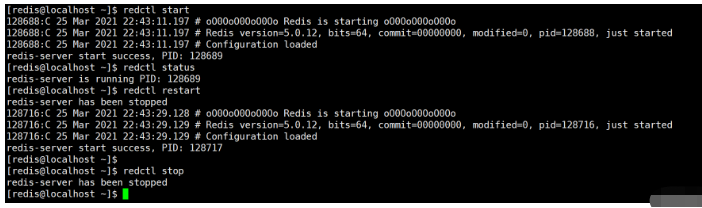
start}status(){getpidif [ ! -n "$pid" ]; thenecho "redis-server is not running"elseecho "redis-server is running PID: $pid"fi}case $ACTION instart) start;;stop) stop;;restart) restart;;status) status;;*) echo "require start|stop|restart|status" ;;esac依次执行,启动,查看状态,重启,停止,命令如下:
redctl start
redctl status
redctl restart
redctl stop
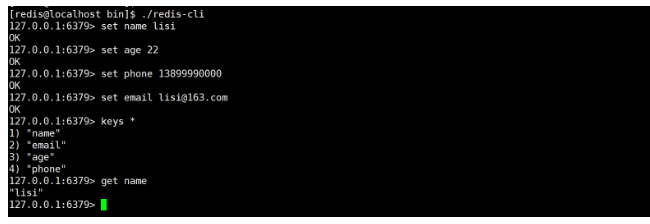
我们再次执行一下启动命令,将redis服务启动起来,
使用
redis-cli连接上,尝试设置一些值,并查看所设置的值,如下:表示成功
未安装gcc g++包的话,请自行安装
yum install -y gcc g++
The above is the detailed content of How to install and run Redis as a non-root user under CentOS7. For more information, please follow other related articles on the PHP Chinese website!


![[Web front-end] Node.js quick start](https://img.php.cn/upload/course/000/000/067/662b5d34ba7c0227.png)


