How to disable USB interface in Windows 11?
USB port is one of the very useful connectivity options in your computer that helps you connect your pen drive or USB drive to your PC and get your work done within minutes. This is one of the best ways to transfer data back and forth without requiring an active internet connection. However, sometimes you may realize that the USB ports on your system are being misused. For example, anyone can gain unauthorized access to your PC, connect a pen drive, and steal data.
This is the whole reason why, you may have noticed that in some organizations and educational institutions, the use of USB ports is prohibited. In this case, the administrator blocks access to the USB port so anyone trying to use the USB drive cannot do so.
So, if you want to disable USB ports in Windows 11 PC to prevent unauthorized access, read this article.
Method 1: Via Registry Editor
If you as an administrator are smart enough, you will disable the USB port by changing the registry setting, which will prevent unauthorized access to the USB port effective method. That's it:
*Note-Before you make any changes to the registry settings, make sure you create a backup of your registry data so that if you lose any during the process Data can be easily recovered.
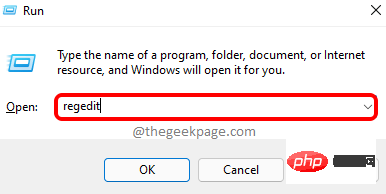
Step 1: Press the Win R keys simultaneously on the keyboard to open the "Run" command window.
Step 2: In the Run Command window, type regedit in the search field and press the Enter keyOpen the Registry Editor window.
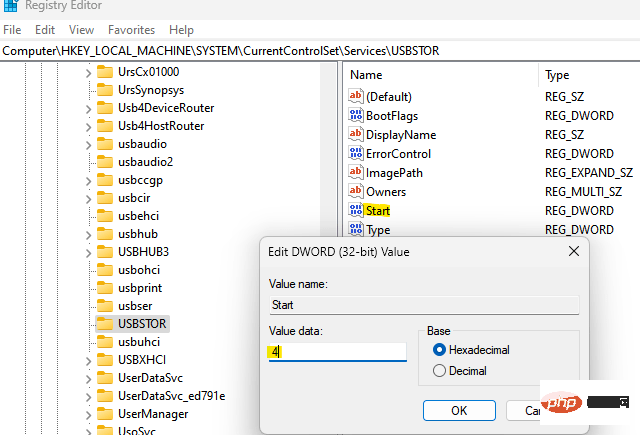
Step 3: Copy and paste the following path into the Registry Editoraddress bar and then Press Enter:
HKEY_LOCAL_MACHINE\SYSTEM\CurrentControlSet\Services\USBSTOR
Now, go to the right side of the window and double-click on the DWORD value - Start.
Step 4: In the Edit DWORD (32-bit) Value dialog box, navigate to the Value data field and change it For 4.
Press OK to save changes and exit.
Now, close the Registry Editor window and restart your PC to check if USB port access should be disabled.
*NOTE –To re-enable the USB port, repeat Step 1 through 3 and then Step 4 , set the numeric data field to 4. Press OK to save changes.
Method Two: Via the Group Policy Editor
Not everyone has access to the Local Group Policy Editor on their Windows system, however, if you are lucky enough to Making changes to the group editor is a great way to block USB ports on your Windows 11 PC if you are accessing the same content. Follow the process below to prevent access to USB ports on your PC:
Step 1: Go to Start, right-click on it and select Run from the context menu.
Step 2: This will open the Run Command box.
In the Run command search field, enter gpedit.msc and press OK to launch Local Group Policy Editor .
Step 3: In the Local Group Policy Editor window, go to the left side of the pane and double-click to expand Administrative Templates" option.
Step 4: Next, double-click to expand the System option.
Step 5: Now, go to the right side of the pane, scroll down and find the Removable Storage Access setting.
Double click on it.
Step 6: Next, on the right side, scroll down to the end and look for Removable Disks: Deny execute access.
Double-click it to open its settings window.
Step 7: In the Removable Disk: Deny execution access settings window, select the radio button next to Enabled to disable removable Execution access to removable disks.
Press Apply and then OKSave changes and return to the Removable Storage Access window.
Step 8: Now, do Removable Disk: Read Access Denied and Removable Disk: Write Access Denied RepeatStep 6 and Step 7, these two settings will also be disabled.
Now, restart your PC and all USB ports on your PC will be completely disabled.
*Note - To re-enable access to removable disks, simply follow steps 1 through 5 and select Disabled or Not Configured for all three settings - Removable Disks: Deny Execution access , Removable disk: read access denied , and Removable disk: write access denied to allow execution access for the Removable storage class.
Method Three: Via Device Manager
However, if you want to easily disable USB ports on your PC, you can choose to disable these ports through Device Manager. Let’s see how:
Step 1: Navigate to the Start menu, right-click on it and select Device Manager from the context menu.

Step 2: In the Device Manager window that opens, navigate to Universal Strings Go to the Bus Controllers section and expand it.
Here, find all available USB interfaces, right-click on each interface and select Disable.
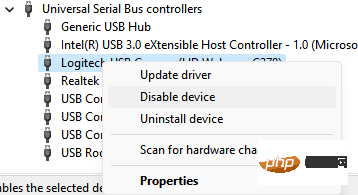
Step 3: You can also check for any possibilities under the System Devices section, right click on the device and select Disable device.
All USB ports on the system are now disabled.
*NOTE – You can re-enable the USB port at any time, just follow Step 1 and go to Universal Serial Bus Controller one by one and System Devices sections, then right-click the device you previously disabled and select Enable Device for each of them.
Method 4: Uninstall the USB Mass Storage Driver
You can even uninstall the USB Mass Storage Driver if you are concerned about the system security of your organization or school. Here's how to do it:
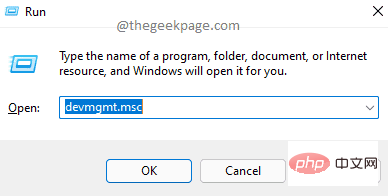
Step 1: Press the Win R shortcut key on your keyboard to launch the Run command box.
Step 2: In the search bar, type devmgmt.msc and press Enter to open the Device Manager window.
Step 3: In the Device Manager window, navigate to the Universal Serial Bus Controllers section and click to expand it.
Here, look for the USB Mass Storage Device option, right-click on it and select Uninstall.
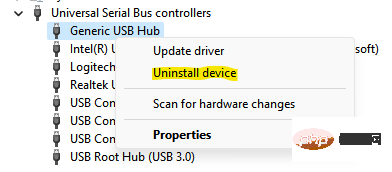
# After uninstallation, all USB ports on your Windows 11 PC will be disabled.
*NOTE –If at any time in the future, you want to re-enable the USB port, you will need to reinstall the driver. Just connect the USB drive to your PC and Windows will start looking for the driver and prompt you to install it. Just proceed to complete the installation.
But, if none of the above methods work, you can use 3rd party tools to help you enable or disable USB drives on your PC without any hassle.
The above is the detailed content of How to disable USB interface in Windows 11?. For more information, please follow other related articles on the PHP Chinese website!

Hot AI Tools

Undresser.AI Undress
AI-powered app for creating realistic nude photos

AI Clothes Remover
Online AI tool for removing clothes from photos.

Undress AI Tool
Undress images for free

Clothoff.io
AI clothes remover

AI Hentai Generator
Generate AI Hentai for free.

Hot Article

Hot Tools

Notepad++7.3.1
Easy-to-use and free code editor

SublimeText3 Chinese version
Chinese version, very easy to use

Zend Studio 13.0.1
Powerful PHP integrated development environment

Dreamweaver CS6
Visual web development tools

SublimeText3 Mac version
God-level code editing software (SublimeText3)

Hot Topics
![Event ID 157: Disk has been removed unexpectedly [Fixed]](https://img.php.cn/upload/article/000/887/227/168576249277516.jpg?x-oss-process=image/resize,m_fill,h_207,w_330) Event ID 157: Disk has been removed unexpectedly [Fixed]
Jun 03, 2023 am 11:21 AM
Event ID 157: Disk has been removed unexpectedly [Fixed]
Jun 03, 2023 am 11:21 AM
Disk has been accidentally deleted is an error in the system event log on Windows devices. This is an unusual issue on the virtual disk that all XBOX Live PC and Microsoft PC installations rely on. Typically, this problem occurs when something disrupts the system's communication with the disk. Event ID157 in Event Viewer The disk has been accidentally deleted, preventing the user from installing the game using the specified virtual drive. This virtual drive will not be visible in File Explorer like other drives. You may also encounter VMWare issues where the disk has been accidentally deleted. The solution below will fix the problem, but you must make changes directly in VMWare's emulated operating system. Depend on
 How to Fix Error Code 1132 in Zoom on Windows PC
May 30, 2023 am 11:08 AM
Zoom's video conferencing capabilities have made it popular among users while working from home. Many Zoom desktop client users have reported seeing error code 1132 along with an “Unknown error has occurred” message on their Windows PCs. Usually, this error code pops up when users try to log into their account and join any meeting in Zoom. In the error window, the user has the option to open a browser and join the meeting. However, some users reported that they were unable to open the meeting even on the browser. Windows firewall settings, outdated Zoom installation, or Zoom blacklisting your account could be some of the possible reasons for this error. Are you encountering an error code while using the Zoom app
 Fix: Windows Driver Foundation missing error
Jun 02, 2023 pm 09:15 PM
It's really frustrating when your Windows PC lags or runs slowly while playing games or performing resource-intensive tasks. Your PC may have all the processing power to handle these tasks, but if certain drivers fail to load, then your PC will experience multiple issues. One such error is WindowsDriverFoundation missing issue. When this error pops up, you should know that some important system-related drivers fail to load on your Windows PC. Since drivers are one of the most important components that allow the hardware to communicate with your PC, any issues with the drivers can cause the hardware process to malfunction. Several users reported that Window
 Essential software for C language programming: five good helpers recommended for beginners
Feb 20, 2024 pm 08:18 PM
C language is a basic and important programming language. For beginners, it is very important to choose appropriate programming software. There are many different C programming software options on the market, but for beginners, it can be a bit confusing to choose which one is right for you. This article will recommend five C language programming software to beginners to help them get started quickly and improve their programming skills. Dev-C++Dev-C++ is a free and open source integrated development environment (IDE), especially suitable for beginners. It is simple and easy to use, integrating editor,
 Detailed guide to 15 Python editors/IDEs, there is always one that suits you!
Aug 09, 2023 pm 05:44 PM
There is no better way to write Python code than using an integrated development environment (IDE). Not only can they make your work simpler and more logical, they can also improve programming experience and efficiency. Everyone knows this. The question is, how to choose the best Python development environment among the many options.
 How to install GitHub Desktop on Windows 11 or 10?
May 25, 2023 pm 03:51 PM
Step 1: Download GitHubDesktop If you don’t want to use the command line to install GitHubDesktop, you can download it manually from the official website. Visit the link and use the "Download for Windows 64-bit" button to get the executable installation file on your system. When you click on it, a popup will appear to save the GitHubDesktopSetup-x64.exe file. Step 2: Install GitHub Desktop on Windows 11 or 10 After completing the download process, the installation file will be on your system. Double-click it to start the installation process of GitHubDesktop. Wait a few seconds, the system will automatically
 Does Windows 11 provide support for VB6 applications?
May 30, 2023 am 08:31 AM
Windows 11 introduces more macOS-style UI elements. You get a redesigned taskbar with the Start menu in the center. Yes, you can change its position, but by default it will be placed in the center. The Control Center has also received some design tweaks. In the next update, support for Android apps will also come along with redesigned Notepad and Media Player. Although all these features make Windows 11 a nice upgrade over Windows 10, certain doubts are brewing in the minds of users. There is a segment of users and developers who are concerned about whether Windows 11 will support legacy applications and technologies, whether they are lagging behind or not. Since V
 Confirmation process for changing startup order in Windows 11
Jun 03, 2023 am 08:15 AM
In some cases, you need to change the startup order in Windows 11. You may want to boot from a USB drive or external hard drive, or you may want to change the default operating system. Before Windows 10, there weren't many ways to accomplish this. You can only press the key multiple times at startup and simply miss entering the BIOS. Today, however, there are many more ways to achieve this. This article will detail all the ways to change the startup order in Windows 11. How to change the boot order in Windows 11? 1. Enter the BIOS menu. First, click on the Start menu, search for Settings, and then click on Open. From the left panel, select System and scroll down


