
Whether you are running Windows 10 or Windows 11, you may often encounter the error message when trying to print a document or install a printer – Windows cannot connect to the printer with error code – 0x0000007c . This is a common error that comes with a certain Windows update (security patch). Although they are a fix released by Microsoft for this bug, it may not work for all users.
Obviously, while security patches are important for the proper functioning of a Windows PC, some updates can eventually interfere with the system and cause problems. While uninstalling updates can sometimes fix the error, this may not work in most cases unless you stop the Windows Update service for a while until the error is completely fixed.
Fortunately, in addition to the above, there are many solutions that users find useful. In this article, we will list down all the possible solutions that may help you fix Windows cannot connect to printer error code – 0x0000007c on Windows 10/11 PC.
Printer error code – 0x0000007c usually occurs due to security updates, mainly KB5006670. In this case, the best thing to do is to uninstall this security update and see if this helps fix the printer not working issue. Let's see how:
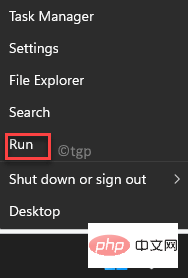
Step 1: Go to Start, right click on it and select ## in the Run command window #Run.
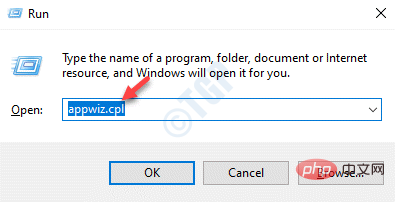
Step 2: In the "Run" command window, type in the search bar appwiz.cpl and press Enter to open the Programs and Features window in the Control Panel.
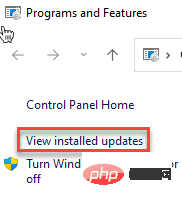
Step 3: In the "Programs and Features" window, click "##" on the left side of the pane #View installed updates".
This will open the installed updates## in the Control Panel #window. You can uninstall updates here.
Now, go to the right and under theUninstall and Update
section, look for the security update that is causing the problem.Right click on it and select Uninstall
.
Now, wait until it is uninstalled. Once completed, restart your PC and you should now be able to use the printer without errors. 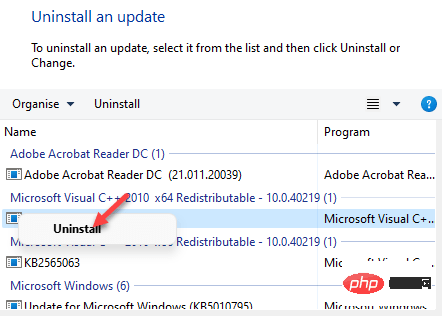
Step 1:
Simultaneously press theWin E keys on your keyboard to open File Explorerwindow. Step 2:
In theFile Explorer window, navigate to Following path:
64 位操作系统:C:\Windows\System32\spool\drivers\x6432 位操作系统:C:\Windows\System32\spool\drivers\W32X86
32-bit/64-bit
, follow the instructions in this article.Step 3: Now, press the Win R
keys simultaneously on your keyboard to open theRun command window. Step 4: In the Run command
search bar, typeservices.msc and press EnterOpenService Manager.
Step 5:In the "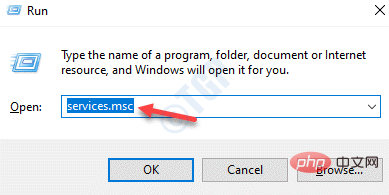 Services
Name" column, look for the Print Spooler service. Right click on it and select Restart to restart the service.
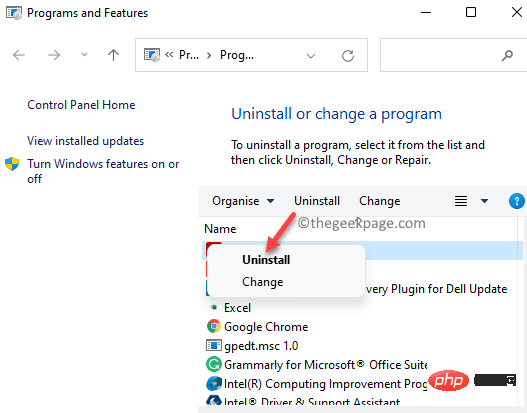
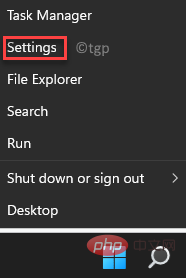
第6步:现在,转到开始,右键单击它并单击运行以打开运行命令。 第 7 步:在“运行”命令窗口中,在搜索字段中键入appwiz.cpl ,然后按“确定”在“控制面板”中打开“程序和功能”窗口。 第 8 步:在“程序和功能”窗口中,转到右侧并在“卸载或更改程序”下,找到打印机,右键单击它并选择“卸载” 。 第 9 步:卸载打印机后,重新启动 PC,然后添加打印机。 接下来,从其制造商网站下载并安装打印机。 完成后,您现在应该能够正常使用打印机,而不会看到Windows 无法连接到打印机并出现错误代码 – 再次出现 0x0000007c 错误。 打印机问题很可能不是由Windows 更新引起的,因此,在这种情况下,您可以运行打印机疑难解答程序来检查其背后的原因。让我们看看如何: 步骤 1:同时按键盘上的Win + R键以打开“运行”命令框。 第 2 步:在搜索栏中,键入cmd并按键盘上的Ctrl + Shift + Enter快捷键打开提升的命令提示符窗口。 第 3 步:在命令提示符(管理员)窗口中,运行以下命令并按 Enter 键打开打印机 疑难解答: 现在,等到该过程结束,疑难解答程序将开始查找任何问题,如果检测到任何问题,它将自动修复问题。 该过程完成后,关闭命令提示符窗口,重新启动 PC 并检查打印机问题是否仍然存在。 在这种方法中,您首先需要从控制面板中卸载打印机,然后将其重新添加。这应该可以帮助您修复Windows 无法连接到打印机的错误代码 - Windows 11 PC 上的 0x0000007c。让我们看看如何: 第 1 步:按Win + R热键启动“运行”命令窗口。 第 2 步:在运行命令搜索栏中,键入appwiz.cpl并按OK打开控制面板中的程序和功能窗口。 第 3 步:在“控制面板”窗口中,转到右侧并在“卸载或更改程序”部分下,在列表中查找打印机。 现在,右键单击它并选择Uninstall。 等待它被卸载。卸载后,重新启动 PC 并按照以下步骤添加打印机。 第 4 步:转到“开始”,右键单击它并选择“设置”。 第 5 步:这将启动设置应用程序。 在这里,转到窗格的左侧,然后单击蓝牙和设备。 第 6 步:现在,导航到右侧并单击打印机和扫描仪。 第 7 步:接下来,在打印机和扫描仪设置页面中,转到右侧并在添加打印机或扫描仪选项旁边,单击添加设备。 第 8 步:它将开始搜索您的打印机,一旦成功检测到您的打印机,请继续连接它。 第 9 步:但是,如果它无法找到您的打印机,您会在其下方看到一条消息 -我想要的打印机不在列表中。 单击旁边的手动添加。 第 10 步:现在,在打开的“添加打印机”窗口中,您可以先尝试最上面的选项——我的打印机有点旧。帮我找到它并按Next。 第 11 步:它现在将搜索可用的打印机。 但是,如果找不到您的打印机,请返回主页。 步骤 12:返回通过其他选项查找打印机窗口,现在选择旁边的单选按钮 -添加本地打印机或网络打印机手动设置,然后按下一步。 现在,按照屏幕上的说明添加所需的详细信息以再次完成打印机安装。 安装成功完成后,您现在应该可以连接到打印机了。 有时,删除打印机驱动程序(可能已经损坏)然后重新安装它可能会帮助您解决打印机问题并允许 Windows 连接到打印机。请按照以下说明可能解决此问题: *注意 -如果您不知道可能是哪个驱动程序导致问题,那么您可以尝试以下解决方案: 步骤 1:同时按下键盘上的Win + R键以打开运行命令。 第 2 步:在搜索字段中,键入cmd并同时按键盘上的Ctrl + Shift + Enter键,以管理员模式启动命令提示符窗口。 第 3 步:在提升的命令提示符窗口中,运行以下命令并按Enter 键: 这将打开一个新窗口 -打印机驱动程序属性,其中包含所有已安装驱动程序的列表。 第 4 步:现在,查找导致问题的打印机驱动程序,选择它并单击下面的删除按钮。 完成后,关闭窗口和命令提示符窗口。 *注意 –但是,如果您知道是哪个打印机驱动程序导致了问题,请按照以下步骤操作: 步骤 1:按Win + R快捷键打开运行命令搜索栏。 第 2 步:在搜索字段中,键入devmgmt.msc并按 OK 打开设备管理器窗口。 步骤 3:接下来,在设备管理器窗口中,展开打印机队列部分,右键单击打印机驱动程序并选择卸载设备。 第 4 步:在“卸载设备”提示中,再次按“卸载”以确认操作并继续。 现在,等到驱动程序完全卸载。 第 5 步:现在,重新启动您的 PC,按照第 1 步和第 2 步操作,转到打印机队列,右键单击它并选择扫描硬件更改。 Windows 现在将查找最新的打印机驱动程序并自动重新安装。 退出设备管理器窗口,重新启动您的 PC,现在检查您是否仍然遇到Windows 无法连接到打印机并出现错误代码 - 0x0000007c 错误。 第 1 步:按Win + E热键打开文件资源管理器窗口。 第 2 步:在文件资源管理器窗口中,导航到以下路径:

方法 3:使用打印机疑难解答
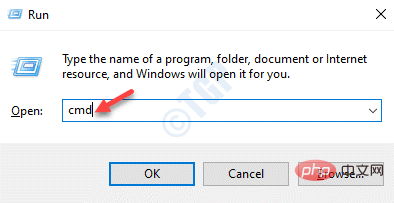
msdt.exe /id 打印机诊断

方法 4:删除并添加打印机


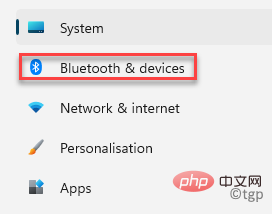
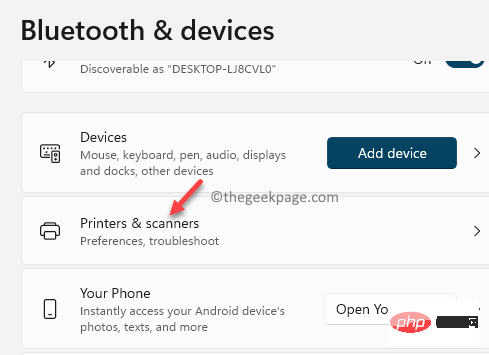
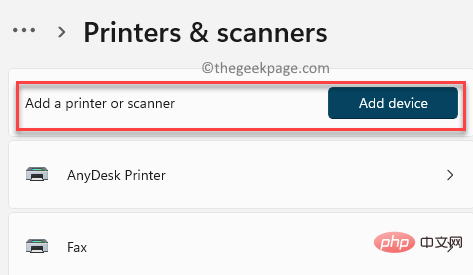
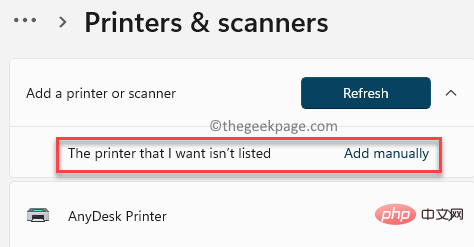
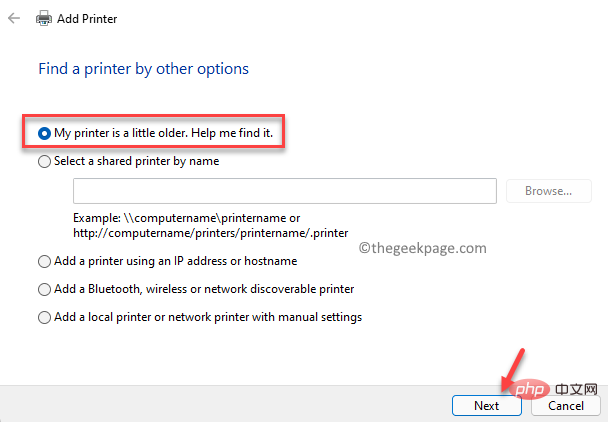
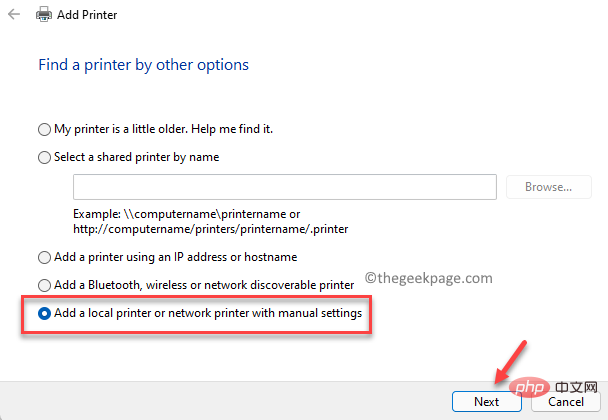
方法 5:重新安装打印机驱动程序
printui.exe /s /t2
方法六:手动替换mscms.dll文件
C:\Windows\system32\
在这里,查找 mscms.dll 文件并将其复制。
第 3 步:现在,如果您正在运行 32 位 Windows 架构,请导航到以下路径:
C:\windows\system32\spool\drivers\w32x86\3\
在这里,粘贴您在步骤 2 中复制的 mscms.dll 文件。
第 4 步:但是,如果您运行的是 64 位 Windows 架构,请转到以下路径并粘贴在第 2 步中复制的 mscms.dll 文件:
C:\windows\system32\spool\drivers\x64\3\
现在,重新启动您的 PC,您现在应该摆脱Windows 无法连接到带有错误代码的打印机 - 0x0000007c 错误。
如果上述方法都不起作用,您可以尝试这个显然对某些用户有效的技巧。为此,首先,您需要访问制造商的网站,下载最新的打印机驱动程序,安装驱动程序,然后当您被要求使用打印机电缆连接到打印机时,选择连接到打印机。连接后,现在取消安装。是的,这听起来可能很奇怪,但这种方法似乎对少数人有效,因此,这应该可以解决您的问题。
The above is the detailed content of Fix: 'Windows cannot connect to the printer” error code – '0x0000007c”. For more information, please follow other related articles on the PHP Chinese website!
 How to solve error code 8024401C
 How to solve dns_probe_possible
 What to do if the blue screen code 0x0000007e occurs
 Solution to computer display error code 651
 How to open win11 control panel
 Introduction to the location of win10 control panel
 How to solve deletefile error code 5
 How to increase download speed


