Although modern web applications are faster and more convenient than ever, there are still many situations where heavy tasks need to be transferred to other parts of the system instead of working on the main thread.
Examples of these situations are as follows:
So, how to deal with these situations? At this time, Celery comes in handy.
Celery is an open source task queue implementation, often combined with Python-based web frameworks such as Flask and Django, to execute tasks asynchronously outside of the typical request-response cycle.
So, Celery is essentially a task queue based on distributed messaging. Execution units or tasks are executed simultaneously on one or more workers using multiprocessing, gevent or eventlets. These tasks can be executed synchronously (i.e., wait until ready) or asynchronously (i.e., in the background).

Celery is a distributed task queue based on the producer-consumer model.
Task Queue is a mechanism for distributing work across threads and machines. It is essentially a message intermediary between producers (web applications) and consumers (Celery workers).
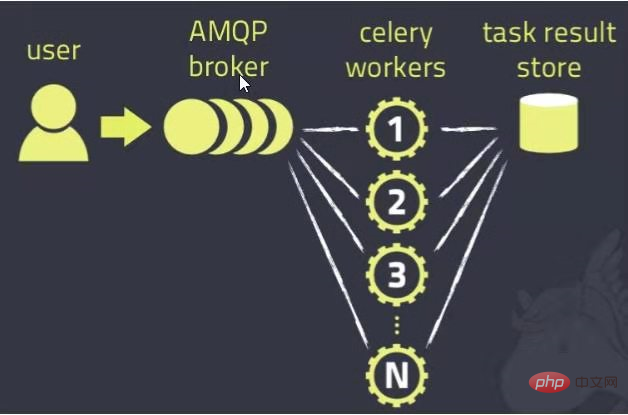
Celery interacts through messages, and the broker acts as an intermediary between clients (producers) and workers (consumers). To start a task, the client pushes a message to the queue, and the broker delivers the message to the worker.
The Celery system can be composed of multiple workers and brokers, which provides the possibility of high availability and horizontal expansion.
In short, the Celery client is the producer, which adds new tasks to the queue through the message broker. Then, Celery workers also obtain new tasks from the queue through the message broker. Once processed, the results are stored in the results backend.
The following example will use RedisMQ as the message broker.
On the linux/macOS system, run the Redis server locally by executing the following command:
$ wget http://download.redis.io/redis-stable.tar.gz
$ tar xvzf redis-stable.tar.gz
$ rm redis-stable.tar.gz
$ cd redis-stable
$ make
After setting up Redis, run the Redis server by executing the following command:
$ redis-server
The server runs on the default port 6379.
First, set up the Python project locally.
Celery can be installed through standard tools such as pip or easy_install. Install Celery and Redis through the following command:
pip install celery redis==4.3.4
Now you need a Celery instance to run the application. Any task implemented by Celery starts with an instance, such as creating and managing tasks.
Create a file tasks.py in the project:
From celery import Celery

broker_url = 'redi://localhost:6379/0'

app = Celery('tasks',broker = broker_url)

@app.task
def add(x, y):
return x+yA simple task add() is defined here to return the sum of two numbers.
In the terminal, switch to the project location and run Celery worker with the following command:
$ celery -A tasks worker - loglevel=info
For more information about the Celery worker command line, you can use help:
$ celery worker - help
In Celery, use the delay() method to call tasks.
Open another terminal window for the project and run the following command:
$ python
This will open the Python command line.
>> from tasks import add
>> add.delay(1,2)
This will return an AsyncResult instance, which can be used to check the status of the task, get its return value, wait for the task to complete, and also get exceptions and tracebacks on failure.
After running the add.delay() command, the task will be pushed to the queue and then acquired by the worker. This can be verified on the Celery worker terminal, where you can clearly see the task being received and then completed successfully.
The above is the detailed content of Learn Python Celery and easily complete asynchronous tasks. For more information, please follow other related articles on the PHP Chinese website!


