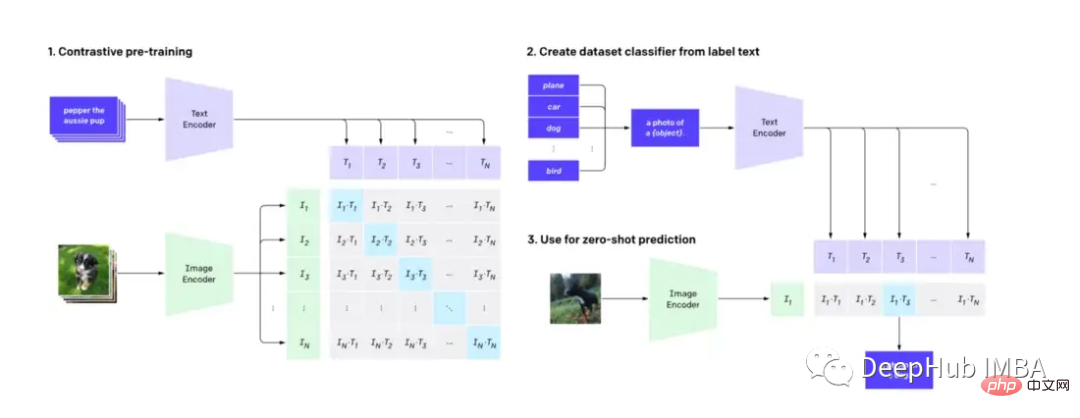
CLIP (Contrastive Language-Image Pre-training) is a machine learning technology that can accurately understand and classify images and natural language text, which has a profound impact on image and language processing and has been used as a popular The underlying mechanism of diffusion model DALL-E. In this post, we’ll cover how to adapt CLIP to assist video search.
This article will not delve into the technical details of the CLIP model, but will show another practical application of CLIP (in addition to the diffusion model).
First we need to know: CLIP uses an image decoder and a text encoder to predict which images in the data set match which text.

By using the pre-trained CLIP model from hugging face, we can build a simple yet powerful video search engine with Natural language capabilities and no need for feature engineering.
We need to use the following software
Python≥= 3.8,ffmpeg,opencv
There are many techniques for searching videos through text. We can think of a search engine as consisting of two parts, indexing and search.
Video indexing often involves a combination of manual and machine processes. Humans preprocess videos by adding relevant keywords in titles, tags, and descriptions, while automated processes extract visual and auditory features such as object detection and audio transcription. User interaction metrics, etc., which record which parts of the video are most relevant and how long they remain relevant. All of these steps help create a searchable index of your video content.
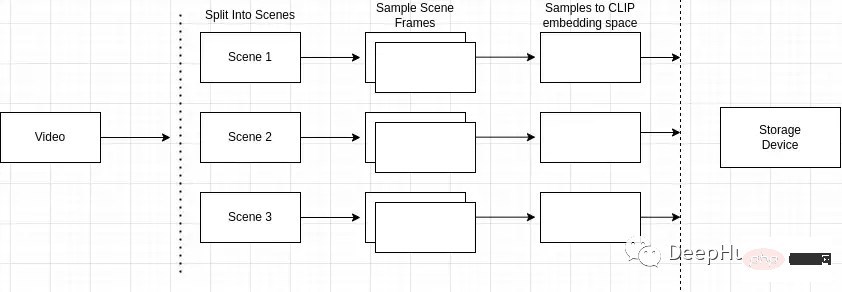
An overview of the indexing process is as follows

Why scene detection is important? Videos are composed of scenes, and Scenes are composed of similar frames. If we only sample arbitrary scenes in the video, we may miss keyframes in the entire video.
So we need to accurately identify and locate specific events or actions in the video. For example, if I search for "dogs in the park" and the video I'm searching for contains multiple scenes, such as a scene of a man riding a bike and a scene of a dog in the park, scene detection allows me to identify the ones that are most relevant to the search query. Close scene.
You can use the "scene detect" python package to perform this operation.
 mport scenedetect as sd

 video_path = '' # path to video on machine

 video = sd.open_video(video_path)
 sm = sd.SceneManager()

 sm.add_detector(sd.ContentDetector(threshold=27.0))
 sm.detect_scenes(video)

 scenes = sm.get_scene_list()
Then you need to use cv2 to frame the video.
 import cv2

 cap = cv2.VideoCapture(video_path)

 every_n = 2 # number of samples per scene

 scenes_frame_samples = []
 for scene_idx in range(len(scenes)):
scene_length = abs(scenes[scene_idx][0].frame_num - scenes[scene_idx][1].frame_num)
every_n = round(scene_length/no_of_samples)
local_samples = [(every_n * n) + scenes[scene_idx][0].frame_num for n in range(3)]

scenes_frame_samples.append(local_samples)
After collecting the samples, we need to compute them into something usable by the CLIP model.
First you need to convert each sample into an image tensor embedding.
 from transformers import CLIPProcessor
 from PIL import Image

 clip_processor = CLIPProcessor.from_pretrained("openai/clip-vit-base-patch32")

 def clip_embeddings(image):
inputs = clip_processor(images=image, return_tensors="pt", padding=True)
input_tokens = {
k: v for k, v in inputs.items()
}

return input_tokens['pixel_values']

 # ...
 scene_clip_embeddings = [] # to hold the scene embeddings in the next step

 for scene_idx in range(len(scenes_frame_samples)):
scene_samples = scenes_frame_samples[scene_idx]

pixel_tensors = [] # holds all of the clip embeddings for each of the samples
for frame_sample in scene_samples:
cap.set(1, frame_sample)
ret, frame = cap.read()
if not ret:
print('failed to read', ret, frame_sample, scene_idx, frame)
break

pil_image = Image.fromarray(frame)

clip_pixel_values = clip_embeddings(pil_image)
pixel_tensors.append(clip_pixel_values)The next step is to average all samples in the same scene, which can reduce the dimensionality of the samples and also solve the problem of noise in a single sample.
 import torch
 import uuid

 def save_tensor(t):
path = f'/tmp/{uuid.uuid4()}'
torch.save(t, path)

return path

 # ..
 avg_tensor = torch.mean(torch.stack(pixel_tensors), dim=0)
scene_clip_embeddings.append(save_tensor(avg_tensor))In this way, a CLIP embedded tensor list representing the video content is obtained.
For underlying index storage, we use LevelDB (LevelDB is a key/value library maintained by Google). The architecture of our search engine will consist of 3 separate indexes:
We will first insert all the calculated metadata in the video and the unique identifier of the video into the metadata index. This step is ready-made and very simple.
 import leveldb
 import uuid

 def insert_video_metadata(videoID, data):
b = json.dumps(data)

level_instance = leveldb.LevelDB('./dbs/videometadata_index')
level_instance.Put(videoID.encode('utf-8'), b.encode('utf-8'))

 # ...
 video_id = str(uuid.uuid4())
 insert_video_metadata(video_id, {
'VideoURI': video_path,
})Then create a new entry in the scene embedding index to save each pixel embedding in the video, and also need a unique identifier to identify each scene.
import leveldb
 import uuid

 def insert_scene_embeddings(sceneID, data):
level_instance = leveldb.LevelDB('./dbs/scene_embedding_index')
level_instance.Put(sceneID.encode('utf-8'), data)

 # ...
 for f in scene_clip_embeddings:
scene_id = str(uuid.uuid4())

with open(f, mode='rb') as file:
content = file.read()

insert_scene_embeddings(scene_id, content)Finally, we need to save which scenes belong to which video.
 import leveldb
 import uuid

 def insert_video_scene(videoID, sceneIds):
b = ",".join(sceneIds)

level_instance = leveldb.LevelDB('./dbs/scene_index')
level_instance.Put(videoID.encode('utf-8'), b.encode('utf-8'))

 # ...
 scene_ids = []
 for f in scene_clip_embeddings:
# .. as shown in previous step
scene_ids.append(scene_id)
scene_embedding_index.insert(scene_id, content)

scene_index.insert(video_id, scene_ids)Now that we have an index of videos, we can search and sort them based on the model output.
The first step requires traversing all records in the scene index. Then, create a list of all video and matching scene ids in the video.
 records = []

 level_instance = leveldb.LevelDB('./dbs/scene_index')

 for k, v in level_instance.RangeIter():
record = (k.decode('utf-8'), str(v.decode('utf-8')).split(','))
records.append(record)The next step requires collecting all scene embedding tensors present in each video.
import leveldb

def get_tensor_by_scene_id(id):
level_instance = leveldb.LevelDB('./dbs/scene_embedding_index')
b = level_instance.Get(bytes(id,'utf-8'))

return BytesIO(b)

for r in records:
tensors = [get_tensor_by_scene_id(id) for id in r[1]]After we have all the tensors that make up the video, we can pass it into the model. The input to the model is "pixel_values", a tensor representing the video scene.
import torch
from transformers import CLIPProcessor, CLIPModel

processor = CLIPProcessor.from_pretrained("openai/clip-vit-base-patch32")
model = CLIPModel.from_pretrained("openai/clip-vit-base-patch32")

inputs = processor(text=text, return_tensors="pt", padding=True)

for tensor in tensors:
image_tensor = torch.load(tensor)
inputs['pixel_values'] = image_tensor
outputs = model(**inputs)Then access "logits_per_image" in the model output to obtain the output of the model.
Logits are essentially the raw unnormalized predictions of the network. Since we only provide a text string and a tensor representing the scene in the video, the structure of the logit will be a single-valued prediction.
logits_per_image = outputs.logits_per_image
probs = logits_per_image.squeeze()

prob_for_tensor = probs.item()
Add the probabilities for each iteration and divide it by the total number of tensors at the end of the operation to get the average probability of the video.
def clip_scenes_avg(tensors, text):
avg_sum = 0.0

for tensor in tensors:
# ... previous code snippets
probs = probs.item()
avg_sum += probs.item()

return avg_sum / len(tensors)
最后在得到每个视频的概率并对概率进行排序后,返回请求的搜索结果数目。
import leveldb
import json

top_n = 1 # number of search results we want back

def video_metadata_by_id(id):
level_instance = leveldb.LevelDB('./dbs/videometadata_index')
b = level_instance.Get(bytes(id,'utf-8'))
return json.loads(b.decode('utf-8'))

results = []
for r in records:
# .. collect scene tensors

# r[0]: video id
return (clip_scenes_avg, r[0])

sorted = list(results)
sorted.sort(key=lambda x: x[0], reverse=True)

results = []
for s in sorted[:top_n]:
data = video_metadata_by_id(s[1])

results.append({
'video_id': s[1],
'score': s[0],
'video_uri': data['VideoURI']
})就是这样!现在就可以输入一些视频并测试搜索结果。
通过CLIP可以轻松地创建一个频搜索引擎。使用预训练的CLIP模型和谷歌的LevelDB,我们可以对视频进行索引和处理,并使用自然语言输入进行搜索。通过这个搜索引擎使用户可以轻松地找到相关的视频,最主要的是我们并不需要大量的预处理或特征工程。
那么我们还能有什么改进呢?
可以在这里找到本文的代码:https://github.com/GuyARoss/CLIP-video-search/tree/article-01。
以及这个修改版本:https://github.com/GuyARoss/CLIP-video-search。
The above is the detailed content of Building a video search engine using CLIP. For more information, please follow other related articles on the PHP Chinese website!


