
WSGI, uWSGI and uwsgi are three related concepts. They are different tools and protocols used in web application development. The following is their detailed introduction:
So, uWSGI is a web server that can communicate with Python applications through the WSGI protocol and communicate using the uwsgi protocol. WSGI is an interface specification between Python web applications and web servers, defining a standard interface between applications and servers. uwsgi is a binary communication protocol between the uWSGI server and applications.
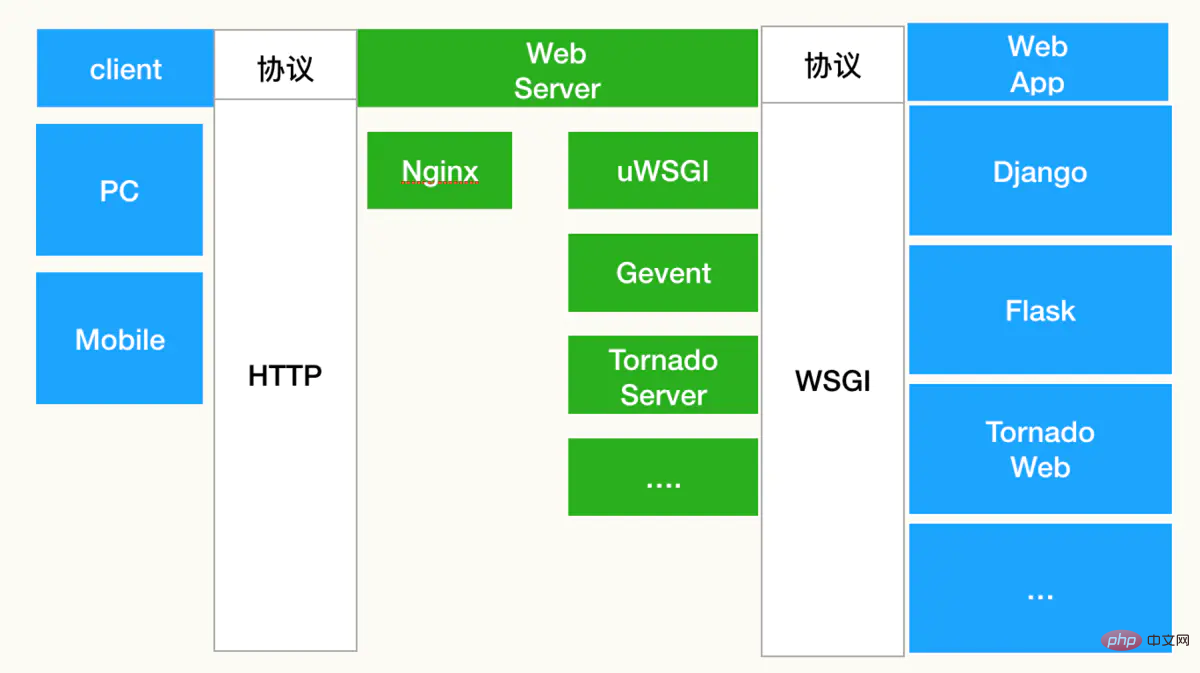
uWSGI is a Web Server Gateway Interface, which can be used For integrating Python web applications with web servers such as Nginx or Apache.
Domestic source address:
mkdir~/.pip/
cat >~/.pip/pip.conf<<EOF
[global]
index-url = https://repo.huaweicloud.com/repository/pypi/simple
trusted-host = repo.huaweicloud.com
timeout = 120
EOF
# 安装python3
yum -y install python3

yum -y install gcc-c++ -y
yum -y install python3-devel -y

# 安装 uwsgi flask 模块
pip3 install uwsgi flask

# 查看版本
uwsgi --version
 3. Example demonstration (uWSGI Nginx configuration)
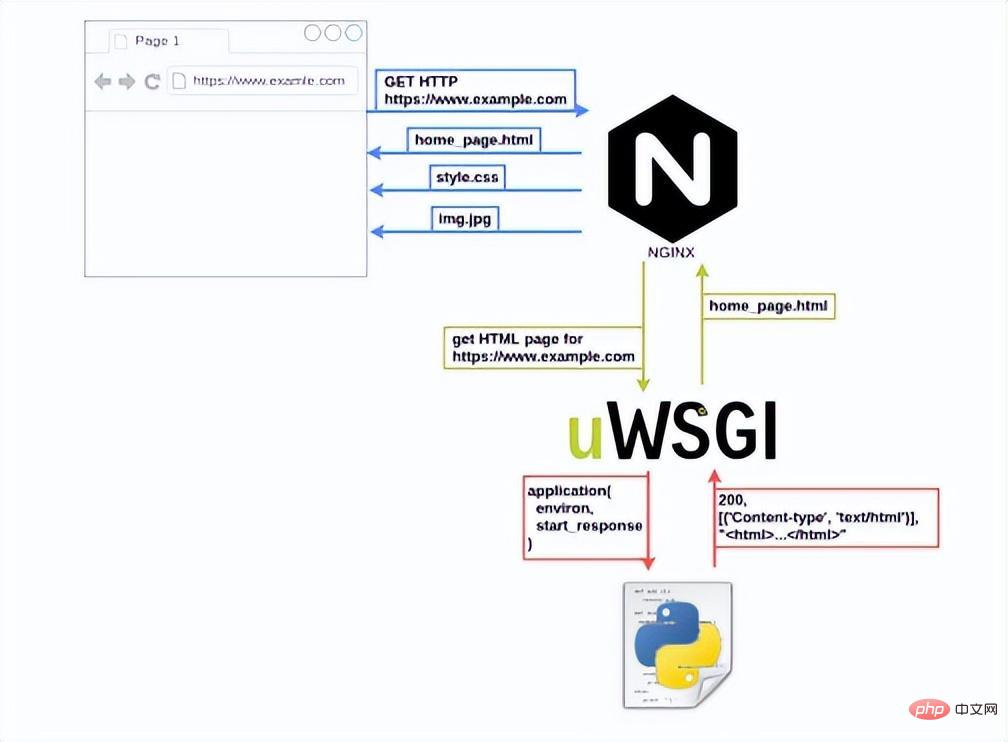 1) Install nginx
yum update -y
yum install epel-release
yum -y install nginx
app.py and add the following code: from flask import Flask
app = Flask(__name__)
@app.route('/')
def hello():
return 'Hello, World!'
if __name__ == '__main__':
app.run()
uwsgi.ini, which contains the following information: [uwsgi]
module = app:app
# 相当于命令下面两行
#wsgi-file = app.py # 项目入口文件
#callable = app #flask应用对象
# 支持http+socket两种方式,这里选用socket,也可以选择http-socket,下面会讲解这三种区别
# http = 127.0.0.1:8000
socket = 0.0.0.0:8000
# 也可以使用socket文件,在nginx配置文件中配置也对应,仅限本机通信,一般也很少使用
# socket = /app/myapp.sock
# 注意记得提前创建目录
chdir = /opt/myapp
pidfile=/opt/myapp/myapp.pid
processes = 4
threads = 2
master = true
vacuum = true
py-autoreload = 1
daemonize = /tmp/uwsgi.log
在命令行中启动 uWSGI: 【温馨提示】其实也可以通过一条命令带上对应的参数即可启动,但是不推荐,测试可以。一般使用配置文件的方式启动服务。 使用http协议启动uwsgi的命令为: 将 Web 服务器配置为反向代理 uWSGI,例如,在 Nginx 中,可以使用以下配置文件: 其中,uwsgi_params 文件包含以下内容: 【特别注意】uwsgi_params 在nginx conf文件夹下自带,uwsgi_pass一定要跟uwsgi_conf.ini中写的地址完全一致。 重启 Web 服务器以使配置生效。 访问(浏览器访问,curl访问也行) Nginx上游(upstream)是指一组后端服务器,Nginx可以与其通信并将客户端请求转发到这些服务器。换句话说,上游服务器是Nginx代理请求的后端服务器。 Nginx的upstream支持5种 分配方式,其中 轮询(默认)、权重、IP散列这三种为Nginx原生支持的分配方式,fair 和 url_hash 为第三方支持的分配方式。 轮询是upstream的默认分配方式,即每个请求按照时间顺序轮流分配到不同的后端服务器,如果某个后端服务器 down 掉后,能自动剔除。 轮询的加强版,既可以指定轮询比率,weight 和访问几率成正比,主要应用于后端服务器异质的场景下。 每个请求按照访问 Ip(即Nginx的前置服务器或客户端IP)的 hash结果分配,这样每个访客会固定访问一个后端服务器,可以解决 session 一致问题。 先在另外一个节点上再起一个uWSGI服务,将上面示例配置修改: 192.168.182.110 节点 app.py 192.168.182.111 节点 app.py 验证 从上图可知,请求轮询调度,这才是企业一般想要的效果,负载均衡。 【1】socket 示例(uwsgi.ini): nginx配置 【2】http 示例(uwsgi.ini): nginx配置 【3】http-socket 示例(uwsgi.ini): nginx配置 TCP和Unix套接字(Unix domain socket)是两种不同类型的套接字。 因此,TCP套接字用于在网络上进行通信,而Unix套接字用于在同一台计算机上进行通信。虽然TCP套接字可以通过网络连接到不同的计算机,但是Unix套接字提供了更高效的进程间通信机制,并且更适合于需要在同一台计算机上运行的进程间通信。 【TCP 示例】常用uwsgi.ini: 【unix 示例】仅限于本机通信,很少使用。uwsgi.ini: nginx配置 Python 中 web开发中的 WSGI、uWSGI 和 uwsgi 三者介绍就先到这里了 The above is the detailed content of Introduction to WSGI, uWSGI and uwsgi in Python. For more information, please follow other related articles on the PHP Chinese website!4)启动 uWSGI
uwsgi --ini uwsgi.ini
###或者
uwsgi uwsgi.ini

### 重启
uwsgi --reload /opt/myapp/myapp.pid
###关闭
uwsgi --stop /opt/myapp/myapp.pid
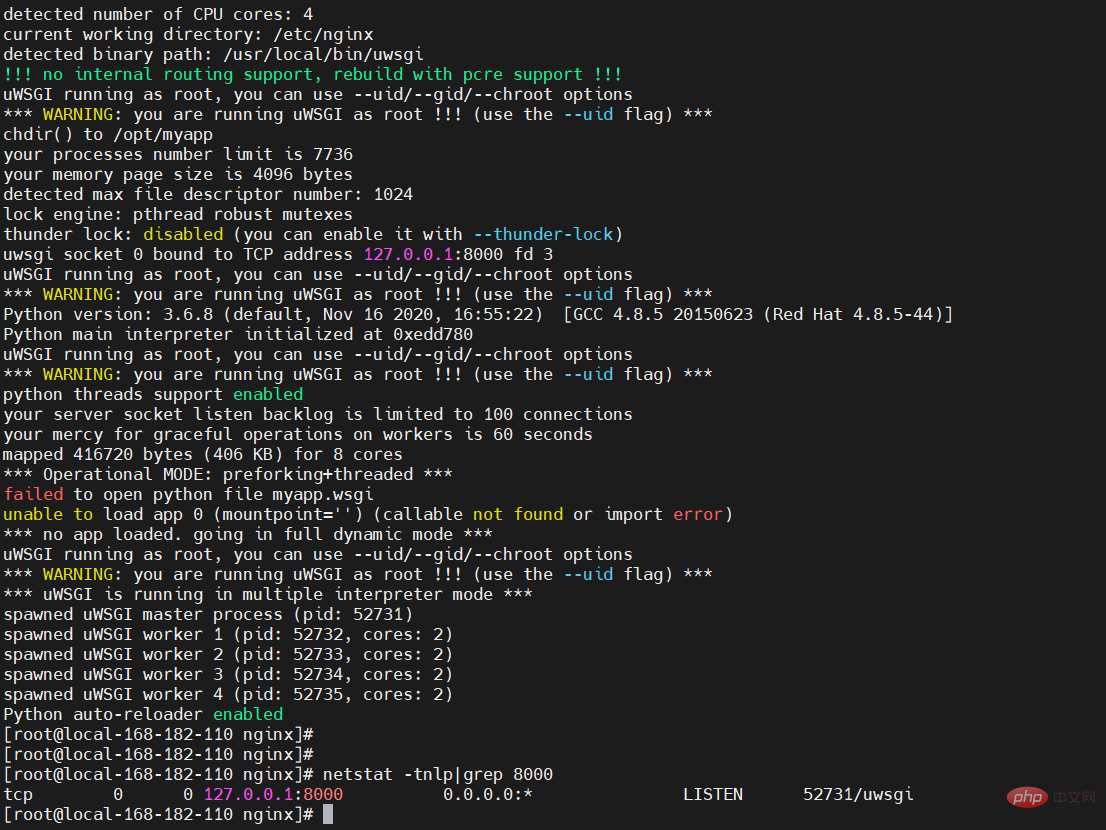
uwsgi --http :8000 --ini uwsgi_conf.ini -d ./uwsgi.log --pidfile=uwsgi.pid
5)配置 Web 服务器
# vi /etc/nginx/conf.d/myapp.conf
server {
listen 8080;
server_name myapp.com;
location / {
 include uwsgi_params;
 uwsgi_pass 127.0.0.1:8000;
}
}uwsgi_paramQUERY_STRING $query_string;
uwsgi_paramREQUEST_METHOD $request_method;
uwsgi_paramCONTENT_TYPE $content_type;
uwsgi_paramCONTENT_LENGTH $content_length;
uwsgi_paramREQUEST_URI$request_uri;
uwsgi_paramPATH_INFO$document_uri;
uwsgi_paramDOCUMENT_ROOT$document_root;
uwsgi_paramSERVER_PROTOCOL$server_protocol;
uwsgi_paramREQUEST_SCHEME $scheme;
uwsgi_paramHTTPS$https if_not_empty;
uwsgi_paramREMOTE_ADDR$remote_addr;
uwsgi_paramREMOTE_PORT$remote_port;
uwsgi_paramSERVER_PORT$server_port;
uwsgi_paramSERVER_NAME$server_name;
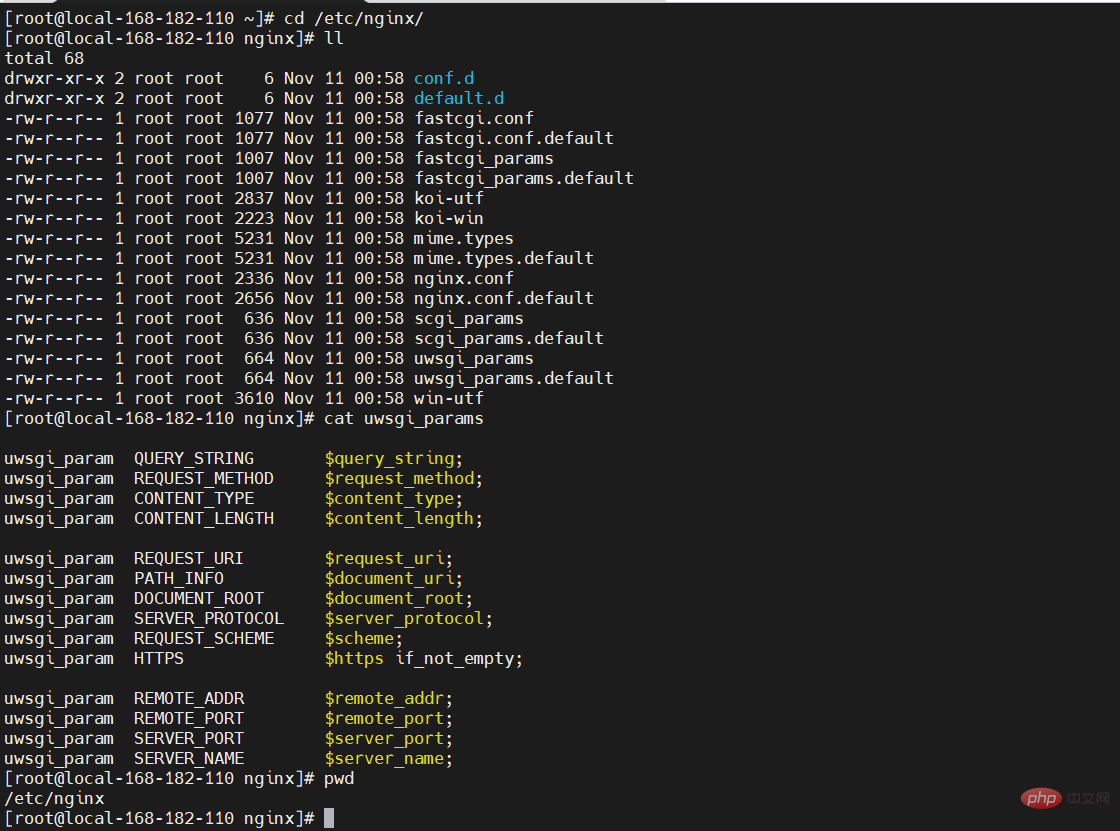
6)重启 Web 服务器
# 重启
systemctl restart nginx

# 如果是之前nginx服务已经存在,只是修改了配置,可建议使用reload加载
nginx -t && nginx -s reload
# 或者
systemctl reload nginx

7)Nginx upstream 负载均衡
1、轮询(默认)
upstream backend {
server 192.168.182.110:8000;
server 192.168.182.111:8000;
}2、权重(weight)
upstream backend {
server 192.168.182.110:8000 weight=1;
server 192.168.182.111:8000 weight=2;
}3、IP散列(ip_hash)
upstream backend {
ip_hash;
server 192.168.182.110:8000 weight=1;
server 192.168.182.111:8000 weight=2;
}# vi /etc/nginx/conf.d/myapp.conf
upstream backend {
server 192.168.182.110:8000;
server 192.168.182.111:8000;
}
server {
listen 8080;
server_name myapp.com;
location / {
include uwsgi_params;
uwsgi_pass backend;
}
}from flask import Flask
app = Flask(__name__)
@app.route('/')
def hello():
return 'Hello, World 192.168.182.110!n'
if __name__ == '__main__':
app.run()from flask import Flask
app = Flask(__name__)
@app.route('/')
def hello():
return 'Hello, World 192.168.182.111!n'
if __name__ == '__main__':
app.run()curl127.0.0.1:8080
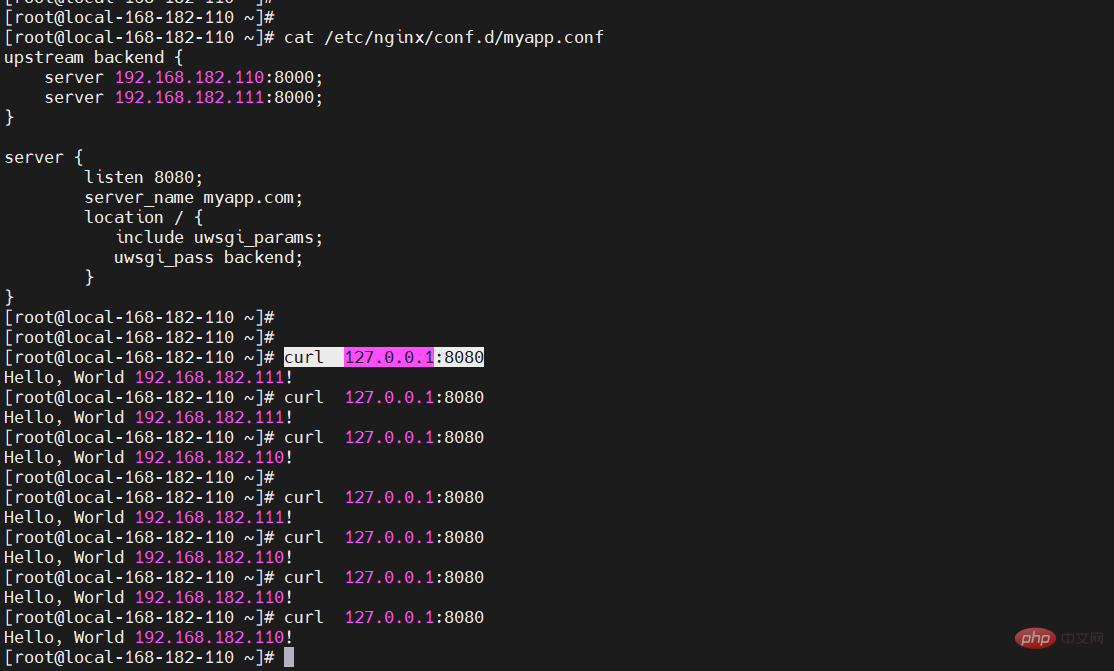
8)http、http-socket 和 socket 区别
[uwsgi]
module = app:app
#socket = 127.0.0.1:8000
socket = 0.0.0.0:8000

chdir = /opt/myapp
pidfile=/opt/myapp/myapp.pid
processes = 4
threads = 2
master = true
vacuum = true
py-autoreload = 1
daemonize = /tmp/uwsgi.log
upstream backend {
server 192.168.182.110:8000;
server 192.168.182.111:8000;
}

server {
listen 8080;
server_name myapp.com;
location / {
 include uwsgi_params;
 uwsgi_pass backend;
}
}[uwsgi]
module = app:app
socket = 0.0.0.0:8000
chdir = /opt/myapp
pidfile=/opt/myapp/myapp.pid
processes = 4
threads = 2
master = true
vacuum = true
py-autoreload = 1
daemonize = /tmp/uwsgi.log
upstream backend {
server 192.168.182.110:8000;
server 192.168.182.111:8000;
}

server {
listen 8080;
server_name myapp.com;
location / {
 include uwsgi_params;
 proxy_pass http://backend;
}
}[uwsgi]
module = app:app
http = 0.0.0.0:8000
chdir = /opt/myapp
pidfile=/opt/myapp/myapp.pid
processes = 4
threads = 2
master = true
vacuum = true
py-autoreload = 1
daemonize = /tmp/uwsgi.log
upstream backend {
server 192.168.182.110:8000;
server 192.168.182.111:8000;
}

server {
listen 8080;
server_name myapp.com;
location / {
 include uwsgi_params;
 proxy_pass http://backend;
}
}9)TCP 与 uinx 区别
[uwsgi]
module = app:app
socket = 127.0.0.1:8000

chdir = /opt/myapp
pidfile=/opt/myapp/myapp.pid
processes = 4
threads = 2
master = true
vacuum = true
py-autoreload = 1
daemonize = /tmp/uwsgi.log
[uwsgi]
module = app:app
socket = /opt/myapp/myapp.socket

chdir = /opt/myapp
pidfile=/opt/myapp/myapp.pid
processes = 4
threads = 2
master = true
vacuum = true
py-autoreload = 1
daemonize = /tmp/uwsgi.log
server {
listen 8080;
server_name myapp.com;
location / {
 include uwsgi_params;
 proxy_pass unix:///opt/myapp/myapp.sock;
}
}


