This article brings you relevant knowledge about javascript, which mainly introduces related issues about the BOM browser object model, including common events of windows objects, timers, and js execution Let’s take a look at the mechanism and so on. I hope it will be helpful to everyone.

[Related recommendations: javascript video tutorial, web front-end】
BOM (Browser Object Model) is the browser object model. It provides objects that interact with the browser window independently of content. Its core object is window.
BOM consists of a series of related objects, and each object provides many methods and properties.
DOM:
1. Document Object Model
2.DOM treats "document" as a Look at it as an "object"
3. The top-level object of DOM is document
4.5. The main thing to learn about DOM is to operate page elements
DOM is a W3C standard specification
BOM:
1. Browser Object Model
2. Treat "browser" as an "object"
3. The top-level object of BOM is window
4.BOM learns some objects that the browser window interacts with
5.BOM is defined by browser manufacturers on their respective browsers, and is compatible with Poor performance

2. It is a global object. Variables and functions defined in the global scope will become properties and methods of the window object.
You can omit window when calling. The previous learning dialog boxes all belong to window object methods, such as alert()prompt()
, etc. 3. Note: a special attribute window.name under window
2. Common events of the window object
Code Demonstration:
<style>
        .box {
            width: 100px;
            height: 100px;
            background-color: pink;
        }
    </style>
</head>

<body>
    <script>
        // window.onload = function () {};
        // 在页面元素全部加载完毕后
        window.addEventListener("load", function () {
            var box = document.querySelector('.box');
            box.onclick = function () {
                box.style.backgroundColor = 'red';
            };
        });
    </script>

    <div class="box"></div>
</body>Note:
1. With window.onload, you can write JS code above the page elements, because onload waits for all page content to be loaded before executing the processing function.
2. window.onload The traditional registration event method can only be written once. If there are multiple, the last window.onload will prevail.
3. If you useaddEventListener
, there is no limit(2)DOMContentLoaded
#When the event is triggered, only when the DOM is loaded, excluding style sheets, pictures, flash, etc. document.addEventListener('DOMContentLoaded',function(){});
<style>
.box {
width: 100px;
height: 100px;
background-color: pink;
}
</style>
</head>
<body>
<script>
//DOMContentLoaded 事件触发时,仅当DOM加载完成,不包括样式表,图片,flash等等。
window.document.addEventListener('DOMContentLoaded', function () {
var box = document.querySelector('.box');
box.onclick = function () {
box.style.backgroundColor = 'red';
};
})
</script>
<div class="box"></div>
</body>Note:
1.
Only supported by Ie9 or above2. If there are many pictures on the page, it may take a long time from user access to onload triggering, and the interactive effect cannot be achieved.
必然影响用 户的体验,此时用 DOMContentLoaded 事件比较合适。 1.window.onresize = function(){} 2.window.addEventListener("resize",function(){}); window.onresize
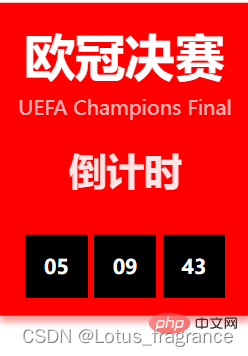
是调整窗口大小加载事件, 当触发时就调用的处理函数。 注意: 1. 只要窗口大小发生像素变化,就会触发这个事件。 2. 我们经常利用这个事件完成响应式布局。 window.innerWidth 当前屏幕的宽度 代码演示: window 对象给我们提供了 2 个非常好用的方法-定时器。 1.setTimeout() 2.setInterval() window.setTimeout(调用函数, [延迟的毫秒数]); 该定时器在定时器到期后执行调用函数。 代码演示: 注意: 1. window 可以省略。 2. 这个调用函数可以直接写函数,或者写函数名或者采取字符串‘函数名()'三种形式。第三种不推荐。 3. 延迟的毫秒数省略默认是 0,如果写,必须是毫秒。 4. 因为定时器可能有很多,所以我们经常给定时器赋值一个标识符。 5.setTimeout() 这个调用函数我们也称为回调函数 callback 6.以前我们讲的 element.onclick = function(){} 或者 element.addEventListener(“click”, fn); 里面的 函数也是回调 函数。 window.clearTimeout(timeoutID) clearTimeout()方法取消了先前通过调用setTimeout()建立的定时器。 代码演示: setInterval() 方法重复调用一个函数,每隔这个时间,就去调用一次回调函数。 代码演示: 案例: 倒计时 代码演示: 演示结果: clearInterval()方法取消了先前通过调用setInterval()建立的定时器。 代码演示: 案例: 发送短信 点击按钮后,该按钮60秒之内不能再次点击,防止重复发送短信 代码演示: 演示结果: this的指向在函数定义的时候是确定不了的,只有函数执行的时候才能确定this到底指向谁,一般情况下this 的最终指向的是那个调用它的对象现阶段,我们先了解一下几个this指向 1. 全局作用域或者普通函数中this指向全局对象window(注意定时器里面的this指向window) 2. 方法调用中谁调用this指向谁 3.构造函数中this指向构造函数的实例 JavaScript 语言的一大特点就是单线程,也就是说,同一个时间只能做一件事。 为了解决这个问题,利用多核 CPU 的计算能力,HTML5 提出 Web Worker 标准,允许 JavaScript 脚本创建多个线程。于是,JS 中出现了同步和异步 1.同步 前一个任务结束后再执行后一个任务,程序的执行顺序与任务的排列顺序是一致的、同步的。 2.异步 你在做一件事情时,因为这件事情会花费很长时间,在做这件事的同时,你还可以去处理其他事情。比如做 饭的异步做法,我们在烧水的同时,利用这10分钟,去切菜,炒菜。 3.同步任务 同步任务都在主线程上执行,形成一个执行栈。 4.异步任务 JS 的异步是通过回调函数实现的。
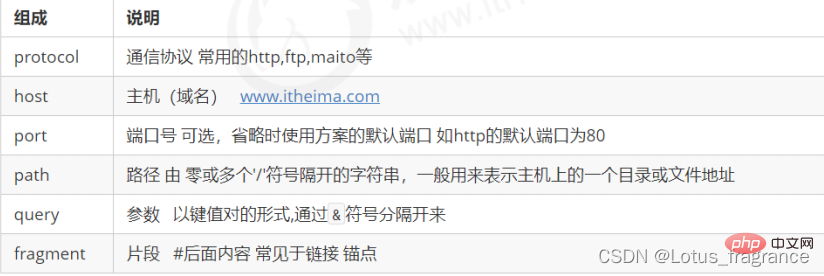
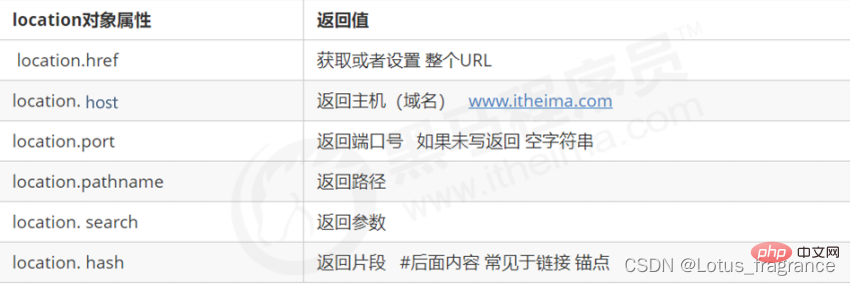
一般而言,异步任务有以下三种类型: (1)普通事件,如 click、resize 等 (2)资源加载,如 load、error 等 (3)定时器,包括 setInterval、setTimeout 等 异步任务相关回调函数添加到任务队列中(任务队列也称为消息队列)。 1. 先执行执行栈中的同步任务。 2. 异步任务(回调函数)放入任务队列中。 3. 一旦执行栈中的所有同步任务执行完毕,系统就会按次序读取任务队列中的异步任务,于是被读取的异步任 务结束等待状态,进入执行栈,开始执行。 window 对象给我们提供了一个 location 属性用于获取或设置窗体的 URL,并且可以用于解析URL 。 因为 这个属性返回的是一个对象,所以我们将这个属性也称为 location 对象。 统一资源定位符 (Uniform Resource Locator, URL) 是互联网上标准资源的地址。互联网上的每个文件都有 一个唯一的 URL,它包含的信息指出文件的位置以及浏览器应该怎么处理它。 URL 的一般语法格式为: protocol://host[:port]/path/[?query]#fragment http://www.itcast.cn/index.html?name=andy&age=18#link 案例: 5秒钟之后自动跳转页面 代码演示: 案例: 获取 URL 参数数据 代码演示: navigator 对象包含有关浏览器的信息,它有很多属性,我们最常用的是 userAgent,该属性可以 返回由客 户机发送服务器的 user-agent 头部的值。 下面前端代码可以判断用户那个终端打开页面,实现跳转 代码演示: window 对象给我们提供了一个 history 对象,与浏览器历史记录进行交互。该对象包含用户(在浏览器窗口中) 访问过的 URL。 history 对象一般在实际开发中比较少用,但是会在一些 OA 办公系统中见到。 【相关推荐:javascript视频教程、web前端】2.2 调整窗口大小事件
<body>
    <script>
        // window.onresize = function () { }
        window.addEventListener("resize", function () {
            // window.innerWidth当前窗口的宽度;window.innerHeight当前窗口的高度。
            console.log(window.innerWidth, window.innerHeight);
        });
    </script>
</body>3. 定时器
3.1 两种定时器
3.2 setTimeout() 定时器
<body>
<script>
// window.setTimeout(调用函数, [延迟的毫秒数]);
window.setTimeout(function () {
alert('你好');
},1000);
</script>
</body>3.3 停止 setTimeout() 定时器
<body>
<script>
// window.setTimeout(调用函数, [延迟的毫秒数]);
function fn() {
alert('你好');
};
var timer = setTimeout(fn, 1000);
//clearTimeout()方法取消了先前通过调用 setTimeout() 建立的定时器。
clearTimeout(timer);
</script>
</body>3.4 setInterval() 定时器
window.setInterval(
回调函数
, [
间隔的毫秒数
]);
<body>
    <script>
        // setInterval() 定时器
        function fn() {
            for(var i = 1; i <= 5; i++) {
                console.log(i);
            }
        }
        var timer = setInterval(fn,1000);
    </script>
</body><style>
* {
margin: 0;
padding: 0;
}
.bigbox {
position: absolute;
top: 50%;
left: 50%;
width: 200px;
height: 250px;
transform: translate(-50%, -50%);
background-color: red;
box-shadow: 0 5px 5px rgba(300, 50, 50, .5);
}
h3 {
padding-top: 15px;
color: #fff;
text-align: center;
font-size: 40px;
}
p {
margin-top: 5px;
text-align: center;
color: #fff;
opacity: .7;
}
h4 {
margin-top: 20px;
text-align: center;
color: #fff;
font-size: 30px;
opacity: .9;
}
.box {
margin: 0 auto;
margin-top: 32px;
width: 160px;
display: flex;
justify-content: space-between;
}
.box div {
width: 50px;
height: 50px;
color: #fff;
font-weight: 700;
text-align: center;
line-height: 50px;
font-size: 16px;
background-color: black;
}
</style>
</head>
<body>
<div class="bigbox">
<h3>欧冠决赛</h3>
<p>UEFA Champions Final</p>
<h4>倒计时</h4>
<div class="box">
<div></div>
<div></div>
<div></div>
</div>
</div>
<script>
// ① 这个倒计时是不断变化的,因此需要定时器来自动变化(setInterval)
// ② 三个黑色盒子里面分别存放时分秒
// ③ 三个黑色盒子利用innerHTML 放入计算的小时分钟秒数
// ④ 第一次执行也是间隔毫秒数,因此刚刷新页面会有空白
// ⑤ 最好采取封装函数的方式, 这样可以先调用一次这个函数,防止刚开始刷新页面有空白问题
//封装一个函数,传入实参(时间),就会产生倒计时。
function fn(imputTime1) {
//获取元素
var box = document.querySelector('.box');
var imputTime = new Date(imputTime1);
//先调用一下函数,解决刷新页面后数字空白现象
fn();
//设定一个倒计时,每隔一秒就执行一次。
var timer = setInterval(fn, 1000);
function fn() {
var nowTime = new Date();
var value = (imputTime.valueOf() - nowTime.valueOf()) / 1000;
var h = parseInt(value / 60 / 60 % 24)
h = h < 10 ? '0' + h : h;
box.children[0].innerHTML = h;
var m = parseInt(value / 60 % 60);
m = m < 10 ? '0' + m : m;
box.children[1].innerHTML = m;
var s = parseInt(value % 60);
s = s < 10 ? '0' + s : s;
box.children[2].innerHTML = s;
}
}
//输入结束的时间
fn('2022-5-29 03:00:00');
</script>
</body>
3.5 停止 setInterval() 定时器
window.clearInterval(intervalID);
<body>
    <script>
        // setInterval() 定时器
        function fn() {
            for (var i = 1; i <= 5; i++) {
                console.log(i);
            }
        }
        var timer = setInterval(fn, 1000);
        // 停止 setInterval() 定时器window.clearInterval(intervalID);
        clearInterval(timer);
    </script>
</body><body>
<form action="" id="">
<input type="text">
<button>发送</button>
</form>
<script>
// 按钮点击之后,会禁用 disabled 为true
// 同时按钮里面的内容会变化, 注意 button 里面的内容通过 innerHTML修改
// 里面秒数是有变化的,因此需要用到定时器
// 定义一个变量,在定时器里面,不断递减
// 如果变量为0 说明到了时间,我们需要停止定时器,并且复原按钮初始状态。
//点击按钮后,该按钮60秒之内不能再次点击,防止重复发送短信
var btn = document.querySelector('button');
btn.addEventListener('click', fn);
function fn() {
//禁用按钮
this.disabled = true;
//声明一个倒计时变量
var time = 60;
btn.innerHTML = time;
//设置定时器
var timer = setInterval(fn, 1000);
function fn() {
//每一秒就会让time自减一下
time--;
//把值给btn
btn.innerHTML = time;
// 判断当到了0秒后,就会停止定时器,解禁按钮
if (time == 0) {
clearInterval(timer);
btn.disabled = false;
btn.innerHTML = '发送';
}
};
}
</script>
</body>
3.6 this指向问题
4. JS 执行机制
4.1 JS 是单线程
4.2同步和异步
4.3 JS 执行机制
5. location 对象
5.1 什么是 location 对象
5.2 URL


<body>
<button>点我跳转页面</button>
<script>
//案例: 5秒钟之后自动跳转页面
var btn = document.querySelector('button');
btn.addEventListener('click', fn)
function fn() {
var time = 5;
document.body.innerHTML = '还有' + time + '秒跳转页面...';
var timer = setInterval(fn, 1000);
function fn() {
time--;
document.body.innerHTML = '还有' + time + '秒跳转页面...';
if (time == 0) {
location.href = 'http://www.itcast.cn';
clearInterval(timer);
}
};
}
</script>
</body><body>
<form action="02案例: 获取 URL 参数数据.html">
用户名:<input type="text" name="uname">
<input type="submit" value="登录">
</form>
</body><body>
<div></div>
<script>
// ① 第一个登录页面,里面有提交表单, action 提交到 index.html页面
// ② 第二个页面,可以使用第一个页面的参数,这样实现了一个数据不同页面之间的传递效果
// ③ 第二个页面之所以可以使用第一个页面的数据,是利用了URL 里面的 location.search参数
// ④ 在第二个页面中,需要把这个参数提取。
// ⑤ 第一步去掉? 利用 substr
// ⑥ 第二步 利用=号分割 键 和 值 split(‘=‘)
// ⑦ 第一个数组就是键 第二个数组就是值
// console.log(location.search);
// 1.截取字符串
var params = location.search.substr(1);//uname = red;
// 2.利用=把字符串分割为数组 split('=');
var arr = params.split('=');
// 3.把用户名打印出来
// console.log(arr[1]);
var div = document.querySelector('div');
div.innerHTML = arr[1];
</script>
</body>5.4 location 对象的方法

6. navigator 对象
<body>
    <script>
        if ((navigator.userAgent.match(/(phone|pad|pod|iPhone|iPod|ios|iPad|Android|
Mobile | BlackBerry | IEMobile | MQQBrowser | JUC | Fennec | wOSBrowser | BrowserNG | WebOS
            | Symbian | Windows Phone) / i))) {
            window.location.href = ""; //手机
        } else {
            window.location.href = ""; //电脑
        }
    </script>
</body>7. history 对象


The above is the detailed content of BOM browser object model analysis. For more information, please follow other related articles on the PHP Chinese website!