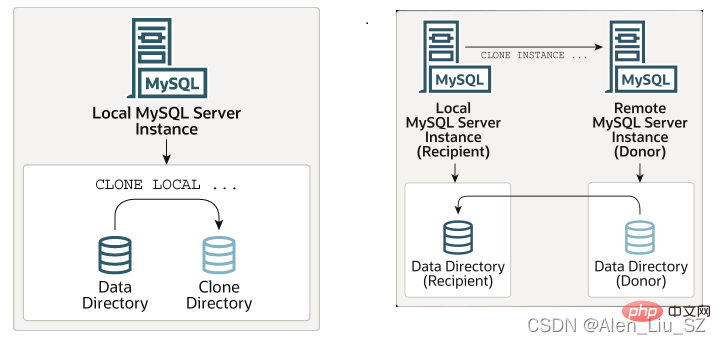
This article brings you relevant knowledge about mysql, which mainly introduces issues related to clone. MySQL 8.0.17 introduces the Clone plug-in, which can be performed locally or from a remote MySQL server. Clone the instance, I hope it will be helpful to everyone.

Recommended learning: mysql tutorial
MySQL 8.0. 17 introduced the Clone plug-in, which can be cloned locally or from a remote MySQL server instance. The cloned data is a physical snapshot of the data stored in InnoDB, including schemas, tables, tablespaces and data dictionary metadata. Cloning operations include local cloning and remote cloning.
Local cloning operation: Remote clone operation:

Use the clone plug -in for cloning operation. You must first perform a plug -in Installation and configuration. The name of the plug-in is mysql_clone.so, and there are two ways to install it.
The MySQL database plug-in is placed in the directory corresponding to the system variable plugin_dir by default. Use the --plugin-load-add option to load the plug-in when the MySQL server starts. However, this method requires you to specify the corresponding options every time you start the server, which can be configured in the my.cnf file, that is:
[mysqld]
plugin-load-add=mysql_clone.so
Load the plug-in at runtime, Use INSTALL PLUGIN to install and register the plug-in in the mysql.plugin system table:
install plugin clone soname 'mysql_clone.so';
After installation, it can be viewed in the information_schema.plugins table or through show plugins.
Local clone data is to clone the MySQL data directory to the same server or node to another directory. The supported syntax is as follows,
CLONE LOCAL DATA DIRECTORY [=] '/path/to/clone_dir'
Execute the above statement, corresponding The user needs to have BACKUP_ADMIN permissions, and the files or tablespaces created by the user must be in the data directory. At the same time, the destination of cloning needs to specify an absolute path. The full path to the directory must exist, but clone_dir must not exist.
1) Create user
mysql> select version();
+-----------+
| version() |
+-----------+
| 8.0.25 |
+-----------+
1 row in set (0.00 sec)
mysql> create user clone_admin identified by 'Cl0neTest';
Query OK, 0 rows affected (0.02 sec)
mysql> grant backup_admin on *.* to clone_admin;
Query OK, 0 rows affected (0.10 sec)
2) Create directory
[root@node1 ~]# mkdir /mysql/clone/
[root@node1 ~]# chown -R mysql:mysql /mysql/clone/
3) Clone operation
mysql> clone local data directory='/mysql/clone/clone_data';
Query OK, 0 rows affected (17.09 sec)
4) View the cloned file
[root@node1 ~]# ll /mysql/clone/clone_data/
total 6348816
drwxr-x---. 2 mysql mysql 89 Nov 28 11:26 #clone
-rw-r-----. 1 mysql mysql 9231 Nov 28 11:26 ib_buffer_pool
-rw-r-----. 1 mysql mysql 4294967296 Nov 28 11:26 ibdata1
-rw-r-----. 1 mysql mysql 1073741824 Nov 28 11:26 ib_logfile0
-rw-r-----. 1 mysql mysql 1073741824 Nov 28 11:26 ib_logfile1
drwxr-x---. 2 mysql mysql 6 Nov 28 11:26 mysql
-rw-r-----. 1 mysql mysql 25165824 Nov 28 11:26 mysql.ibd
drwxr-x---. 2 mysql mysql 4096 Nov 28 11:26 sakila
drwxr-x---. 2 mysql mysql 28 Nov 28 11:26 sys
-rw-r-----. 1 mysql mysql 16777216 Nov 28 11:26 undo_001
-rw-r-----. 1 mysql mysql 16777216 Nov 28 11:26 undo_002
5) Verify, use the cloned directory to start the database
[root@node1 ~]# service mysql.server stop
Shutting down MySQL.... SUCCESS!
[root@node1 ~]# mysqld_safe --datadir=/mysql/clone/clone_data/ --lower-case-table-names=1 --user=mysql
2021-11-28T03:47:11.012900Z mysqld_safe Logging to '/mysql/clone/clone_data/node1.com.cn.err'.
2021-11-28T03:47:11.036181Z mysqld_safe Starting mysqld daemon with databases from /mysql/clone/clone_data
Clone the remote MySQL server instance (donor) and It is transmitted to the MySQL instance (recipient) that performs the cloning operation. The supported syntax for cloning remote data is as follows:
CLONE INSTANCE FROM 'user'@'host':port
IDENTIFIED BY 'password'
[ DATA DIRECTORY [ = ] 'clone_dir' ]
[ REQUIRE [ NO ] SSL ]
where
To perform a clone operation, the clone plug-in must be in donor and recipient MySQL The server instance is activated. In the donor server instance, cloning users requires BACKUP_ADMIN permissions. In the recipient server instance, cloning users requires CLONE_ADMIN permissions. CLONE_ADMIN permissions include BACKUP_ADMIN and SHUTDOWN permissions.
The following prerequisites must be met to execute the CLONE INSTANCE statement:
默认将数据克隆到recipient端的数据目录,并使用donor的数据进行覆盖,然后进行自动重启recipient端的MySQL服务器实例
1)登录到donor MySQL服务器实例,创建用户并安装插件(若安装可忽略)
mysql> create user 'donor_clone_user' identified by 'donor_clone_user';
Query OK, 0 rows affected (0.02 sec)
mysql> grant backup_admin on *.* to donor_clone_user;
Query OK, 0 rows affected (0.01 sec)
2)登录到recipient MySQL服务器实例,创建账户并安装插件,并设置clone_valid_donor_list
mysql> create user recipient_clone_user identified by 'recipient_clone_user';
Query OK, 0 rows affected (0.04 sec)
mysql> grant clone_admin,backup_admin on *.* to recipient_clone_user;
Query OK, 0 rows affected (0.01 sec)
mysql> install plugin clone soname 'mysql_clone.so';
Query OK, 0 rows affected (0.01 sec)
mysql> set global clone_valid_donor_list='192.168.56.53:3306';
Query OK, 0 rows affected (0.00 sec)
3)登录到recipient MySQL服务器实例,使用 recipient_clone_user用户或root用户执行克隆操作,操作完成后会自动重启
mysql> clone instance from 'donor_clone_user'@'192.168.56.81':3306 identified by 'donor_clone_user';
Query OK, 0 rows affected (51.08 sec)
注:将donor的数据克隆到recipient端默认会覆盖其数据文件,也可以指定一个目录进行克隆,如下:
mysql> clone instance from 'donor_clone_user'@'192.168.56.81':3306 identified by 'donor_clone_user' data directory='/mysql/clone/clone_data';
Query OK, 0 rows affected (51.17 sec)
使用新目录启动MySQL服务器实例:
[root@node2 clone]# mysqld --lower-case-table-names=1 --datadir=/mysql/clone/clone_data/ --user=mysql &
推荐学习:mysql视频教程
The above is the detailed content of MySQL detailed analysis of Clone plug-in. For more information, please follow other related articles on the PHP Chinese website!