The example in this article describes the method of realizing Tab linkage between horizontal and vertical tabs using JS. Share it with everyone for your reference. The details are as follows:
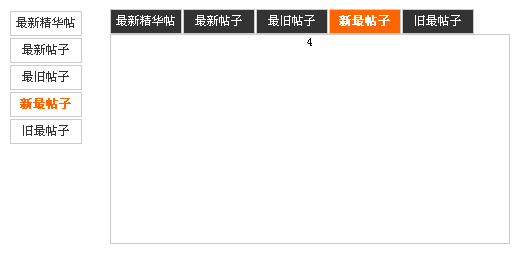
This is a horizontal and vertical linkage tab. The content of the card is the same, but there is an additional operation method. When one tab is clicked, the other tab will also indicate the corresponding option. The card position, that is, the functions of both are the same, which is a very clever layout method.
The screenshot of the running effect is as follows:

The online demo address is as follows:
http://demo.jb51.net/js/2015/js-hx-sx-tab-ld-demo/
The specific code is as follows:
<!DOCTYPE html PUBLIC "-//W3C//DTD XHTML 1.0 Transitional//EN"
"http://www.w3.org/TR/xhtml1/DTD/xhtml1-transitional.dtd">
<html xmlns="http://www.w3.org/1999/xhtml">
<head>
<meta http-equiv="Content-Type" content="text/html; charset=utf-8" />
<title>选项卡Tab联动</title>
<style type="text/css">
body{text-align:center;margin:0;padding:0;font-size:12px;}
div,form,img,ul,ol,li,dl,dt,dd{margin:0;padding:0;border:0;}
h1,h2,h3,h4,h5,h6,p,table,td{margin:0;padding:0;font-size:12px;}
li{list-style:none;}
#layout{width:500px;margin:10px auto;}
#tabnav{width:80px;float:left;}
#tabnav li{float:left;width:70px;height:23px;line-height:23px;cursor:pointer;border:1px solid #ccc;margin:2px 0 0 0;display:inline;color:#333;}
#tabnav li.current{color:#f60;font-weight:bold;}
#tab{width:400px;height:235px;float:right;}
#tab ul{width:400px;height:24px;}
#tab li{float:left;width:70px;height:23px;line-height:23px;cursor:pointer;border:1px solid #ccc;margin:0 1px 0 0;display:inline;background:#333;color:#fff;}
#tab li.current{background:#f60;font-weight:bold;}
#tab .tabcon{float:left;width:398px;height:208px;display:none;border:1px solid #ccc;}
#tab .block{display:block;}
</style>
</head>
<body>
<div id="layout">
 <ul id="tabnav">
  <li onclick="go_to(1);" class="current">最新精华帖</li>
  <li onclick="go_to(2);">最新帖子</li>
  <li onclick="go_to(3);">最旧帖子</li>
  <li onclick="go_to(4);">新最帖子</li>
  <li onclick="go_to(5);">旧最帖子</li>
 </ul>
 <div id="tab">
  <ul id="tabnav02">
   <li onclick="go_to(1);" class="current">最新精华帖</li>
   <li onclick="go_to(2);">最新帖子</li>
   <li onclick="go_to(3);">最旧帖子</li>
   <li onclick="go_to(4);">新最帖子</li>
   <li onclick="go_to(5);">旧最帖子</li>
  </ul>
  <div id="tabcon_1" class="tabcon block">
   1
  </div>
  <div id="tabcon_2" class="tabcon">
   2
  </div>
  <div id="tabcon_3" class="tabcon">
   3
  </div>
  <div id="tabcon_4" class="tabcon">
   4
  </div>
  <div id="tabcon_5" class="tabcon">
   5
  </div>
  <script type="text/javascript">
  <!--
  var h=document.getElementById("tabnav").getElementsByTagName("li");
  var d=document.getElementById("tabnav02").getElementsByTagName("li");
  function go_to(s){
   for(var i=1;i<=h.length;i++){
    if(s==i){
    h[i-1].className="current";
    d[i-1].className="current";
    document.getElementById("tabcon_"+i).className="tabcon block";
    }
    else{
    h[i-1].className="";
    d[i-1].className="";
    document.getElementById("tabcon_"+i).className="tabcon";
    }
   }
  }
  //-->
  </script>
 </div>
</div>
</body>
</html>I hope this article will be helpful to everyone’s JavaScript programming.


