Foreword
This is a timeline plug-in that can be used to display history and plans. It is especially suitable for some websites to display development processes, major events, etc. This plug-in is based on jQuery and can slide switching, horizontal and vertical scrolling, and supports keyboard arrow keys. After expansion, it can support mouse wheel events.
HTML
We create a div #timeline in the body as the display area, #dates is the timeline, in the example we use year as the main axis, #issues as the content display area, that is, display the content corresponding to the year of the main axis point, pay attention to the corresponding ID .
<div id="timeline">
  <ul id="dates">
   <li><a href="#2011">2011</a></li>
   <li><a href="#2012">2012</a></li>
  </ul>
  <ul id="issues">
   <li id="2011">
     <p>Lorem ipsum.</p>
   </li>
   <li id="2012">
     <p>分享生活 留住感动</p>
   </li>
  </ul>
  <a href="#" id="next">+</a> <!-- optional -->
  <a href="#" id="prev">-</a> <!-- optional -->
</div>
jQuery Timelinr depends on jQuery, so the jQuery library and jQuery Timelinr plug-in must be loaded in html first.
<script type="text/javascript" src="jquery-1.8.2.min.js"></script>
<script type="text/javascript" src="jquery.timelinr-0.9.53.js"></script>
css
Next, use CSS to layout. You can set different CSS to control whether the timeline is arranged horizontally or vertically. You can play it freely according to your needs. The following is a vertical arrangement, that is, a style for vertical scrolling.
#timeline {width: 760px;height: 440px;overflow: hidden;margin: 40px auto;
position: relative;background: url('dot.gif') 110px top repeat-y;}
#dates {width: 115px;height: 440px;overflow: hidden;float: left;}
#dates li {list-style: none;width: 100px;height: 100px;line-height: 100px;font-size: 24px;
 padding-right:20px; text-align:right; background: url('biggerdot.png') 108px center no-repeat;}
#dates a {line-height: 38px;padding-bottom: 10px;}
#dates .selected {font-size: 38px;}
#issues {width: 630px;height: 440px;overflow: hidden;float: right;}
#issues li {width: 630px;height: 440px;list-style: none;}
#issues li h1 {color: #ffcc00;font-size: 42px; height:52px; line-height:52px;
 text-shadow: #000 1px 1px 2px;}
#issues li p {font-size: 14px;margin: 10px;line-height: 26px;}
jQuery
Calling the timeline plug-in is very simple, execute the following code:
$(function(){
  $().timelinr({
      orientation:'vertical'
  });
});
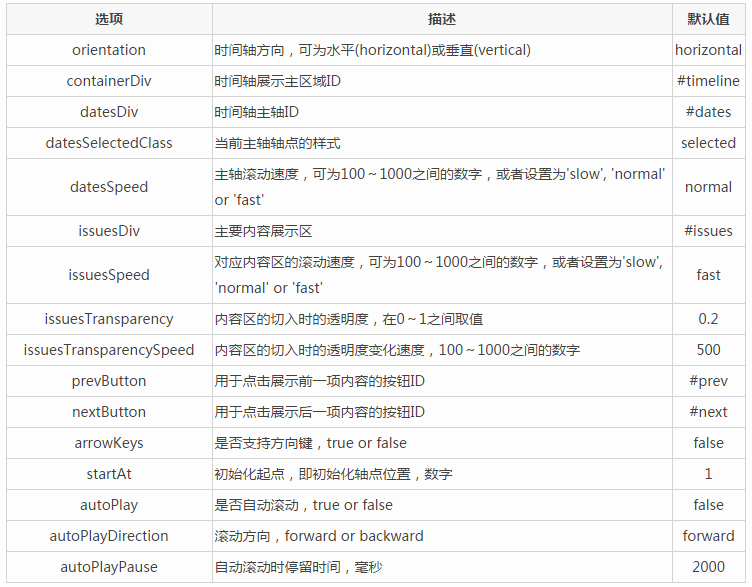
jQuery Timelinr provides many configurable options that can be set according to your needs. As shown in the picture:

Support roller drive
In addition, the current jQuery Timelinr does not support mouse wheel driver. In fact, we can slightly extend the plug-in to support mouse wheel driver. Here we need to use the wheel time plug-in: jquery.mousewheel.js
After downloading the plug-in, import it on the page:
Then, modify jquery.timelinr-0.9.53.js and add the following code at about line 260:
//--------------Added by helloweba.com 20130326----------
if(settings.mousewheel=="true") { //支持滚轮
  $(settings.containerDiv).mousewheel(function(event, delta, deltaX, deltaY){
    if(delta==1){
      $(settings.prevButton).click();
    }else{
      $(settings.nextButton).click();
    }
  });
}
We have blocked the buttons prevButton and nextButton in the example. When the wheel event is set to support, the wheel up is equivalent to clicking the prevButton, and the wheel down is equivalent to clicking the nextButton.
Finally, after using the following code, the entire timeline can support wheel events
$(function(){
  $().timelinr({
    mousewheel:  'true'
  });
});


