


How to use zoom in premiere

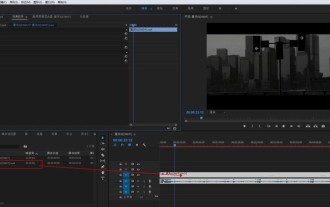
How to use zoom in Premiere: First move the timeline to the location that needs to be zoomed in, hold down the slider pointed by the arrow and slide it to the left to zoom in; then directly drag the slider to the right. The shortcut key is the minus sign [-] to zoom out.

The operating environment of this article: Windows 7 system, Adobe Premiere Pro 2020 version, Dell G3 computer.
Recommended (free): premiere tutorial
How to use zoom in premiere:
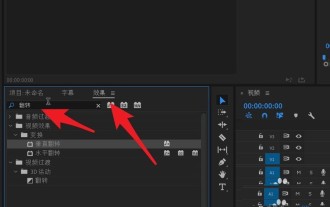
1. In the pr timeline panel, move the timeline to the position that needs to be enlarged

2. Press and hold the slider pointed by the arrow to the left Slide

#3. In this way, the track position of the timeline is enlarged, which is more convenient for us to edit. The shortcut key is to directly press the plus sign on the keyboard

4. Similarly, if you want to narrow the view range, drag the slider directly to the right. The shortcut key is the minus sign-

5. In this way, we will be able to zoom in and out of the track view by dragging the slider or pressing keyboard shortcuts in PR

The above is the detailed content of How to use zoom in premiere. For more information, please follow other related articles on the PHP Chinese website!

Hot AI Tools

Undresser.AI Undress
AI-powered app for creating realistic nude photos

AI Clothes Remover
Online AI tool for removing clothes from photos.

Undress AI Tool
Undress images for free

Clothoff.io
AI clothes remover

Video Face Swap
Swap faces in any video effortlessly with our completely free AI face swap tool!

Hot Article
Hot Tools

Notepad++7.3.1
Easy-to-use and free code editor

SublimeText3 Chinese version
Chinese version, very easy to use

Zend Studio 13.0.1
Powerful PHP integrated development environment

Dreamweaver CS6
Visual web development tools

SublimeText3 Mac version
God-level code editing software (SublimeText3)
Hot Topics
 1386
1386
 52
52

 Display scaling guide on Windows 11
Sep 19, 2023 pm 06:45 PM
Display scaling guide on Windows 11
Sep 19, 2023 pm 06:45 PM
We all have different preferences when it comes to display scaling on Windows 11. Some people like big icons, some like small icons. However, we all agree that having the right scaling is important. Poor font scaling or over-scaling of images can be a real productivity killer when working, so you need to know how to customize it to get the most out of your system's capabilities. Advantages of Custom Zoom: This is a useful feature for people who have difficulty reading text on the screen. It helps you see more on the screen at one time. You can create custom extension profiles that apply only to certain monitors and applications. Can help improve the performance of low-end hardware. It gives you more control over what's on your screen. How to use Windows 11
 Recommended desktop computer configuration for video editing
Apr 22, 2024 am 10:07 AM
Recommended desktop computer configuration for video editing
Apr 22, 2024 am 10:07 AM
Install a computer mainly used for video editing: Lenovo ThinkPad X1: X1 has a built-in active stylus, the keyboard automatically retracts in tablet mode, and supports fast charging. The X1 has a solid black appearance and a 4KHDR screen, making it easy to edit videos, program software, etc. The downside is that the Ethernet port requires a dedicated adapter. Regarding memory issues: It is recommended to use memory modules of 16G or above. Because in order for the computer to edit high-definition videos without lagging, large memory is a necessary configuration. On the hard drive issue: Two hard drives can be installed. Monitor: Choose a high-resolution monitor for clearer viewing and editing of video footage. A monitor with 4k resolution or above is recommended. Operating system: Common editing software such as Adobe Premiere
 What is the solution to jitter and shaking in video editing? Why is the screen shaking?
May 02, 2024 am 11:37 AM
What is the solution to jitter and shaking in video editing? Why is the screen shaking?
May 02, 2024 am 11:37 AM
Video editing has become a very important industry. During the video editing process, screen jitter and shaking are a common problem, which has a great impact on the quality of the video. So, what is the solution to screen jitter and shaking? 1. What is the solution to jitter and shaking in video editing? 1. Use a stabilizer. A stabilizer is an important piece of equipment during video shooting. It can effectively reduce the shake and shaking of the picture. During the video editing process, if the original video image is jittery and shaking, you can use a stabilizer to process the image to make it more stable. Use a stabilizer to make the picture more stable. 2. Stabilization function in video editing software Nowadays, most video editing software has the function of stabilizing the picture.
 Safari zoom issue on iPhone: Here's the fix
Apr 20, 2024 am 08:08 AM
Safari zoom issue on iPhone: Here's the fix
Apr 20, 2024 am 08:08 AM
If you don't have control over the zoom level in Safari, getting things done can be tricky. So if Safari looks zoomed out, that might be a problem for you. Here are a few ways you can fix this minor zoom issue in Safari. 1. Cursor magnification: Select "Display" > "Cursor magnification" in the Safari menu bar. This will make the cursor more visible on the screen, making it easier to control. 2. Move the mouse: This may sound simple, but sometimes just moving the mouse to another location on the screen may automatically return it to normal size. 3. Use Keyboard Shortcuts Fix 1 – Reset Zoom Level You can control the zoom level directly from the Safari browser. Step 1 – When you are in Safari
 How to zoom pages side by side in word
Mar 19, 2024 pm 07:19 PM
How to zoom pages side by side in word
Mar 19, 2024 pm 07:19 PM
When we use word documents to edit files, sometimes there are many pages. We want to display them side by side and check the overall effect. However, because we don’t know how to operate, we often need to scroll for a long time to view page by page. I don’t know if you have ever encountered a similar situation. In fact, we can easily solve it at this time as long as we learn how to set the word zoom pages side by side. Below, let’s take a look and learn together. First, we create and open a new page in the Word document, and then enter some simple content to make it easier to distinguish. 2. For example, if we want to realize word zoom and side-by-side display, we need to find [View] in the menu bar, and then select [Multiple Pages] in the view tool options, as shown in the figure below: 3. Find [Multiple Pages] and click,
 How to make dynamic watermark in Premiere_How to make dynamic watermark in Premiere
Apr 29, 2024 pm 04:30 PM
How to make dynamic watermark in Premiere_How to make dynamic watermark in Premiere
Apr 29, 2024 pm 04:30 PM
1. Open the PR software, create a new project, import the video material and put it on the track. 2. Use the text tool to add watermark text. I used XXX instead. You can also put a pre-made watermark LOGO picture. 3. In the opacity, lower the parameters appropriately so that the watermark is not too eye-catching. 4. Add key frames to the position. From the beginning to the end, move the watermark position every once in a while. The parameters are arbitrary and key frames are created every time. 5. Click play and you can see the dynamic watermark moving around the screen.
 How to blur video edges in Premiere_How to set feathered video edges in Premiere
May 08, 2024 pm 02:16 PM
How to blur video edges in Premiere_How to set feathered video edges in Premiere
May 08, 2024 pm 02:16 PM
1. First, let’s import a piece of material for demonstration. 2. Drag the material into the timeline panel. 3. Let’s take a look at the material. We can find that the edges of the fallen leaves in the lower half are stiff, which is not ideal for blending into such a scene. So I'm going to blur the edges of it. 4. Find it in the effects panel and double-click the feather edge to add the effect. 5. Adjust the blur amount so that the edges can achieve a blurred effect. 6. Take a look at the effect after processing. You can find that the edges of the fallen leaves have been blurred. Similarly, this method can be used in different scenarios. Friends can use this example to draw inferences. 7. Finally, let’s take a look at the finished animation effect.
 How to mirror flip pr2020 video_How to mirror flip pr2020 video
Apr 29, 2024 pm 03:00 PM
How to mirror flip pr2020 video_How to mirror flip pr2020 video
Apr 29, 2024 pm 03:00 PM
Start by searching for the Flip effect in the Effects panel. You can see vertical flipping and horizontal flipping in the picture below. The horizontal flip can realize the left and right swap of the video. The character in the original video is on the right side of the video. Then hold down the left mouse button and drag to the video track for horizontal flip effect. At this point you can see that the video has been flipped left and right. The person in the video appears on the left. The flipped video can have objects within it masked.
