


How to build a PHP environment under Linux: first obtain the PHP, Apache and MySQL installation packages; then install Apache and modify the configuration file httpd.conf; then install MySQL and make basic configurations; finally install PHP and configure php.ini is enough.

Recommended: "PHP Video Tutorial"
LAMP is a very popular web development environment at the moment. Many developers will encounter various problems in the process of building LAMP. Thinking of these problems, their heads are about to explode. Today, I specially took the time to record the process of building a PHP development environment for everyone's reference. If you find any problems, I hope you can correct them.
1. Obtain the installation package
2. Install Apache
1. Dependencies Package installation
1) Install compiler gcc, gcc-c
yum install -y gcc gcc-c++Copy after login2) Install dependent packages expat-devel, zlib-devel, openssl-devel
yum install -y expat-devel zlib-devel openssl-develCopy after login2) Install the dependent package apr
wget http://mirror.bit.edu.cn/apache//apr/apr-1.6.2.tar.gz
tar zxvf apr-1.6.2.tar.gzcd apr-1.6.2
./configure --prefix=/usr/local/apr
make && make install
Copy after login3) Install the dependent package apr-util
wget http://mirror.bit.edu.cn/apache//apr/apr-util-1.6.0.tar.gz
tar zxvf apr-util-1.6.0.tar.gzcd apr-util-1.6.0
./configure --prefix=/usr/local/apr-util --with-apr=/usr/local/apr
make && make install
Copy after login4) Install the dependent package pcre
wget https://ftp.pcre.org/pub/pcre/pcre-8.41.tar.gz
tar zxvf pcre-8.41.tar.gzcd pcre-8.41
./configure --prefix=/usr/local/pcre
make && make install
Copy after loginNote: Replace apr, apr-util Copy the installation package to the srclib directory of the Apache installation package
Named apr, apr-util respectively, without the subsequent version number
2. Installation process
1) Unzip the Apache installation package
tar zxvf httpd-2.4.28.tar.gzCopy after login2) Compile and install
cd httpd-2.4.28
./configure --prefix=/usr/local/server/apache \
--with-apr=/usr/local/apr \
--with-apr-util=/usr/local/apr-util \
--with-pcre=/usr/local/pcre \
--enable-so \
--enable-ssl \
--enable-deflate \
--enable-rewrite \
--enable-headers \
--enable-expires \
--disable-cgid\
--disable-cgi
make && make install
Copy after login
3. Modify the configuration file httpd.conf
vim /usr/local/server/apache/conf/httpd.confCopy after loginRemove
# in front of ServerName and change the URL after ServerName to localhost:80
4. Add httpd to the system service and set it to start automatically at boot
1) Add httpd to the system service
cp /usr/local/server/apache/bin/apachectl /etc/init.d/httpdCopy after login2) Modify /etc/init.d/httpd and add the following content in line 3
# chkconfig: 345 85 15# description: Activates/Deactivates Apache Web ServerCopy after loginNote: The # in the code cannot be removed
3) Set the system service to start automatically at boot
systemctl enable httpdCopy after login4) Start Apache
service httpd startCopy after login
3. Install MySQL
1. Preparation before installation
1) Unzip the installation package
tar zxvf mysql-5.7.19-linux-glibc2.12-x86_64.tar.gz
mv mysql-5.7.19-linux-glibc2.12-x86_64 /usr/local/server/mysql
Copy after login2) Create users and user groups and assign corresponding permissions
groupadd mysql
useradd -r -g mysql mysql -s /sbin/nologin
Copy after login3) Install dependencies
yum -y install numactl.x86_64Copy after login
2. Initialize mysql and do basic configuration
1) Initialize mysql
cd /usr/local/server/mysql
bin/mysqld \
--initialize \
--user=mysql \
--basedir=/usr/local/server/mysql \
--datadir=/usr/local/server/mysql/data \
Copy after login2) Configure mysql
vim my.cnf # 创建配置文件Copy after loginThis example only ensures that mysql can run normally. For more configuration, please refer to the official documentation
[mysqld]
skip-grant-tablesbasedir   = /usr/local/server/mysqldatadir   = /usr/local/server/mysql/datasocket    = /usr/local/server/mysql/data/mysql.socklog-error = /usr/local/server/mysql/log/error.logport      = 3306[mysql_safe]pid-file  = /var/run/mysql/mysqld.pidlog-error = /usr/local/server/mysql/log/error.log[client]port   = 3306socket = /usr/local/server/mysql/data/mysql.sock
Copy after loginSoftly link the configuration file to the /etc/ directory
ln -s /usr/local/server/mysql/my.cnf /etc/my.cnfCopy after loginNote: If you are prompted that the file exists when creating a soft link, you can delete /etc/my.cnf and then create a soft link
3) Create the directories and files required for database storage information
mkdir /usr/local/server/mysql/data
mkdir /usr/local/server/mysql/log
mkdir /var/run/mysql
touch /usr/local/server/mysql/log/error.log
Copy after login4) Set the directory owner
chown -R mysql:mysql /usr/local/server/mysql/
chown -R mysql:mysql /var/run/mysql/
Copy after login
3. Set environment variables and auto-start
1) Set environment variables
Edit profile file
vim /etc/profileCopy after loginAdd the following information to the end of profile
export PATH=$PATH:/usr/local/server/mysql/binCopy after loginMake the environment variables take effect immediately
source /etc/profileCopy after login2) Set up auto-start at boot
cp support-files/mysql.server /etc/init.d/mysqld
chkconfig --add mysqld
chkconfig mysqld on
Copy after login
4. Firewall settings
CentOS has the firewall enabled by default. Below we use firewall to open the 3306l port
1) Let’s check before opening it. Is port 3306 open?
firewall-cmd --query-port=3306/tcpCopy after login2) If not, open the firewall firewall
systemctl start firewalld.serviceCopy after login3) We can choose to temporarily open or permanently open port 3306
firewall-cmd --add-port=3306/tcp  # 临时开启3306端口
firewall-cmd --permanent --zone=public --add-port=3306/tcp  # 永久开启3306端口
Copy after login4) Restart the firewall
firewall-cmd --reloadCopy after login
5. Start mysql and set the root user password
1) Start mysql
/usr/local/server/mysql/support-files/mysql.server start  # 启动MySQL
/usr/local/server/mysql/bin/mysql -uroot -p  # 这里直接回车,无须输入密码
Copy after login2) Set the root user password
use mysql;update user set authentication_string=password('root') where user='root';
exit;
Copy after loginNote 1: After successfully changing the password, log out of skip-grant-tables in the configuration file
Restart mysql and log in again using the root user, and then execute the following code
set password=password('root');Copy after loginNote 2: Second It is a system requirement to reset the password once, otherwise the database cannot be operated
6. Remote access
1) Give any host permission to access mysql
GRANT ALL PRIVILEGES ON *.* TO 'root'@'%' IDENTIFIED BY 'your password' WITH GRANT OPTION;Copy after login2) Make the permission modification take effect
FLUSH PRIVILEGES;Copy after login
4. Install PHP
1. Installation steps
1) Installation Dependency package libxml-devel
yum -y install libxml2-develCopy after login2) Unzip the PHP installation package
tar zxvf php-7.1.10.tar.gzCopy after login3) Compile and install
cd php-7.1.10
./configure --prefix=/usr/local/server/php \
--with-apxs2=/usr/local/server/apache/bin/apxs \
--with-config-file-path=/usr/local/server/php \
--with-pdo-mysql
make && make install
Copy after login
2. Configure php. ini
1) Copy the configuration file to the PHP installation directory
cp php.ini-* /usr/local/server/php/Copy after login2) Generate php.ini
cp php.ini-development /usr/local/server/php/php.iniCopy after login
3 . Modify httpd.conf
to load the PHP module. If there is the following code in httpd.conf, just remove the preceding #. If not, add
LoadModule php7_module modules/libphp7.soCopy after loginand add the following code at the bottom. Enable Apache to parse php files
<IfModule mod_php7.c> AddType application/x-httpd-php .php</IfModule>Copy after login找到如下代码,在index.html后面加入index.php
<IfModule dir_module> DirectoryIndex index.html</IfModule>Copy after login重启Apache
service httpd restartCopy after login
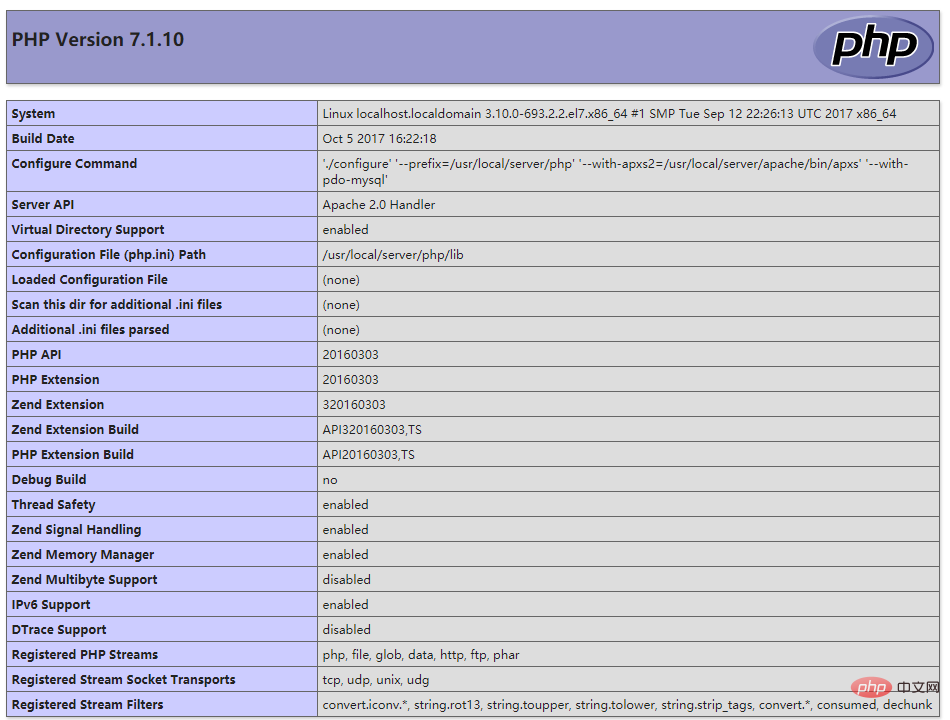
4. 测试PHP是否成功安装
创建/usr/local/server/apache/htdocs/index.php
vim /usr/local/server/apache/htdocs/index.phpCopy after login在index.php中编写以下代码
<?php

   phpinfo();?>
Copy after login如果出现以下页面则安装成功
The above is the detailed content of Tutorial on setting up PHP environment under Linux. For more information, please follow other related articles on the PHP Chinese website!


![[Web front-end] Node.js quick start](https://img.php.cn/upload/course/000/000/067/662b5d34ba7c0227.png)


