
Apache PHP MySQL phpMyAdmin environment construction
1. Install Apache
(1) Download an Apache installation package and unzip it:

(2) Enter the conf directory, open httpd.conf with Notepad or other text editor, and make the following changes:
a. Change directory

Please change to the directory where your server is located
b. If you want to change the server listening port (not necessary):

c. In order to associate it with php, add at the end of the file:

There are 283 lines left (in the picture below ), plus index.php and index.htm (index is also the default page for opening the server. In other words, if you want to open a page by default, name it index):

(3) Enter the Apache24/bin directory on the command line and enter the following command to install:

If you want to change the server name, add -n after it and parameters.
(4) The server should have been installed. There are many ways to open the server. You can use the command line or ApacheMonitor.
Open the browser and enter localhost to access. If the page appears, it means that the apache server has been installed and running.
2. Configure PHP
(1) Download php and unzip it. Note that the VC version must be matched with apache. Mine is:

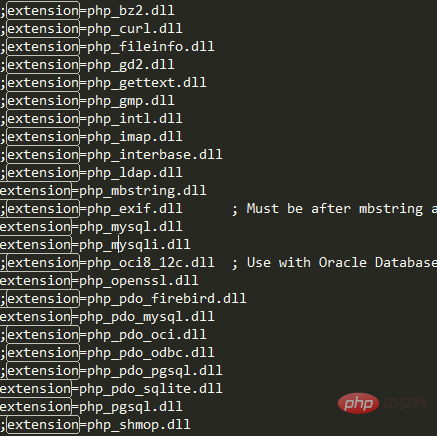
(2) Find php.ini-development under the folder, copy one in the current folder, and rename it to php.ini, open it, and make the following modifications:

These are the expansion packages to be used. Since we want to use mysql, remove the semicolons in front of php_mysql.dll and php_mysqli.dll. Any expansion packages to be used in the future will also be modified here.
Then add the ext folder under the php root folder to the environment variable Path.
(3) Restart Apache, write a php file in the htdocs folder, and open it with a browser. If it can be parsed successfully, it means it is done.
3. Configure MySQL
In fact, there is no need to configure this. Just follow the online tutorial to install mysql on your computer. In other words, the configuration of mysql does not need to be like the configuration of php. Same as Apache. However, remember to open the database when running the server in the future.
Note: Remember to change your username and password.
4. Configure phpMyAdmin
(1) Download the compressed package and decompress it in Apache’s htdocs directory:

(2) Open libraries/config.default.php and modify the following three lines:
$cfg['Servers'][$i]['user'] / /Change to the login name to access the database
$cfg['Servers'][$i]['password'] //Change to the password to access the database
$cfg['PmaAbsoluteUri'] //Change to the phpMyAdmin directory path. My phpMyAdmin folder is placed in the htdocs directory and uses port 80. What I changed is:

It should be noted that empty password login is no longer allowed, so the default username root and empty password at mysql cannot be used. You must change the password at mysql first, and then correspond here.
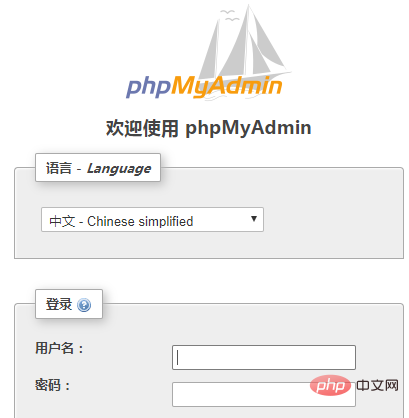
(3) Open http://localhost/phpmyadmin/ in the browser (this is related to the location of the phpmyadmin folder, but no matter where it is, it must be in the htdocs directory ), the following screen appears:

Enter the user name and password you just configured. If you can jump, it is a success.
Recommended related article tutorials: phpmyadmin tutorial
The above is the detailed content of phpmyadmin development environment setup. For more information, please follow other related articles on the PHP Chinese website!
 How to learn python programming from scratch
 Commonly used mysql management tools
 What to do if phpmyadmin fails to import sql file
 How to change phpmyadmin to Chinese
 What's going on when phpmyadmin can't access it?
 How to enter recovery mode on win10 system computer
 How to export word from powerdesigner
 What are the differences between weblogic and tomcat


