1. Beginning instructions
#There is nothing to say here. It should be noted that memory needs to be used later. When size, you can specify the unit, usually in the form of k, gb, m, and the unit is not case-sensitive.
2, INCLUDES
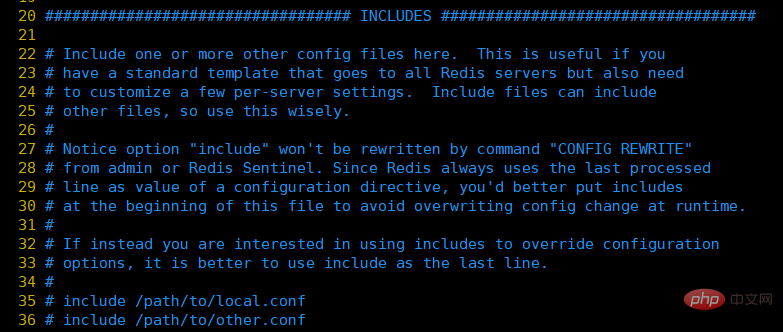
We know that Redis has only one configuration file. If multiple people develop and maintain it, then multiple For such a configuration file, multiple configuration files can be configured here through include /path/to/local.conf, and the original redis.conf configuration file serves as a main gate.
ps: For students who have used struts2 development, when multiple people develop in the project team, there will usually be multiple struts2.xml files, which will also be introduced through class configuration.
In addition, it should be noted that if this configuration is written at the beginning of the redis.conf file, then the subsequent configuration will overwrite the configuration of the imported file. If you want to focus on the configuration of the imported file, you need to include The configuration is written at the end of the redis.conf file.
3, MODULES
The explosive function of redis3.0 is the new cluster, and redis4.0 is in 3.0 Many new functions have been added based on this, among which the custom module configuration here is one of them. Through the loadmodule configuration here, custom modules will be introduced to add some new functions.
4, NETWORK
ps: The configuration here is long, I only intercepted part of it, the same below.
①.bind: Bind the redis server network card IP. The default is 127.0.0.1, which is the local loopback address. In this case, access to the redis service can only be done through the local client connection, but not through remote connections. If the bind option is empty, connections from all available network interfaces will be accepted.
②. port: Specify the port on which redis runs. The default is 6379. Since Redis is a single-threaded model, the port will be modified when multiple Redis processes are opened on a single machine.
③. timeout: Set the timeout time when the client connects, in seconds. When the client does not issue any instructions during this period, the connection is closed. The default value is 0, which means no shutdown.
④, tcp-keepalive: The unit is seconds, which means SO_KEEPALIVE will be used periodically to detect whether the client is still in a healthy state to avoid the server being blocked all the time. The official recommended value is 300s. If set to 0 , it will not be detected periodically.
5, GENERAL
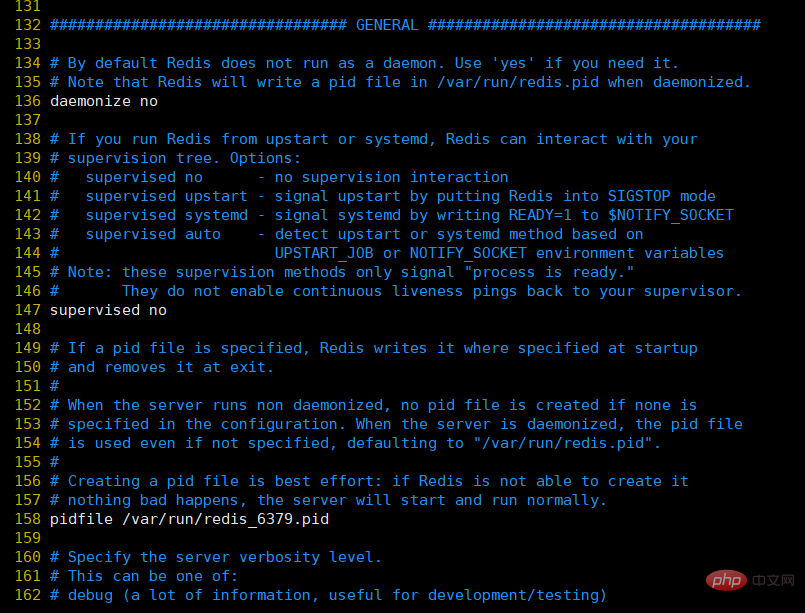
Detailed configuration details:
①, daemonize: set to yes to specify Redis Start as a daemon (start in the background). The default value is no
②, pidfile: Configure the PID file path. When redis is running as a daemon process, it will write the pid to the /var/redis/run/redis_6379.pid file by default
③, loglevel: Define the log level. The default value is notice, which has the following 4 values:
debug (records a large amount of log information, suitable for development and testing phases)
verbose (more log information)
notice (appropriate amount of log information, used in production environment)
warning (only some important and critical information will be recorded)
④, logfile: configure log The file address is printed on the command line terminal window by default
5. databases: Set the number of databases. The default database is DB 0. You can use the select
6. SNAPSHOTTING
The configuration here is mainly used for persistence operations.
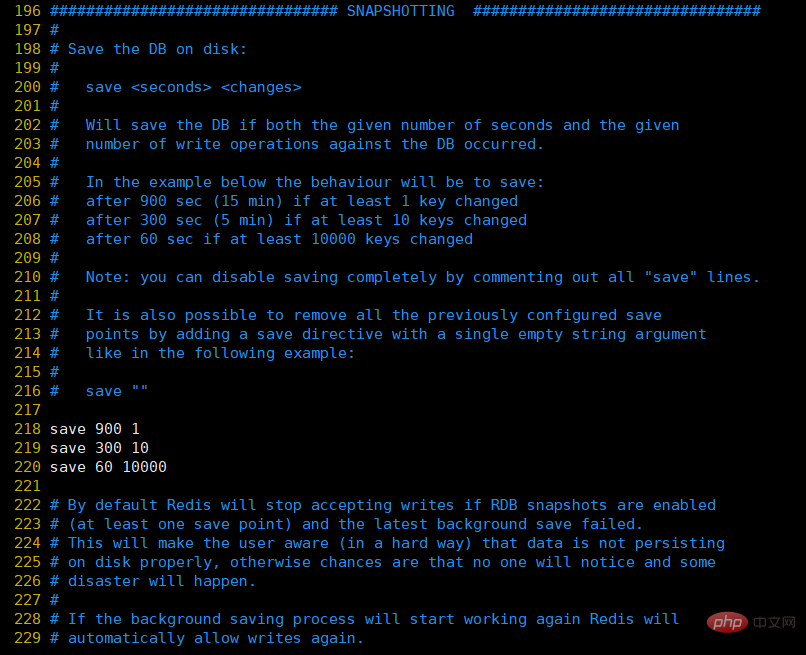
①. save: This is used to configure the persistence conditions that trigger Redis, that is, when to save the data in the memory to the hard disk. The default configuration is as follows:
save 900 1:表示900 秒内如果至少有 1 个 key 的值变化,则保存
save 300 10:表示300 秒内如果至少有 10 个 key 的值变化,则保存
save 60 10000:表示60 秒内如果至少有 10000 个 key 的值变化,则保存
Of course, if you only use the caching function of Redis and do not need persistence, then you can comment out all save lines to disable the saving function. You can directly use an empty string to achieve deactivation: save ""
②, stop-writes-on-bgsave-error: The default value is yes. When RDB is enabled and the last background save of data fails, whether Redis stops receiving data. This would make the user aware that the data was not persisted to disk correctly, otherwise no one would notice that a disaster had occurred. If Redis restarts, it can start receiving data again
③、rdbcompression ;默认值是yes。对于存储到磁盘中的快照,可以设置是否进行压缩存储。如果是的话,redis会采用LZF算法进行压缩。如果你不想消耗CPU来进行压缩的话,可以设置为关闭此功能,但是存储在磁盘上的快照会比较大。
④、rdbchecksum :默认值是yes。在存储快照后,我们还可以让redis使用CRC64算法来进行数据校验,但是这样做会增加大约10%的性能消耗,如果希望获取到最大的性能提升,可以关闭此功能。
⑤、dbfilename :设置快照的文件名,默认是 dump.rdb
⑥、dir:设置快照文件的存放路径,这个配置项一定是个目录,而不能是文件名。使用上面的 dbfilename 作为保存的文件名。
7、REPLICATION
①、slave-serve-stale-data:默认值为yes。当一个 slave 与 master 失去联系,或者复制正在进行的时候,slave 可能会有两种表现:
1) 如果为 yes ,slave 仍然会应答客户端请求,但返回的数据可能是过时,或者数据可能是空的在第一次同步的时候
2) 如果为 no ,在你执行除了 info he salveof 之外的其他命令时,slave 都将返回一个 "SYNC with master in progress" 的错误
②、slave-read-only:配置Redis的Slave实例是否接受写操作,即Slave是否为只读Redis。默认值为yes。
③、repl-diskless-sync:主从数据复制是否使用无硬盘复制功能。默认值为no。
④、repl-diskless-sync-delay:当启用无硬盘备份,服务器等待一段时间后才会通过套接字向从站传送RDB文件,这个等待时间是可配置的。 这一点很重要,因为一旦传送开始,就不可能再为一个新到达的从站服务。从站则要排队等待下一次RDB传送。因此服务器等待一段 时间以期更多的从站到达。延迟时间以秒为单位,默认为5秒。要关掉这一功能,只需将它设置为0秒,传送会立即启动。默认值为5。
⑤、repl-disable-tcp-nodelay:同步之后是否禁用从站上的TCP_NODELAY 如果你选择yes,redis会使用较少量的TCP包和带宽向从站发送数据。但这会导致在从站增加一点数据的延时。
Linux内核默认配置情况下最多40毫秒的延时。如果选择no,从站的数据延时不会那么多,但备份需要的带宽相对较多。默认情况下我们将潜在因素优化,但在高负载情况下或者在主从站都跳的情况下,把它切换为yes是个好主意。默认值为no。
8、SECURITY
①、rename-command:命令重命名,对于一些危险命令例如:
flushdb(清空数据库)
flushall(清空所有记录)
config(客户端连接后可配置服务器)
keys(客户端连接后可查看所有存在的键)
作为服务端redis-server,常常需要禁用以上命令来使得服务器更加安全,禁用的具体做法是是:
rename-command FLUSHALL ""
也可以保留命令但是不能轻易使用,重命名这个命令即可:
rename-command FLUSHALL abcdefg
这样,重启服务器后则需要使用新命令来执行操作,否则服务器会报错unknown command。
9、CLIENTS

①、maxclients :设置客户端最大并发连接数,默认无限制,Redis可以同时打开的客户端连接数为Redis进程可以打开的最大文件。 描述符数-32(redis server自身会使用一些),如果设置 maxclients为0 。表示不作限制。当客户端连接数到达限制时,Redis会关闭新的连接并向客户端返回max number of clients reached错误信息
10、MEMORY MANAGEMENT
①、maxmemory:设置客户端最大并发连接数,默认无限制,Redis可以同时打开的客户端连接数为Redis进程可以打开的最大文件。描述符数-32(redis server自身会使用一些),如果设置 maxclients为0 。表示不作限制。当客户端连接数到达限制时,Redis会关闭新的连接并向客户端返回max number of clients reached错误信息。
②、maxmemory-policy :当内存使用达到最大值时,redis使用的清楚策略。有以下几种可以选择:
1) volatile-lru Use the LRU algorithm to remove keys with an expired time (LRU: Least Recently Used)
2) allkeys-lru Use the LRU algorithm to remove any key
3) volatile-random removes random keys with expiration time
4) allkeys-random removes random keys
5) volatile-ttl removes keys that are about to expire (minor TTL)
6) noeviction noeviction does not remove any key, just returns a write error, the default option
③, maxmemory-samples: LRU and minimal TTL algorithms are not accurate algorithms, but Relatively precise algorithm (to save memory). You can choose the sample size for testing at will. Redis selects 3 samples for testing by default. You can set the number of samples through maxmemory-samples.
11. APPEND ONLY MODE
①, appendonly: By default, redis uses rdb mode for persistence. This method is used in It is sufficient for many applications. However, if redis goes down in the middle, it may cause data loss for several minutes. Persistence is carried out according to the save strategy. Append Only File is another persistence method that can provide better persistence characteristics. Redis will write each written data into the appendonly.aof file after receiving it. Every time it is started, Redis will first read the data of this file into the memory and ignore the RDB file first. The default value is no.
②, appendfilename: aof file name, the default is "appendonly.aof"
③, appendfsync: configuration of aof persistence strategy; no means not to execute fsync, and the operating system ensures data synchronization to the disk, which is the fastest; always means that fsync is executed for each write to ensure that the data is synchronized to the disk; everysec means that fsync is executed once per second, which may result in the loss of this 1s data
④, no-appendfsync -on-rewrite: When aof is rewriting or writing to an rdb file, a large amount of IO will be performed. At this time, for everysec and always aof modes, executing fsync will cause blocking for a long time, no-appendfsync-on-rewrite Field settings are set to no by default.
If the application has high latency requirements, this field can be set to yes, otherwise it can be set to no, which is a safer choice for the persistence feature. Setting it to yes means that new write operations will not be fsyncd during rewrite, and will be temporarily stored in the memory, and will be written after rewrite is completed. The default is no, and yes is recommended. The default fsync policy of Linux is 30 seconds. 30 seconds of data may be lost. The default value is no.
⑤、auto-aof-rewrite-percentage: The default value is 100. aof automatic rewrite configuration, when the current aof file size exceeds the percentage of the last rewritten aof file size, it will be rewritten, that is, when the aof file grows to a certain size, Redis can call bgrewriteaof to rewrite the log file . When the current AOF file size is twice the size of the AOF file obtained from the last log rewrite (set to 100), a new log rewrite process is automatically started.
⑥, auto-aof-rewrite-min-size: 64mb. Set the minimum AOF file size that is allowed to be rewritten to avoid rewriting when the agreed percentage is reached but the size is still small.
⑦, aof-load-truncated: The aof file may be incomplete at the end. When redis starts, the data of the aof file is loaded into the memory. The restart may occur after the host operating system where redis is located is down, especially if the ext4 file system does not add the data=ordered option. This phenomenon occurs. Redis downtime or abnormal termination will not cause the tail to be incomplete. You can choose to let redis exit. , or import as much data as possible.
If yes is selected, when the truncated aof file is imported, a log will be automatically posted to the client and then loaded. If it is no, the user must manually redis-check-aof to repair the AOF file. The default value is yes.
12. LUA SCRIPTING
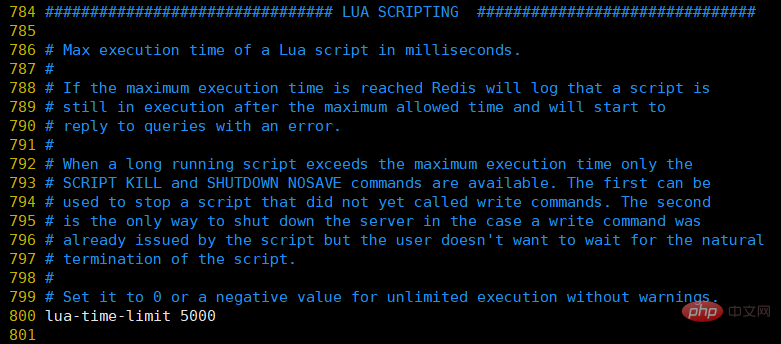
①, lua-time-limit: The maximum time for a Lua script to be executed, in ms . The default value is 5000.
13, REDIS CLUSTER
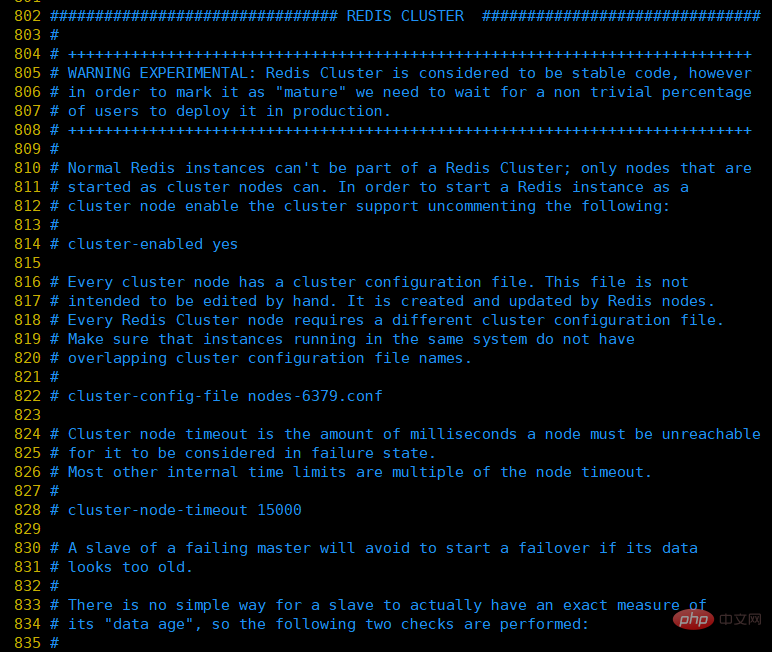
①, cluster-enabled: cluster switch, the default is not to enable the cluster model.
②, cluster-config-file: The name of the cluster configuration file. Each node has a cluster-related configuration file, which persistently saves cluster information. This file does not require manual configuration. This configuration file is generated and updated by Redis. Each Redis cluster node requires a separate configuration file. Please make sure there is no conflict with the configuration file name in the system where the instance is running. The default configuration is nodes-6379.conf.
③、cluster-node-timeout: The value can be configured as 15000. Node interconnection timeout threshold, cluster node timeout milliseconds
④、cluster-slave-validity-factor: The value can be configured to 10. During failover, all slaves will request to be masters, but some slaves may have been disconnected from the master for a period of time, causing the data to be too stale. Such slaves should not be promoted to masters. This parameter is used to determine whether the slave node has been disconnected from the master for too long.
The judgment method is: compare the slave disconnection time and (node-timeout * slave-validity-factor) repl-ping-slave-period If the node timeout is thirty seconds, and slave-validity- The factor is 10, assuming that the default repl-ping-slave-period is 10 seconds, that is, if it exceeds 310 seconds, the slave will not try to failover
⑤, cluster-migration-barrier: You can configure the value to 1 . If the master's slave number is greater than this value, the slave can be migrated to other isolated masters. If this parameter is set to 2, then only when a master node has 2 working slave nodes, one of its slave nodes will try to migrate. .
⑥, cluster-require-full-coverage: By default, all slots in the cluster are responsible for nodes, and only when the cluster status is ok can services be provided. Set to no to provide services when not all slots are allocated. It is not recommended to turn on this configuration, as this will cause the master of the small partition to always accept write requests during partitioning, resulting in data inconsistency for a long time.
For more redis knowledge, please pay attention to the redis database tutorial column.
The above is the detailed content of Introduction to redis configuration file. For more information, please follow other related articles on the PHP Chinese website!
 Commonly used database software
 What are the in-memory databases?
 Which one has faster reading speed, mongodb or redis?
 How to use redis as a cache server
 How redis solves data consistency
 How do mysql and redis ensure double-write consistency?
 What data does redis cache generally store?
 What are the 8 data types of redis