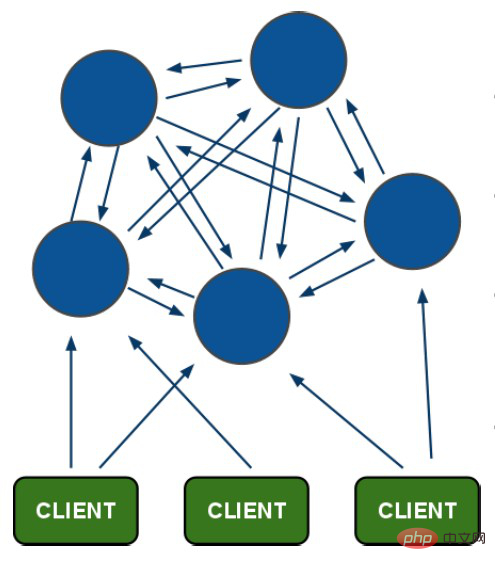
Redis cluster architecture diagram

The blue color in the above picture is the redis cluster node.
Use the ping command between nodes to test whether the connection is normal. There is no primary distinction between nodes. When you connect to any node for operation, it may be forwarded to other nodes.
1. Redis fault tolerance mechanism
Nodes will send ping commands to each other regularly to test the health status of the nodes. When the nodes receive the ping command, they will Returns a pong string.
Voting mechanism: If a node A sends a ping to node B and does not receive a pong return, other nodes will be notified to send ping to B again. If more than half of the nodes in the cluster cannot receive the pong from node B. Then it is considered that node B is down. Generally, a backup node is provided for each node. If it fails, it will be switched to the backup node.
2. Redis cluster storage principle
Redis will perform a hash operation on each stored key and generate a hash value of [0-16384] (first
crc algorithm then takes the remainder of 16384).
In the case of a cluster, the interval [0-16384] is split and placed in different redis.
3. Redis persistence
Snapshotting: regularly save the data in Redis memory to the hard disk
AOF: save all commands The operation is saved to the AOF. The synchronization frequency of AOP is very high. Even if the data is lost, the granularity is very small, but it will have an impact on performance.
2.Cluster environment construction
##redis cluster management tool redis-trib.rb Relying on the ruby environment, you first need to install the ruby environment Install ruby
yum install ruby yum install rubygems
gem install /usr/local/redis-3.0.0.gem
3. Create a Redis cluster
On one server, you can use different port numbers To represent different redis servers. The Redis cluster requires at least three servers, and each server requires a backup server, so at least 6 servers are required. The port planning is as follows: Master server: 192.168.100.66 :7001 :7002 :7003 Slave server: 192.168.100.66 :7004 :7005 :7006 In /usr/ local Create a folder to store the server program mkdir 7001 7002 7003 7004 7005 7006 If you want redis to support the cluster, you need to modify the cluster-enabled yes# of the redis.config configuration file. ##In this example, we use ports to distinguish different redis services, so we also need to modify the port of redis.config to the corresponding port.
After modifying the configuration file, copy the bin of the redis installation directory to each directory above. middle.
Enter 7001/bin/ 7002/bin respectively....
Start the service ./redis-server ./redis.conf
View the redis process: ps - aux|grep redis The following figure shows that the startup is successful

Change the redis-3.0.0/src/redis of the previously decompressed folder -trib.rb is copied to the redis-cluster directory
Run
./redis-trib.rb create --replicas 1 192.168.100.66:7001 192.168.100.66:7002 192.168.100.66:7003 192.168.100.66:7004 192.168.100.66:7005 192.168.100.66:7006
If the execution reports the following error:
[ERR] Node XXXXXX is not empty. Either the node already knows other nodes (check with CLUSTER NODES) or contains some key in database 0
The solution is to delete the generated configuration file nodes.conf, if If it fails, it means that the node created now includes the node information of the old cluster. You need to delete the persistence file of redis and then restart redis, such as: appendonly.aof, dump.rdb
If successful, enter the following:


./redis-cli -c - h 192.168.101.3 -p 7001, where -c indicates connecting to redis in cluster mode, -h specifies the ip address, and -p specifies the port number
cluster nodes Query cluster node information
cluster info Query cluster status information
Step one: Connect to the cluster
./ redis-trib.rb reshard 192.168.101.3:7001 (connect to any available node in the cluster)
Step 2: Enter the number of slots to be allocated

Step 3: Enter the node id of the receiving slot
这里准备给7007分配槽,通过cluster nodes查看7007结点id为15b809eadae88955e36bcdbb8144f61bbbaf38fb
输入:15b809eadae88955e36bcdbb8144f61bbbaf38fb
第四步:输入源结点id
这里输入all
第五步:输入yes开始移动槽到目标结点id

添加从节点
集群创建成功后可以向集群中添加节点,下面是添加一个slave从节点。
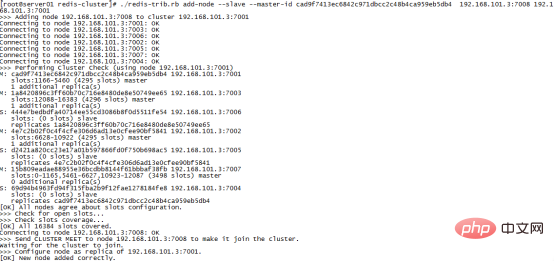
添加7008从结点,将7008作为7007的从结点。
./redis-trib.rb add-node --slave --master-id 主节点id 添加节点的ip和端口 集群中已存在节点ip和端口
执行如下命令:
./redis-trib.rb add-node --slave --master-id cad9f7413ec6842c971dbcc2c48b4ca959eb5db4 192.168.101.3:7008 192.168.101.3:7001
cad9f7413ec6842c971dbcc2c48b4ca959eb5db4 是7007结点的id,可通过cluster nodes查看。

注意:如果原来该结点在集群中的配置信息已经生成cluster-config-file指定的配置文件中(如果cluster-config-file没有指定则默认为nodes.conf),这时可能会报错:
[ERR] Node XXXXXX is not empty. Either the node already knows other nodes (check with CLUSTER NODES) or contains some key in database 0
解决方法是删除生成的配置文件nodes.conf,删除后再执行./redis-trib.rb add-node指令
查看集群中的结点,刚添加的7008为7007的从节点:
删除结点:
./redis-trib.rb del-node 127.0.0.1:7005 4b45eb75c8b428fbd77ab979b85080146a9bc017
删除已经占有hash槽的结点会失败,报错如下:
[ERR] Node 127.0.0.1:7005 is not empty! Reshard data away and try again.
需要将该结点占用的hash槽分配出去(参考hash槽重新分配章节)。
测试:
Maven:redis.clients jedis 2.7.0 junit junit 4.12 test org.springframework spring-test 4.3.10.RELEASE test
普通测试:
@Test public void redisClusterTest1(){ JedisPoolConfig config=new JedisPoolConfig(); config.setMaxTotal(30); config.setMaxIdle(2); Set jedisNode=new HashSet(); jedisNode.add(new HostAndPort("192.168.100.66",7001)); jedisNode.add(new HostAndPort("192.168.100.66",7002)); jedisNode.add(new HostAndPort("192.168.100.66",7003)); jedisNode.add(new HostAndPort("192.168.100.66",7004)); jedisNode.add(new HostAndPort("192.168.100.66",7005)); jedisNode.add(new HostAndPort("192.168.100.66",7006)); JedisCluster jc=new JedisCluster(jedisNode,config); jc.set("name","老王"); String value=jc.get("name"); System.out.println(value); }
Spring测试:
配置文件:
测试类:
@RunWith(SpringJUnit4ClassRunner.class) @ContextConfiguration({"classpath:spring-config.xml"}) public class RedisClusterTest { @Autowired private JedisCluster jedisCluster; @Test public void redisClusterTest2(){ jedisCluster.set("username","小明啦啦"); String name=jedisCluster.get("username"); System.out.println(name); } }
更多redis知识请关注redis数据库教程栏目。
The above is the detailed content of Introduction to redis distributed cluster construction. For more information, please follow other related articles on the PHP Chinese website!
 Commonly used database software
 What are the in-memory databases?
 Which one has faster reading speed, mongodb or redis?
 How to use redis as a cache server
 How redis solves data consistency
 How do mysql and redis ensure double-write consistency?
 What data does redis cache generally store?
 What are the 8 data types of redis