
Liu Wayong's Blog I think the most successful thing about jQuery is that its scalability has attracted many developers to develop plug-ins for it, thus establishing an ecosystem. This is like big companies competing to build a platform. The one who wins the platform wins the world. Giants such as Apple, Microsoft, and Google all have their own platforms and ecosystems.
It is not difficult to learn to use jQuery, because it is simple and easy to learn, and I believe that after you come into contact with jQuery, you must have used or been familiar with many of its plug-ins. If you want to take your capabilities to the next level, writing your own plug-in is a good choice.
This tutorial may not be the most exquisite, but it must be the most detailed.
jQuery plug-in development model
The software development process requires certain design patterns to guide development. With patterns, we can better organize our code and learn many good practices from the patterns summarized by our predecessors.
According to the description of "jQuery Advanced Programming", there are three main ways to develop jQuery plug-ins:
Extend jQuery through $.extend()
Add new methods to jQuery via $.fn
Use jQuery UI’s widget factory method to create
through $.widget()
Usually we use the second method for simple plug-in development, which is said to be simple compared to the third method. The third method is used to develop more advanced jQuery components. The components developed in this mode have many built-in features of jQuery, such as automatic saving of plug-in status information, various common methods about plug-ins, etc. It is very considerate. Here Not going into details.
The first method is too simple. It is just adding a static method to the jQuery namespace or understanding it as jQuery. So when we call the function added through $.extend(), we call it directly through the $ symbol ($.myfunction()) without selecting the DOM element ($('#example').myfunction()). Please see the example below.
$.extend({
  sayHello: function(name) {
    console.log('Hello,' + (name ? name : 'Dude') + '!');
  }
})
$.sayHello(); //调用
$.sayHello('Wayou'); //带参调用Running results:

In the above code, a sayHello function is added to jQuery through $.extend(), and then called directly through $. At this point you can think that we have completed a simple jQuery plug-in.
But as you can see, this method is more convenient for defining some auxiliary methods. For example, a custom console outputs information in a specific format. Once defined, it can be called anywhere in the program through jQuery.
$.extend({
  log: function(message) {
    var now = new Date(),
      y = now.getFullYear(),
      m = now.getMonth() + 1, //!JavaScript中月分是从0开始的
      d = now.getDate(),
      h = now.getHours(),
      min = now.getMinutes(),
      s = now.getSeconds(),
      time = y + '/' + m + '/' + d + ' ' + h + ':' + min + ':' + s;
    console.log(time + ' My App: ' + message);
  }
})
$.log('initializing...'); //调用

However, this method cannot take advantage of the convenience brought by jQuery's powerful selector. To process DOM elements and better apply plug-ins to selected elements, you still need to use the second development method. Most of the plug-ins you see or use are developed in this way.
Plug-in Development
Let’s look at the second way of jQuery plug-in development.
Basic method
Let’s take a look at its basic format:
$.fn.pluginName = function() {
  //your code goes here
}Basically add a method to $.fn, the name is our plug-in name. Then our plug-in code is expanded in this method.
For example, if we change the color of all links on the page to red, we can write this plug-in like this:
$.fn.myPlugin = function() {
  //在这里面,this指的是用jQuery选中的元素
  //example :$('a'),则this=$('a')
  this.css('color', 'red');
}Inside the function defined by the plug-in name, this refers to the element selected with the jQuery selector when we call the plug-in, which is usually a collection of jQuery type. For example, $('a') returns a collection of all a tags on the page, and this collection is already a jQuery packaging type. That is to say, when operating on it, you can directly call other jQuery methods without having to Wrap it up in dollar signs.
So in the above plug-in code, we call jQuery’s css() method on this, which is equivalent to calling $('a').css().
It is important to understand the meaning of this in this place. In this way, you will know why you can directly use the jQuery method commercially and at the same time, when this reference is different in other places, we need to repackage it with jQuery to call it, which will be discussed below. It is easy for beginners to be confused by the value of this, but it is not difficult once you understand it.
Now you can go to the page and try our code. Put a few links on the page. After calling the plug-in, the link font will turn red.
<ul>
	<li>
		<a href="http://www.webo.com/liuwayong">我的微博</a>
	</li>
	<li>
		<a href="http://http://www.cnblogs.com/Wayou/">我的博客</a>
	</li>
	<li>
		<a href="http://wayouliu.duapp.com/">我的小站</a>
	</li>
</ul>
<p>这是p标签不是a标签,我不会受影响</p>
<script src="jquery-1.11.0.min.js"></script>
<script src="jquery.myplugin.js"></script>
<script type="text/javascript">
	$(function(){
		$('a').myPlugin();
	})
</script>运行结果:
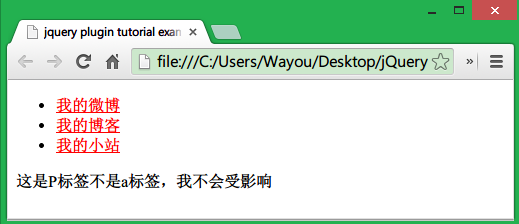
下面进一步,在插件代码里处理每个具体的元素,而不是对一个集合进行处理,这样我们就可以针对每个元素进行相应操作。
我们已经知道this指代jQuery选择器返回的集合,那么通过调用jQuery的.each()方法就可以处理合集中的每个元素了,但此刻要注意的是,在each方法内部,this指带的是普通的DOM元素了,如果需要调用jQuery的方法那就需要用$来重新包装一下。
比如现在我们要在每个链接显示链接的真实地址,首先通过each遍历所有a标签,然后获取href属性的值再加到链接文本后面。
更改后我们的插件代码为:
$.fn.myPlugin = function() {
  //在这里面,this指的是用jQuery选中的元素
  this.css('color', 'red');
  this.each(function() {
    //对每个元素进行操作
    $(this).append(' ' + $(this).attr('href'));
  }))
}调用代码还是一样的,我们通过选中页面所有的a标签来调用这个插件
运行结果:
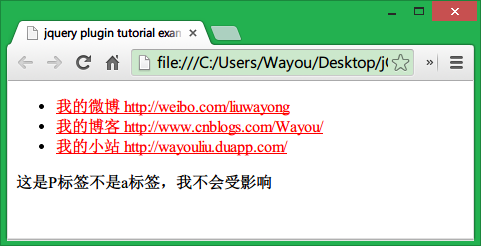
到此,你已经可以编写功能简单的jQuery插件了。是不是也没那么难。
下面开始jQuery插件编写中一个重要的部分,参数的接收。
支持链式调用
我们都知道jQuery一个时常优雅的特性是支持链式调用,选择好DOM元素后可以不断地调用其他方法。
要让插件不打破这种链式调用,只需return一下即可。
$.fn.myPlugin = function() {
  //在这里面,this指的是用jQuery选中的元素
  this.css('color', 'red');
  return this.each(function() {
    //对每个元素进行操作
    $(this).append(' ' + $(this).attr('href'));
  }))
}让插件接收参数
一个强劲的插件是可以让使用者随意定制的,这要求我们提供在编写插件时就要考虑得全面些,尽量提供合适的参数。
比如现在我们不想让链接只变成红色,我们让插件的使用者自己定义显示什么颜色,要做到这一点很方便,只需要使用者在调用的时候传入一个参数即可。同时我们在插件的代码里面接收。另一方面,为了灵活,使用者可以不传递参数,插件里面会给出参数的默认值。
在处理插件参数的接收上,通常使用jQuery的extend方法,上面也提到过,但那是给extend方法传递单个对象的情况下,这个对象会合并到jQuery身上,所以我们就可以在jQuery身上调用新合并对象里包含的方法了,像上面的例子。当给extend方法传递一个以上的参数时,它会将所有参数对象合并到第一个里。同时,如果对象中有同名属性时,合并的时候后面的会覆盖前面的。
利用这一点,我们可以在插件里定义一个保存插件参数默认值的对象,同时将接收来的参数对象合并到默认对象上,最后就实现了用户指定了值的参数使用指定的值,未指定的参数使用插件默认值。
为了演示方便,再指定一个参数fontSize,允许调用插件的时候设置字体大小。
$.fn.myPlugin = function(options) {
  var defaults = {
    'color': 'red',
    'fontSize': '12px'
  };
  var settings = $.extend(defaults, options);
  return this.css({
    'color': settings.color,
    'fontSize': settings.fontSize
  });
}现在,我们调用的时候指定颜色,字体大小未指定,会运用插件里的默认值12px。
$('a').myPlugin({
  'color': '#2C9929'
});运行结果:
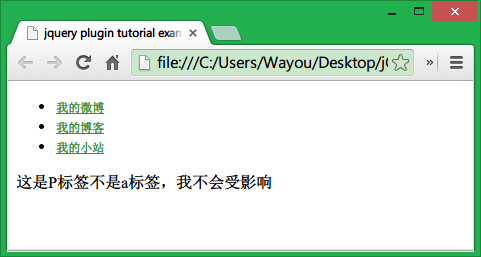
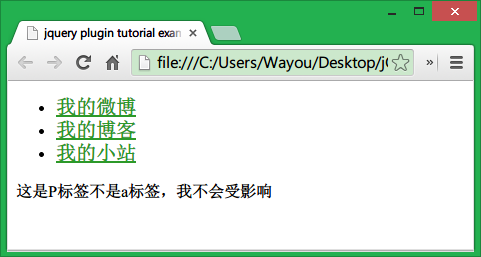
同时指定颜色与字体大小:
$('a').myPlugin({
  'color': '#2C9929',
  'fontSize': '20px'
});
保护好默认参数
注意到上面代码调用extend时会将defaults的值改变,这样不好,因为它作为插件因有的一些东西应该维持原样,另外就是如果你在后续代码中还要使用这些默认值的话,当你再次访问它时它已经被用户传进来的参数更改了。
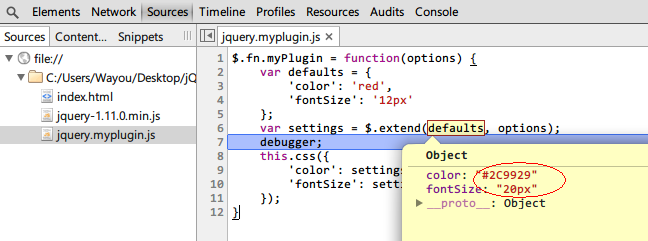
一个好的做法是将一个新的空对象做为$.extend的第一个参数,defaults和用户传递的参数对象紧随其后,这样做的好处是所有值被合并到这个空对象上,保护了插件里面的默认值。
$.fn.myPlugin = function(options) {
  var defaults = {
    'color': 'red',
    'fontSize': '12px'
  };
  var settings = $.extend({},defaults, options);//将一个空对象做为第一个参数
  return this.css({
    'color': settings.color,
    'fontSize': settings.fontSize
  });
}到此,插件可以接收和处理参数后,就可以编写出更健壮而灵活的插件了。若要编写一个复杂的插件,代码量会很大,如何组织代码就成了一个需要面临的问题,没有一个好的方式来组织这些代码,整体感觉会杂乱无章,同时也不好维护,所以将插件的所有方法属性包装到一个对象上,用面向对象的思维来进行开发,无疑会使工作轻松很多。
面向对象的插件开发
为什么要有面向对象的思维,因为如果不这样,你可能需要一个方法的时候就去定义一个function,当需要另外一个方法的时候,再去随便定义一个function,同样,需要一个变量的时候,毫无规则地定义一些散落在代码各处的变量。
还是老问题,不方便维护,也不够清晰。当然,这些问题在代码规模较小时是体现不出来的。
如果将需要的重要变量定义到对象的属性上,函数变成对象的方法,当我们需要的时候通过对象来获取,一来方便管理,二来不会影响外部命名空间,因为所有这些变量名还有方法名都是在对象内部。
接着上面的例子,我们可以把这个插件抽象成一个美化页面的对象,因为他的功能是设置颜色啊字体啊什么的,当然我们还可以加入其他功能比如设置下划线啊什么的。当然对于这个例子抽象成对象有点小题大做,这里仅作演示用。以后我可能会介绍我编写的一个jQuery插件SlipHover,其中代码就比较多,这样的模式就用得上了。
所以我们新建一个对象命名为Beautifier,然后我们在插件里使用这个对象来编码。
//定义Beautifier的构造函数
var Beautifier = function(ele, opt) {
  this.$element = ele,
  this.defaults = {
    'color': 'red',
    'fontSize': '12px',
    'textDecoration':'none'
  },
  this.options = $.extend({}, this.defaults, opt)
}
//定义Beautifier的方法
Beautifier.prototype = {
  beautify: function() {
    return this.$element.css({
      'color': this.options.color,
      'fontSize': this.options.fontSize,
      'textDecoration': this.options.textDecoration
    });
  }
}
//在插件中使用Beautifier对象
$.fn.myPlugin = function(options) {
  //创建Beautifier的实体
  var beautifier = new Beautifier(this, options);
  //调用其方法
  return beautifier.beautify();
}通过上面这样一改造,我们的代码变得更面向对象了,也更好维护和理解,以后要加新功能新方法,只需向对象添加新变量及方法即可,然后在插件里实例化后即可调用新添加的东西。
插件的调用还是一样的,我们对代码的改动并不影响插件其他地方,只是将代码的组织结构改动了而以。
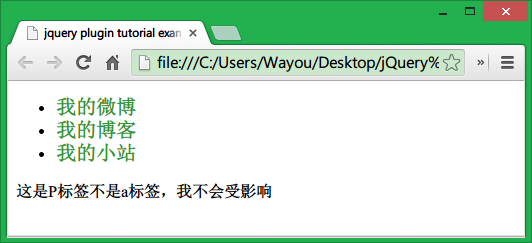
$(function() {
  $('a').myPlugin({
    'color': '#2C9929',
    'fontSize': '20px'
  });
})
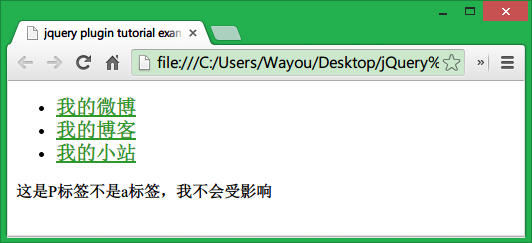
指定文字带下划线(我们在Beautifier对象中新加的功能,默认不带下划线,如上面的例子)的调用:
$(function() {
  $('a').myPlugin({
    'color': '#2C9929',
    'fontSize': '20px',
    'textDecoration': 'underline'
  });
})
到这里,你可以更好地编写复杂的插件同时很好地组织代码了。当我们回头去看上面的代码时,其实也还是有改进空间的。也就是下面介绍的关于命名空间及变量各什么的,一些杂项。
关于命名空间
不仅仅是jQuery插件的开发,我们在写任何JS代码时都应该注意的一点是不要污染全局命名空间。因为随着你代码的增多,如果有意无意在全局范围内定义一些变量的话,最后很难维护,也容易跟别人写的代码有冲突。
比如你在代码中向全局window对象添加了一个变量status用于存放状态,同时页面中引用了另一个别人写的库,也向全局添加了这样一个同名变量,最后的结果肯定不是你想要的。所以不到万不得已,一般我们不会将变量定义成全局的。
一个好的做法是始终用自调用匿名函数包裹你的代码,这样就可以完全放心,安全地将它用于任何地方了,绝对没有冲突。
用自调用匿名函数包裹你的代码
我们知道JavaScript中无法用花括号方便地创建作用域,但函数却可以形成一个作用域,域内的代码是无法被外界访问的。如果我们将自己的代码放入一个函数中,那么就不会污染全局命名空间,同时不会和别的代码冲突。
如上面我们定义了一个Beautifier全局变量,它会被附到全局的window对象上,为了防止这种事情发生,你或许会说,把所有代码放到jQuery的插件定义代码里面去啊,也就是放到$.fn.myPlugin里面。这样做倒也是种选择。但会让我们实际跟插件定义有关的代码变得臃肿,而在$.fn.myPlugin里面我们其实应该更专注于插件的调用,以及如何与jQuery互动。
所以保持原来的代码不变,我们将所有代码用自调用匿名函数包裹。
(function() {
  //定义Beautifier的构造函数
  var Beautifier = function(ele, opt) {
    this.$element = ele,
    this.defaults = {
      'color': 'red',
      'fontSize': '12px',
      'textDecoration': 'none'
    },
    this.options = $.extend({}, this.defaults, opt)
  }
  //定义Beautifier的方法
  Beautifier.prototype = {
    beautify: function() {
      return this.$element.css({
        'color': this.options.color,
        'fontSize': this.options.fontSize,
        'textDecoration': this.options.textDecoration
      });
    }
  }
  //在插件中使用Beautifier对象
  $.fn.myPlugin = function(options) {
    //创建Beautifier的实体
    var beautifier = new Beautifier(this, options);
    //调用其方法
    return beautifier.beautify();
  }
})();这样做的好处,也就是上面所阐述的那样。另外还有一个好处就是,自调用匿名函数里面的代码会在第一时间执行,页面准备好过后,上面的代码就将插件准备好了,以方便在后面的代码中使用插件。
目前为止似乎接近完美了。如果再考虑到其他一些因素,比如我们将这段代码放到页面后,前面别人写的代码没有用分号结尾,或者前面的代码将window, undefined等这些系统变量或者关键字修改掉了,正好我们又在自己的代码里面进行了使用,那结果也是不可预测的,这不是 我们想要的。我知道其实你还没太明白,下面详细介绍。
将系统变量以变量形式传递到插件内部
来看下面的代码,你猜他会出现什么结果?
var foo=function(){
  //别人的代码
}//注意这里没有用分号结尾

//开始我们的代码。。。
(function(){
  //我们的代码。。
  alert('Hello!');
})();本来别人的代码也正常工作,只是最后定义的那个函数没有用分号结尾而以,然后当页面中引入我们的插件时,报错了,我们的代码无法正常执行。
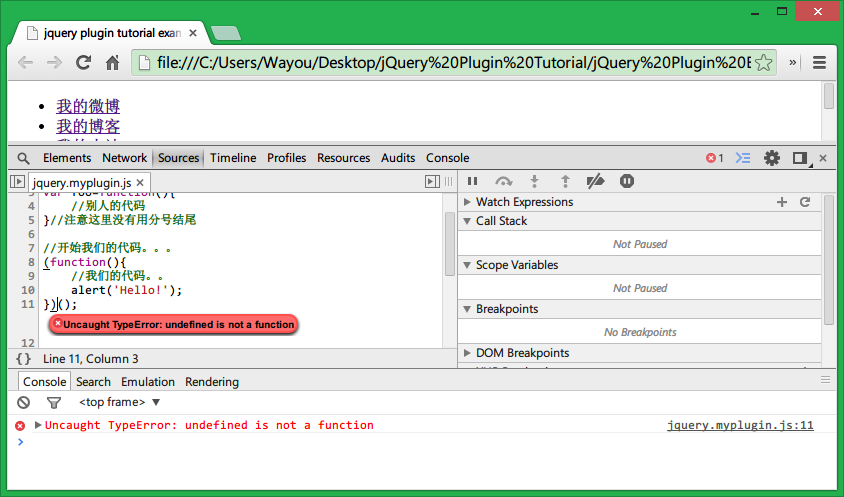
原因是我们用来充当自调用匿名函数的第一对括号与上面别人定义的函数相连,因为中间没有分号嘛,总之我们的代码无法正常解析了,所以报错。
所以好的做法是我们在代码开头加一个分号,这在任何时候都是一个好的习惯。
var foo=function(){
  //别人的代码
}//注意这里没有用分号结尾

//开始我们的代码。。。
;(function(){
  //我们的代码。。
  alert('Hello!');
})();同时,将系统变量以参数形式传递到插件内部也是个不错的实践。
当我们这样做之后,window等系统变量在插件内部就有了一个局部的引用,可以提高访问速度,会有些许性能的提升
最后我们得到一个非常安全结构良好的代码:
;(function($,window,document,undefined){
  //我们的代码。。
  //blah blah blah...
})(jQuery,window,document);而至于这个undefined,稍微有意思一点,为了得到没有被修改的undefined,我们并没有传递这个参数,但却在接收时接收了它,因为实际并没有传,所以‘undefined'那个位置接收到的就是真实的'undefined'了。是不是有点hack的味道,值得细细体会的技术,当然不是我发明的,都是从前人的经验中学习。
所以最后我们的插件成了这样:
;(function($, window, document,undefined) {
  //定义Beautifier的构造函数
  var Beautifier = function(ele, opt) {
    this.$element = ele,
    this.defaults = {
      'color': 'red',
      'fontSize': '12px',
      'textDecoration': 'none'
    },
    this.options = $.extend({}, this.defaults, opt)
  }
  //定义Beautifier的方法
  Beautifier.prototype = {
    beautify: function() {
      return this.$element.css({
        'color': this.options.color,
        'fontSize': this.options.fontSize,
        'textDecoration': this.options.textDecoration
      });
    }
  }
  //在插件中使用Beautifier对象
  $.fn.myPlugin = function(options) {
    //创建Beautifier的实体
    var beautifier = new Beautifier(this, options);
    //调用其方法
    return beautifier.beautify();
  }
})(jQuery, window, document);一个安全,结构良好,组织有序的插件编写完成。
关于变量定义及命名
现在谈谈关于变量及方法等的命名,没有硬性规定,但为了规范,遵循一些约定还是很有必要的。
变量定义:好的做法是把将要使用的变量名用一个var关键字一并定义在代码开头,变量名间用逗号隔开。原因有二:
一是便于理解,知道下面的代码会用到哪些变量,同时代码显得整洁且有规律,也方便管理,变量定义与逻辑代码分开;
二是因为JavaScript中所有变量及函数名会自动提升,也称之为JavaScript的Hoist特性,即使你将变量的定义穿插在逻辑代码中,在代码解析运行期间,这些变量的声明还是被提升到了当前作用域最顶端的,所以我们将变量定义在一个作用域的开头是更符合逻辑的一种做法。当然,再次说明这只是一种约定,不是必需的。
变量及函数命名 一般使用驼峰命名法(CamelCase),即首个单词的首字母小写,后面单词首字母大写,比如resultArray,requestAnimationFrame。对于常量,所有字母采用大写,多个单词用下划线隔开,比如WIDTH=100,BRUSH_COLOR='#00ff00'。当变量是jQuery类型时,建议以$开头,开始会不习惯,但经常用了之后会感觉很方便,因为可以很方便地将它与普通变量区别开来,一看到以$开头我们就知道它是jQuery类型可以直接在其身上调用jQuery相关的方法,比如var $element=$('a'); 之后就可以在后面的代码中很方便地使用它,并且与其他变量容易区分开来。
引号的使用:既然都扯了这些与插件主题无关的了,这里再多说一句,一般HTML代码里面使用双引号,而在JavaScript中多用单引号,比如下面代码所示:
var name = 'Wayou';
document.getElementById(‘example').innerHTML = '< a href="http: //wayouliu.duapp.com/">'+name+'</a>'; //href=".." HTML中保持双引号,JavaScript中保持单引号
一方面,HTML代码中本来就使用的是双引号,另一方面,在JavaScript中引号中还需要引号的时候,要求我们单双引号间隔着写才是合法的语句,除非你使用转意符那也是可以的。再者,坚持这样的统一可以保持代码风格的一致,不会出现这里字符串用双引号包着,另外的地方就在用单引号。
代码混淆与压缩
进行完上面的步骤,已经小有所成了。或许你很早就注意到了,你下载的插件里面,一般都会提供一个压缩的版本一般在文件名里带个'min'字样。也就是minified的意思,压缩浓缩后的版本。并且平时我们使用的jQuery也是官网提供的压缩版本,jquery.min.js。
这里的压缩不是指代码进行功能上的压缩,而是通过将代码里面的变量名,方法函数名等等用更短的名称来替换,并且删除注释(如果有的话)删除代码间的空白及换行所得到的浓缩版本。同时由于代码里面的各种名称都已经被替代,别人无法阅读和分清其逻辑,也起到了混淆代码的作用。
压缩的好处
源码经过混淆压缩后,体积大大减小,使代码变得轻量级,同时加快了下载速度,两面加载变快。比如正常jQuery v1.11.0的源码是276kb,而压缩后的版本仅94.1kb!体积减小一半还多。这个体积的减小对于文件下载速度的提升不可小觑。
经过压缩混淆后,代码还能阅读嘛?当然不能,所以顺带还起到了代码保护的作用。当然只是针对你编写了一些比较酷的代码又不想别人抄袭的情况。对于jQuery社区,这里本身就是开源的世界,同时JavaScript这东西其实也没什么实质性方法可以防止别人查看阅读你的代码,毕竟有混淆就有反混淆工具,这里代码压缩更多的还是上面提到的压缩文件的作用,同时一定程度上防止别人抄袭。
工具
所使用的工具推崇的是Google开发的Closure Compiler。该工具需要Java环境的支持,所以使用前你可能需要先在机子上装JRE, 然后再获取Closure进行使用。
同时也有很朋在线的代码混淆压缩工具,用起来也很方便。这些工具都是一搜一大把的。
插件发布
这一步不是必需的,但本着把事情做完整的态度,同时你也许也希望有更多人看到或使用你的插件吧。
首先你需要将插件代码放到GitHub上创建一个Service Hook,这样做的目的是你以后更新的插件后,jQuery可以自动去获取新版本的信息然后展示在插件中心的页面上。关于如何传代码到GitHub,你去下载GitHub 提供的客户端工具,就会知道如何操作了,非常方便。关于在GitHub创建Service Hook,也只是点几下而以的事情。下面会截图介绍。
然后需要制作一个JSON格式的清单文件,其中包括关于插件的基本信息,具体格式及参数可以在jQuery官网插件发布指南页面了解到,这里提供一个示例文件,是我之前写的一个jQuery插件SlipHover:
{
  "name": "sliphover",
  "title": "SlipHover",
  "description": "Apply direction aware 2D/3D hover effect to images",
  "keywords": [
    "direction-aware",
    "animation",
    "effect",
    "hover",
    "image",
    "overlay",
    "gallery"
  ],
  "version": "1.1.1",
  "author": {
    "name": "Wayou",
    "email": "liuwayong@gmail.com",
    "url": "https://github.com/Wayou"
  },
  "maintainers": [
    {
      "name": "Wayou",
      "email": "liuwayong@gmail.com",
      "url": "https://github.com/Wayou"
    }
  ],
  "licenses": [
    {
      "type": "MIT",
      "url": "https://github.com/jquery/jquery-color/blob/2.1.2/MIT-LICENSE.txt"
    }
  ],
  "bugs": "https://github.com/Wayou/sliphover/issues",
  "homepage": "http://wayou.github.io/SlipHover/",
  "docs": "http://wayou.github.io/SlipHover/",
  "demo":"http://wayou.github.io/SlipHover/",
  "download": "https://github.com/Wayou/SlipHover/zipball/master",
  "dependencies": {
    "jquery": ">=1.5"
  }
}然后就可以在插件的根目录执行现行git代码来发布插件了。其中0.1.0是版本号,以后每次你的插件有新版本发布只需更新上面命令中的版本,创建新的tag,这样jQuery插件中心就会自动获取到新版本信息了
$ git tag 0.1.0
$ git push origin --tags
GitHub Service Hook
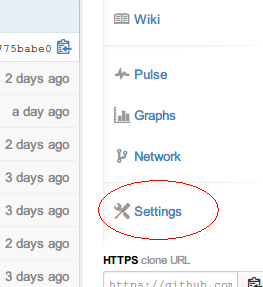
1 Click Settings in the menu on the right side of the project
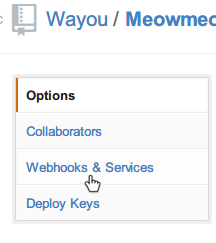
2 After entering the settings page, click 'Webhooks & Services'
3 Then click the 'Configure services' button on the main page on the right

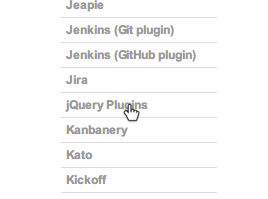
4A long list will appear. Go down to find jQuery Plugins and click
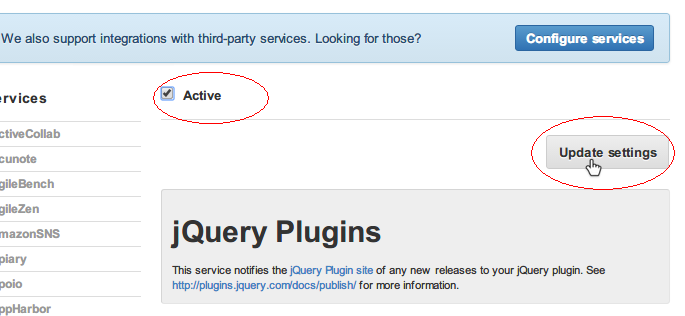
5 Click the check box and click the 'Update Settings' button
The setup is now complete.
Reference:
Original text: Liu Wayong’s blog
 How to solve invalid synrax
 What to do if windows photo viewer is out of memory
 Common encryption methods for data encryption storage
 Introduction to foreign free vps software
 The difference between scratch and python
 What does network access denied mean wifi?
 Port 8080 is occupied
 SQL 5120 error solution


