Redis is a commonly used NoSQL database. We usually use Redis for caching. This is an article about Redis installation, so it will not involve the advanced features and usage scenarios of Redis. Redis is compatible with most POSIX systems, such as Linux, OS , the GitHub address is: https://github.com/microsoftarchive/redis. I checked that the version above is relatively old, so I personally do not recommend using this to install Redis. Windows users can use Docker containers to install it, which is also very It's convenient and simple. Next, let's take a look at how to install Redis.

#1. Install redis under Linux system
Install
On the redis official website There is an installation tutorial, link: https://redis.io/download, I copied the installation steps, the steps are as follows:
$ wget http://download.redis.io/releases/redis-5.0.6.tar.gz $ tar xzf redis-5.0.6.tar.gz $ cd redis-5.0.6 $ make
I operated under the/usr/localdirectory These commands, that is to say, the installation directory of Redis is/usr/local. After executing these commands, Redis is installed on your machine. During the installation process, if ## is not installed on your machine, #gcc, after you install gcc and then make, you may get the following error
jemalloc/jemalloc.h: No such file or directoryThere was no interception at that time For the detailed error message, only the main section has been cut out. The reason for this error is that after our last make error, there were compiled files, so we need to clear the last residual files and then recompile.
makeJust replace it withmake distclean && make.
redis.conf file
redis.confis the configuration file of Redis. All the configurations of redis are in this file. This file is very The large one has nearly 1,400 lines. The operation and usage instructions for redis are all in it. You can read this configuration file in detail. In most cases, we can use the default configuration and only need to set a small amount of configuration. The storage location of redis.conf is in the Redis installation directory. Here is the/usr/local/redis-5.0.5directory. Let’s take a look at several configurations we may modify:
● bind 127.0.0.1: Allows access to the machine’s IP. By default, only this machine can access it. You can modify the IP to run on other machines and also access it. But if you want all machines to have access, set it directly to bind 0.0.0.0 will do. ● port 6379: The port where the redis instance is started, the default is 6379 ● daemonize no: Whether to run as a daemon process, the default is no, which means you have closed the startup window , the redis instance is closed. Generally, we set this option to yes and run it as a daemon process. To put it simply, it runs in the background. ● pidfile /var/run/redis_6379.pid: If we run it in daemon mode, a file with the suffix name .pid will be generated. This can also be the default one ● dir ./: The storage location of persistent files. It is better to set this configuration. I set it here to dir /usr/local/redis_data ● appendonly no: whether to enable AOF persistence mode, redis default Only the RDB mode is enabled, here we set it to yes, both methods are enabled, double insurance. Regarding the difference between the two methods, we will learn later ● It seems that these settings are enough. For more information about the configuration of redis.conf, you can read the redis.conf configuration file in detail or consult the relevant manual.Startup of redis
The startup of Redis is very simple. After the Redis installation is completed, the Redis shell will be stored in /usr/local/redis-5.0.5/src Interactive commands, including redis-server, this is the startup command of Redis, execute:./redis-server /usr/local/redis-5.0.5/redis.confis followed by the file path of redis.conf. If nothing goes wrong, we will start successfully and you will see the following interface:

这里我们使用的是守护进程的方式启动,所以不会出现带有 redis logo 的启动界面,我们可以使用 shell 命令登录到 Redis 中,还是在 src 目录下面,执行下面这条命令:
./redis-cli
这命令你就进入了 shell 交互界面,./redis-cli 命令可以带一些参数,例如-h IP这个就可以进入指定机器的 Redis 实例,进入之后你就可以进行一些操作了,如下图所示:

redis 关闭
Redis 的关闭方式有两种,一种是在 shell 交互界面关闭,另一种是 kill + 进程号关闭 Redis 实例的方式
shell 交互界面关闭
shutdown [nosave|save]
在 shell 交互界面输入 shutdown 命令就可以关闭 Redis 实例,后面有一个可选参数,nosave 就是不将内存中的数据持久化,save 就是将内存中的数据持久化。shutdown 关闭方式是比较优雅的关闭方式,建议使用这种关闭方式
Kill + 进程号关闭 Redis 实例
使用 ps -ef|grep redis 查看 Redis 进程号,如下图所示:

在这里找到我们需要关闭 redis 实例的进程号,比如这里我们的进程号为 27133,那么我们就直接使用kill 27133关闭 Redis 实例服务,这种方式我们需要注意一个地方,那就是需要我们去把 pid 文件删掉,pid 文件存放的位置我们在 redis.conf 里配置的 pidfile /var/run/redis_6379.pid,我们需要到 /var/run 目录下把 redis_6379.pid 删掉,这样下一次才能正常重启 Redis 服务。
上面两种方式都可以关闭 Redis 服务,随便选一种都行,但是切记不要使用 Kill 9 方式关闭 Redis 进程,这样 Redis 不会进行持久化操作,除此之外,还会造成缓冲区等资源不能优雅关闭,极端情况下会造成 AOF 和复制丢失数据的情况
redis 开机自启动
在服务器上我们可能需要将 Redis 设置为开机自启动,其实这个也非常简单,我们只需要做以下四步操作即可。
1、 编写配置脚本 vim /etc/init.d/redis
#!/bin/sh # # Simple Redis init.d script conceived to work on Linux systems # as it does use of the /proc filesystem. #chkconfig: 2345 80 90 #description:auto_run # 端口号 REDISPORT=6379 # 启动命令 EXEC=/usr/local/redis-5.0.5/src/redis-server # shell 交付命令 CLIEXEC=/usr/local/redis-5.0.5/src/redis-cli # pid 存放位置 PIDFILE=/var/run/redis_${REDISPORT}.pid # redis 配置文件 CONF="/usr/local/redis-5.0.5/redis.conf" case "$1" in start) if [ -f $PIDFILE ] then echo "$PIDFILE exists, process is already running or crashed" else echo "Starting Redis server..." $EXEC $CONF fi ;; stop) if [ ! -f $PIDFILE ] then echo "$PIDFILE does not exist, process is not running" else PID=$(cat $PIDFILE) echo "Stopping ..." $CLIEXEC -p $REDISPORT shutdown while [ -x /proc/${PID} ] do echo "Waiting for Redis to shutdown ..." sleep 1 done echo "Redis stopped" fi ;; *) echo "Please use start or stop as first argument" ;; esac
2、修改 redis.conf,设置 redis 为守护进程方式运行
################################# GENERAL ##################################### # By default Redis does not run as a daemon. Use 'yes' if you need it. # Note that Redis will write a pid file in /var/run/redis.pid when daemonized. daemonize yes
3、修改文件执行权限
chmod +x /etc/init.d/redis
4、设置开机启动
# 启动 redis service redis start # 停止 redis service redis stop # 开启服务自启动 chkconfig redis on
2、Docker 安装 Redis
Docker 安装 Redis 整体来说比较方便,我说的是非生产环境,就是自己搭着测试或者学习的环境,下面的步骤全部建立在你已经在你的电脑上安装了 Docker 的基础上,下面就来开启安装之旅。
1、拉取 redis 镜像
docker pull redis
2、快速启动
docker run -p 6379:6379 --name myredis -d redis redis-server --appendonly yes
这种方式启动使用的默认的 redis.conf 配置,我们先来看看这几个参数的意思
3、使用 redis
通过上面的步骤,我们已经在 Docker 中启动了 Redis 服务,下面我们就来通过 redis-cli 访问一下,使用下面这条命令就可以启动 redis-cli
docker exec -it dockerRedis redis-cli
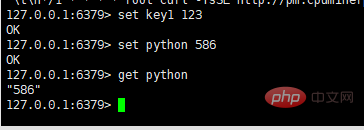
where dockerRedis is the name of the Redis container you start. If nothing else, you can start a redis-cli client, as shown in the following figure:

The above is to simply start Redis using Docker. Generally speaking, it is much more convenient than installing and starting on Linux. The main reason is that you can run it on a Windows system. Although it still runs on Linux in the end, we are unaware of this process. . You may ask: Is it possible to know redis.conf at startup? The answer is feasible, but if you don't know Docker, you may encounter some pitfalls. I encountered it because I don't know Docker very well. When I usually use Docker, I only need to pass in parameters. There is no need to pass in parameters. file. Regarding specifying the configuration file at startup, there are instructions in the redis image, but it is under Linux, not the Docker configuration method under Windows system, so I Baidu to the following command
docker run -v /d:/dockerdata/redis/config/redis.conf:/usr/local/etc/redis/redis.conf --name myredis redis redis-server /usr/local/etc/redis/redis.conf
This command is a trap, it doesn’t exist at all. If you start this command, you will get the following feedback:

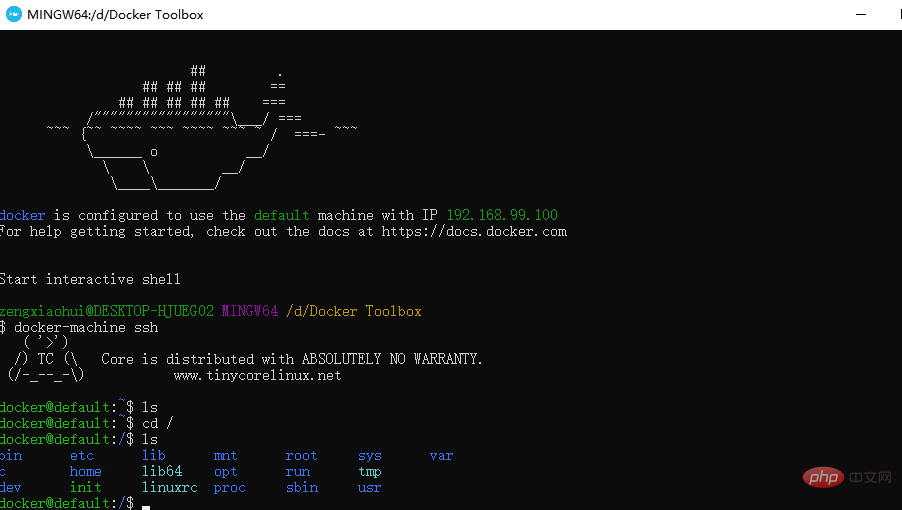
Obviously this command does not exist Of course, this is just my personal opinion. Maybe I made a mistake in my operation, maybe I don’t have enough knowledge. If friends find mistakes, please give me some advice. I will treat it as a mistake here. The correct way is in Docker. The redis.conf file is stored on the host machine. Obviously, the Docker host machine is not a Windows system, but a virtual machine started on the Windows system, so we need to enter the virtual machine. The default interface for Docker Quickstart Terminal startup is not authentic. Log in to the virtual machine, so we need to change the login method and use thedocker-machine sshcommand, as shown in the figure below:

In this way we enter In a real virtual machine, we operate on a virtual machine. Just like our installation on Linux, we first create two directories to store the Redis configuration:
/usr/ local/redis: stores redis.conf
/usr/local/redis/data: stores persistent files
After establishing the two directories, we put redis.conf in /usr/ In the local/redis directory, use the following Docker command to start the Redis image:
docker run -p 6379:6379 -v /usr/local/redis/redis.conf:/usr/local/ etc/redis/redis.conf -v /usr/local/redis/data:/data --name dockerRedis -d redis redis-server /usr/local/etc/redis/redis.conf
This docker startup command is a little different from the above. There are two parameters that I will explain here:
● -v /usr/local/redis/redis.conf:/usr/local/etc/ redis/redis.conf: This parameter is to copy /usr/local/redis/redis.conf to /usr/local/etc/redis/redis.conf
● -v /usr/local/redis /data:/data: The storage location of persistent files in the container will also be mapped to the host. In other words, persistent files will also be stored in /usr/local/redis/data
Here, Docker installation The complex operations of Redis have also been completed. If there are no special requirements, just use a simple docker to start it. It is simple, convenient and completely sufficient.
For more Redis related knowledge, please visit theRedis usage tutorialcolumn!
The above is the detailed content of Two installation and deployment methods of Redis (detailed explanation with pictures and texts). For more information, please follow other related articles on the PHP Chinese website!
 Commonly used database software
 What are the in-memory databases?
 Which one has faster reading speed, mongodb or redis?
 How to use redis as a cache server
 How redis solves data consistency
 How do mysql and redis ensure double-write consistency?
 What data does redis cache generally store?
 What are the 8 data types of redis