Images are one of the most basic content types available on the web. They say a picture is worth a thousand words. But if you're not careful, the image size can sometimes reach dozens of megabytes.
So while web images need to be clear and crisp, their size can be reduced and compressed, using load times to remain at acceptable levels.
php Chinese website new course announcement:
"PHP Development of Super Large CMS Website Management System Online Live Class" is now open for registration! (Class starts on October 28th)
For details, please see: //m.sbmmt.com/k.html
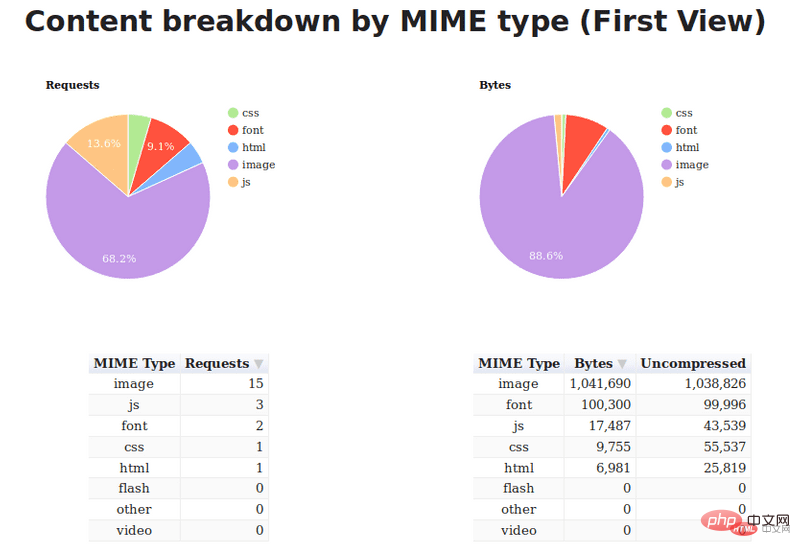
On my website, I noticed that my homepage The page size is over 1.1MB, with images taking up about 88%, I also noticed that the images I'm serving are larger than they need to be (resolution-wise), so obviously, there's a lot of room for improvement.
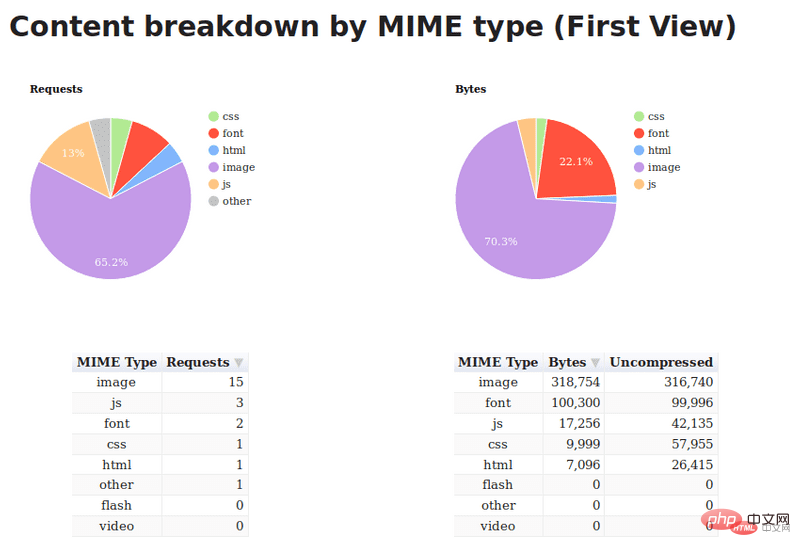
I started reading Addy Osmani’s excellent Essential Image Optimization (https://images.guide/) e-book and started adding content to my website I have made some image optimizations according to their suggestions. , and then did some research on responsive images and applied it.
This reduces the page size to 445kb, about 62%!
Compressing images means reducing the file size while maintaining the image within an acceptable definition range. I use imagemin (https://github.com/imagemin /imagemin) to compress images on your site.
To use imagemin, make sure you have Node.js installed, then open a terminal window, cd into the project, and run the following command:
npm install imagemin
Then create a new file named imagemin.js and write the following content:
const imagemin = require('imagemin');
const PNGImages = 'assets/images/*.png';
const JPEGImages = 'assets/images/*.jpg';
const output = 'build/images';
You can change PNGImages,# according to your needs Values for ##JPEGImages and output to match your project structure.
In addition, to perform image compression, you also need to install the corresponding plug-in according to the type of image to be compressed. JPEG/JPGAdvantages of JPG
The biggest feature of JPG islossy compression. This efficient compression algorithm makes it a very lightweight image format. On the other hand, even if it is called "lossy" compression, the JPG compression method is still a high-quality compression method: when we compress the image volume to less than 50% of the original volume, JPG can still maintain 60 % quality. In addition, the JPG format stores a single image in 24 bits and can present up to 16 million colors, which is enough to meet the color requirements in most scenes. This determines that its quality loss before and after compression is not easily visible to our human eyes. Perception - provided you use the right business scenario.
JPG usage scenarios
JPG is suitable for presenting colorful pictures. In our daily development, JPG pictures are often used as large background images, carousel images or banners. Figure appears.Defects of JPG
Lossy compression is indeed difficult to show off in the carousel shown above, but when it deals with vector graphics and logos and other lines When using images with strong sense of color and strong color contrast, the image blur caused by artificial compression will be quite obvious. In addition, JPEG images do not support transparency processing, and transparent images need to be rendered by calling PNG.Use MozJPEG to compress jpeg
Here we use Mozilla’sMozJPEG (https://github.com/mozilla/mozjpeg) tool, which It can be used as an Imagemin plug-in through imagemin-mozjpeg (https://www.npmjs.com/package/imagemin-mozjpeg). You can install it by running the following command:
npm install imagemin-mozjpeg
const imageminMozjpeg = require('imagemin-mozjpeg');
const optimiseJPEGImages = () =>
  imagemin([JPEGImages], output, {
    plugins: [
      imageminMozjpeg({
        quality: 70,
      }),
    ]
  });
optimiseJPEGImages()
.catch(error => console.log(error));node imagemin.js to run the script. This will process all JPEG images and place optimized versions in the build/images folder.
我发现将 quality 设置为 70 在大多数情况下可以产生足够清晰的图像,但你的项目需求可能不同,可以自行设置合适的值。
默认情况下,MozJPEG 生成渐进式 jpeg,这会导致图像从低分辨率逐渐加载到高分辨率,直到图片完全加载为止。由于它们的编码方式,它们也比原始的 jpeg 略小。
你可以使用 Sindre Sorhus 提供的这个命令行工具(https://www.npmjs.com/package/is-progressive-cli)来检查JPEG图像是否是渐进式的。
Addy Osmani 已经很好地总结了使用渐进式 jpeg (https://cloudinary.com/blog/progressive_jpegs_and_green_martians)的优缺点(https://images.guide/#the-advantages-of-progressive-jpegs)。对我来说,我觉得利大于弊,所以我坚持使用默认设置。
如果你更喜欢使用原始的jpeg,可以在 options 对象中将 progressive 设置为 false。另外,请确保 imagemin-mozjpeg(https://www.npmjs.com/package/imagemin-mozjpeg) 版本的变化,请重新查看对应文档。
PNG 的优缺点
PNG(可移植网络图形格式)是一种无损压缩的高保真的图片格式。8 和 24,这里都是二进制数的位数。按照我们前置知识里提到的对应关系,8 位的 PNG 最多支持 256 种颜色,而 24 位的可以呈现约 1600 万种颜色。
PNG 图片具有比 JPG 更强的色彩表现力,对线条的处理更加细腻,对透明度有良好的支持。它弥补了上文我们提到的 JPG 的局限性,唯一的缺点就是 体积太大。
PNG 应用场景
前面我们提到,复杂的、色彩层次丰富的图片,用 PNG 来处理的话,成本会比较高,我们一般会交给 JPG 去存储。
考虑到 PNG 在处理线条和颜色对比度方面的优势,我们主要用它来呈现小的 Logo、颜色简单且对比强烈的图片或背景等。
使用 pngquant 优化 PNG 图像
pngquant(https://pngquant.org/) 是我优化PNG图像的首选工具,你可以通过 imagemin-pngquant (https://www.npmjs.com/package/imagemin-pngquant)使用它:
npm install imagemin-pngquant
然后将以下内容添加到 imagemin.js 文件中:
const imageminPngquant = require('imagemin-pngquant');
const optimisePNGImages = () =>
  imagemin([PNGImages], output, {
    plugins: [
      imageminPngquant({ quality: '65-80' })
    ],
  });
optimiseJPEGImages()
  .then(() => optimisePNGImages())
.catch(error => console.log(error));我发现将 quality 设置为 65-80 可以在文件大小和图像质量之间较好的折衷方案。
有了这些设置,我可以得到一个屏幕截图,我的网站从 913kb 到 187kb,没有任何明显的视觉损失,惊人的79% 的降幅!
这是两个文件。看一看,自己判断一下:
原图(913kb)(https://img.php.cn/upload/article/000/000/006/5da92671660ec768.png)
优化后的图像(187kb)(https://img.php.cn/upload/article/000/000/006/5da925b776dd4330.png)
WebP 的优点
WebP 像 JPEG 一样对细节丰富的图片信手拈来,像 PNG 一样支持透明,像 GIF 一样可以显示动态图片——它集多种图片文件格式的优点于一身。
WebP 的官方介绍对这一点有着更权威的阐述:
与 PNG 相比,WebP 无损图像的尺寸缩小了 26%。在等效的 SSIM 质量指数下,WebP 有损图像比同类 JPEG 图像小25-34%。 无损 WebP 支持透明度(也称为 alpha 通道),仅需 22% 的额外字节。对于有损 RGB 压缩可接受的情况,有损 WebP 也支持透明度,与 PNG 相比,通常提供 3 倍的文件大小。
将 WebP 图像提供给支持它们的浏览器
WebP(https://developers.google.com/speed/webp/) 是谷歌引入的一种相对较新的格式,它的目标是通过以无损和有损格式编码图像来提供更小的文件大小,使其成为 JPEG 和 PNG 的一个很好的替代方案。
WebP 图像的清晰度通常可以与 JPEG 和 PNG相提并论,而且文件大小要小得多。例如,当我将屏幕截图从上面转换到 WebP 时,我得到了一个 88kb 的文件,其质量与 913kb 的原始图像相当,减少了90% !
看看这三张图片,你能说出区别吗?
原图PNG (913kb)(https://img.php.cn/upload/article/000/000/006/5da925930f14b710.png)
优化PNG图像(187kb)(https://img.php.cn/upload/article/000/000/006/5da925b776dd4330.png)
WebP图像(88kb,可在Chrome或Opera浏览器中浏览)(https://freshman.tech/assets/dist/images/articles/freshman-1600.webp)
就我个人而言,我认为视觉效果是可以比较的,而且节省下来的大小是不容忽视的。
既然我们已经认识到在可能的情况下使用WebP格式是有价值的,那么很重要的一点是—它不能完全替代 JPEG 和 PNG,因为浏览器对 WebP 支持并不普遍。
在撰写本文时,Firefox、Safari 和 Edge 都是不支持WebP的浏览器。
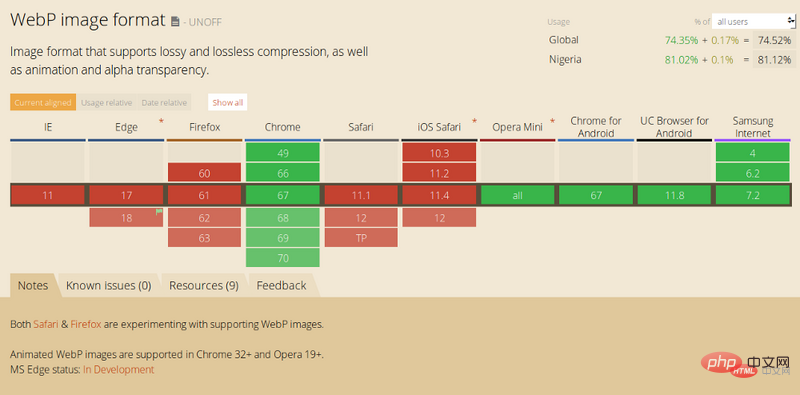
然而,根据 caniuse.com(https://caniuse.com/#search=WebP) 的数据,全球超过70%的用户使用支持WebP的浏览器。这意味着,通过使用 WebP 图像,可以为大约 70% 的客户提供更快的 web 页面及更好的体验。
安装它,运行以下命令:
npm install imagemin-webp
然后将以下内容添加到你的 imagemin.js 文件中:
const imageminWebp = require('imagemin-webp');
const convertPNGToWebp = () =>
  imagemin([PNGImages], output, {
    use: [
      imageminWebp({
        quality: 85,
      }),
    ]
  });
const convertJPGToWebp = () =>
  imagemin([JPGImages], output, {
    use: [
      imageminWebp({
        quality: 75,
      }),
    ]
  });
optimiseJPEGImages()
  .then(() => optimisePNGImages())
  .then(() => convertPNGToWebp())
  .then(() => convertJPGToWebp())
.catch(error => console.log(error));我发现,将 quality 设置为 85 会生成质量与 PNG 相当但小得多的 WebP 图像。对于 jpeg,我发现将 quality 设置为 75 可以在视觉和文件大小之间取得很好的平衡。
一旦有了 WebP 图像,可以使用以下标记将它们提供给可以使用它们的浏览器,同时向不兼容 WebP 的浏览器使用 png 或者 jpeg。
<picture>
    <source srcset="sample_image.webp" type="image/webp">
    <source srcset="sample_image.jpg" type="image/jpg">
    <img src="sample_image.jpg" alt="">
</picture>使用此标记,理解 image/webp 媒体类型的浏览器将下载 Webp 图片并显示它,而其他浏览器将下载 JPEG 图片。
任何不支持
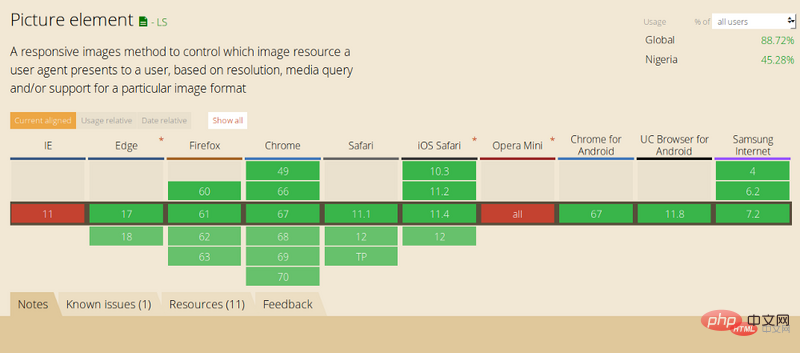
请注意,在所有情况下,img 标记都是实际呈现给页面的内容,因此它确实是语法的必需部分。 如果省略 img 标记,则不会渲染任何图像。
这意味着你无需设置
正如你所看到的,优化 web 上使用的图像的过程并不复杂,通过减少页面加载时间,可以为客户带来更好的用户体验,希望本文对你有所帮助,共进步!
英文原文地址:https://www.freecodecamp.org/news/image-optimization-558d9f449e3/
为了保证的可读性,本文采用意译而非直译。
相关推荐:
优化CSS并加速网站的21种方法