Composer is a dependency management tool for PHP. You can declare dependent code libraries in your project and install them. The following column composer usage tutorial will explain the installation and simple use of Composer on Windows and Linux (such as CentOS).

Install Composer
1. First, please confirm that PHP has been installed correctly. Open the command line window in windows/open the terminal in linux. Execute php -v to check whether the version number is correctly output.
windows
PS E:\repository\work> php -v
PHP 7.0.32 (cli) (built: Sep 12 2018 15:54:08) ( ZTS )
Copyright (c) 1997-2017 The PHP Group
Zend Engine v3.0.0, Copyright (c) 1998-2017 Zend Technologies
centos
[root@jmsiteos7 ~]# php -v
PHP 7.2.13 (cli) (built: Dec  6 2018 23:18:37) ( NTS )
Copyright (c) 1997-2018 The PHP Group
Zend Engine v3.2.0, Copyright (c) 1998-2018 Zend Technologies
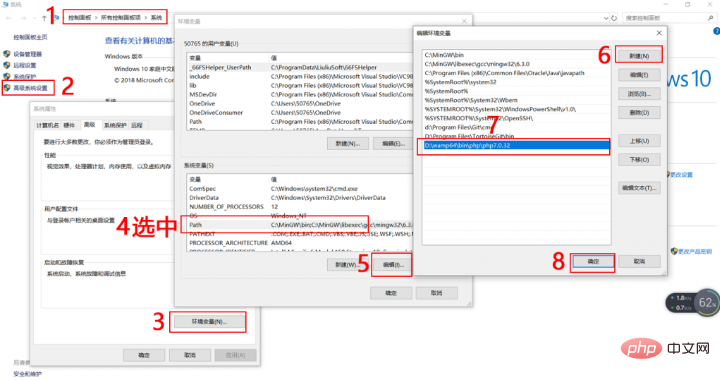
with Zend OPcache v7.2.13, Copyright (c) 1999-2018, by Zend TechnologiesIf php is installed but the environment variable is not set, you need to set the environment variable
windows

#Exit and reopen the command line window, enter php -v again to check the version number, if it is still abnormal, please Check whether the php directory is correct
centos
vi /etc/profile
#文件地步输入如下两行
PATH=$PATH:/usr/local/php72/bin/:/usr/local/php72/sbin/
export PATH
#立即生效
source /etc/profile
Enter php -v again to check the version number. If it is still abnormal, please check whether the php directory is correct
2. Download Composer
php -r "copy('https://install.phpcomposer.com/installer', 'composer-setup.php');"
3. Install Composer
php composer-setup.php
4. Delete the installer
php -r "unlink('composer-setup.php');"
5. Partial installation
The above steps download Composer After the process is executed correctly, you can copy the composer.phar file to any directory (such as the project root directory), and then use Composer through the php composer.phar command!
6. Global installation
centos
Open the terminal and execute the following command to move the composer.phar file downloaded earlier to /usr/local/ Under the bin/ directory:
mv composer.phar /usr/local/bin/composer
windows
Enter the PHP installation directory, copy composer.phar to the PHP installation directory, and create a new one in the PHP installation directory composer.bat file, and save the following code into this file
@php "%~dp0composer.phar" %*
Re-open a command line window and try executing composer --version to see if the version number is correctly output
windows
PS E:\repository\work> composer --version
Composer version 1.8.0 2018-12-03 10:31:16
centos
[root@jmsite ~]# composer --version
Do not run Composer as root/super user! See https://getcomposer.org/root for details
Composer version 1.8.0 2018-12-03 10:31:16
This is just a demonstration. Composer cannot be executed as root. The official explanation is: some Composer commands , including exec, install, and update, allow third-party code to execute on your system. This comes from its "plugins" and "scripts" capabilities. Plugins and scripts have full access to the user account running Composer. Therefore, it is highly recommended to avoid running Composer as superuser/root.
7. Upgrade Composer
composer selfupdate
8. Set composer domestic source
composer config -g repo.packagist composer https://packagist.phpcomposer.com
Use Composer
1.Based on composer.json
Create a composer.json file in the project directory to describe the project's dependencies.
{
    "require": {
        "monolog/monolog": "1.2.*"
    }
}means you need to download any version of monolog starting from 1.2. Use the following command to install the code library
composer install
2. Based on the require command
If you feel that you can create The composer.json file is troublesome. You can also use the require command during installation.
composer require monolog/monolog
composer will look for the code base information and automatically create the composer.json file and composer.lock file
3. Update All code libraries in the project, or certain code libraries specified
# 更新所有代码库
composer update
# 更新指定的代码库
composer update monolog/monolog
# 更新指定的多个代码库
composer update monolog/monolog phpaes/phpaes
# 还可以通过通配符匹配代码库
composer update monolog/monolog phpaes/*
4. Remove a code library. If it is used by other code libraries, it cannot be removed
composer remove monolog/monolog
5. Search the code library in the source
composer search monolog
6. View code library information
# 显示已经安装的代码库
composer show
# 通过通配符进行筛选
composer show monolog/*
# 具体某个代码库的信息
composer show monolog/monolog
Automatic loading
In addition to downloading the code library, Composer also prepares a Automatically load files, which can load all class files in the code base downloaded by Composer. To use it, you just need to add the following line of code to your project's bootstrap file
require 'vendor/autoload.php';
#
$log = new Monolog\Logger('name');
$log->pushHandler(new Monolog\Handler\StreamHandler('app.log', Monolog\Logger::WARNING));
$log->addWarning('Foo');
The above is the detailed content of Installation and use of Composer on Windows and Linux. For more information, please follow other related articles on the PHP Chinese website!