This article brings you a detailed introduction (code example) about Ajax in JavaScript communication. It has certain reference value. Friends in need can refer to it. I hope it will be helpful to you.
Form submission
provides the form submission function in HTML. We can submit data from the front desk to the background through the form, by setting submitEvents can be buttons or other elements that can also trigger form submission events
Submitting data through the form does not need to rely on the js engine. The browser itself can implement it, but this will also cause a problem. User submission When data information needs to be refreshed, the entire page is required, which greatly reduces the user experience.
Ajax
What is Ajax
The birth of Ajax solved the above problem question, Ajax stands for: Asynchronous Javascript And XML, that is, asynchronous, javascript and XML. Ajax is not a programming language, but a language used to create better, faster, and more interactive Web application technology can partially refresh the page through a small amount of data interaction between the browser and the server. After using Ajax technology, the user's request data is sent indirectly through the Ajax engine instead of directly through the browser. Issued, the data returned by the server is also transmitted back to the Ajax engine
Although the advantages of Ajax when used are obvious, there are also disadvantages:
It is not suitable for search engines Friendly
Users cannot use rollback to get the previous page
We can compare the traditional submission method and the submission method using Ajax technology Different:
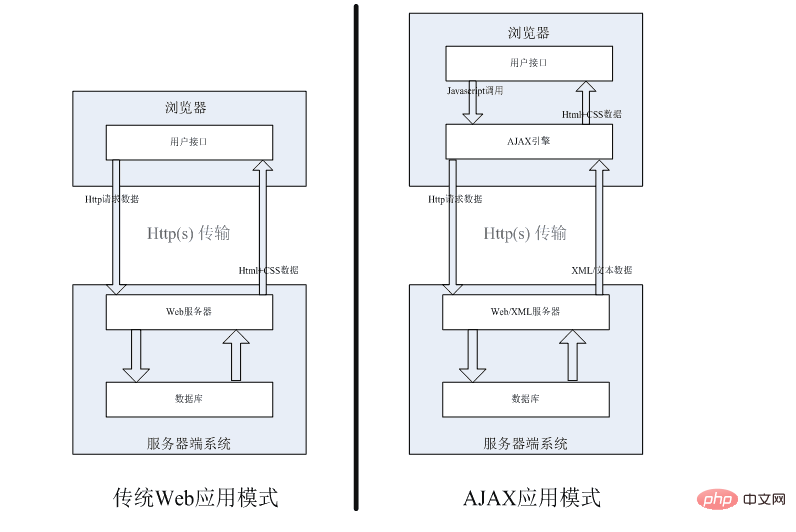
Ajax engine
The essence of Ajax is its Ajax engine, so what is an Ajax engine? It is the XMLHttpRequest object. Except for IE5, which has been buried, other modern browsers support this object. It is also a JavaScript object, which is responsible for making requests and receiving responses.
In IE5 and IE6 The Ajax engine is ActiveXRequest, so we may need to do some compatibility
<script>
  function createAjax(){
     var xhr;
     window.XMLHttpRequest?xhr=new XMLHttpRequest():xhr=new ActiveXObject("Msxml2.XMLHTTP");
     return xhr;
  }
</script>Create an Ajax engine using Ajax
##
    function createRequst() {
      return window.XMLHttpRequest ? new window.XMLHttpRequest() :
                    new window.ActiveXObject('Microsoft.XMLHTTP');
    }

console.log(createRequst());//在IE7-中返回的是一个object对象XMLHttpRequest object in the console
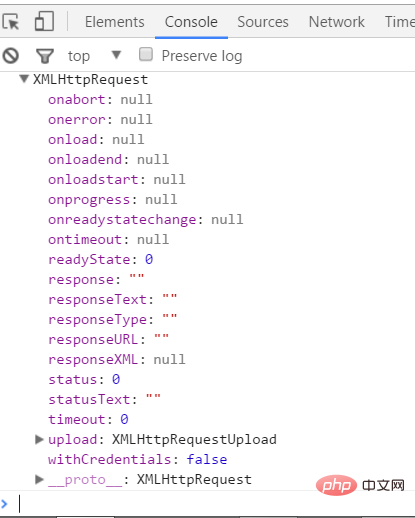
onloadend Events triggered when the request endsontimeout Events triggered when the request times outonreadystatechange Events triggered when the request state changesreadyState Request statusstatus The status code returned by the servertimeout sets the request time. When the request time exceeds the time we set, the request will be automatically logged outwithCredentials Whether Require certificate (e.g. 12306) responseText Data returned in non-XML formatEstablish connection
    var xhr=createRequst();//封装的函数
    xhr.open("GET","data.php",true);
    //如果是使用GET方式提交数据那么需要在URl后添加?然后把键值对之间以&符号链接拼接在?后面
//如果是使用POST获取数据,那么我们要将参数传递到send中,键值对与键值对之间使用&符号拼接我们都知道,无论是GET还是POST请求,都是建立在HTTP协议之上的,而HTTP协议又是建立在TCP协议之上的,也就是HTTP协议规定的数据在万维网中传输的的规定,那么说白了GET和POST只是两种不同的TCP链接,只是由于浏览器的规定设置导致了有一些差异,在本质上并没有什么区别,实际上真正的差别在于,GET和POST在传输数据的过程中,GET会产生一个TCP数据包,而POST会产生两个数据包
浏览器在发送GET请求时是将http header和data一起发出,服务响应200,而在发送POST请求时。浏览器会先发送http header,服务器响应100 continue,再发送data,服务器响应200,也就是说,GET方式提交数据是一次性的,而POST第一次先告诉服务器我要请求数据,第二次再将数据提交过去
所以这里由于POST是两次请求,耗时会增加,这也是雅虎优化建议中为什么提出,我们尽量将页面中使用POST的方式改为GET来提升响应速度,但是,在网络性能好的情况下,使用GET和POST的时间差别几乎没有,在网络较差的情况下,两次打包会大大提升数据的完整性,而且不是所有浏览器都是两次打包的,Firefox就是使用一次打包
至于安全性方面,GET和POST同样不安全,通过POST加密的数据会被抓包工具截取,如果有要求使用加密同样需要通过加密方式进行加密
继续上面的栗子:
xhr.onreadystatechange=function(){
      if(xhr.readyState===4){
      //判断请求状态是否是已经完成
        if(xhr.status>=200&&xhr.status<p>这里有一些需要我们了解的</p><ol class=" list-paddingleft-2">
<li>
<p><code>readyState</code> 请求的状态码</p>
<p>0: 表示请求未初始化,也就是没有建立open请求</p>
<p>1: 表示建立open()请求,正在发送请求</p>
<p>2: 表示请求已经接收,open()方法已经完成,已经收到全部响应内容</p>
<p>3: 表示请求处理中,正在解析响应内容</p>
<p>4: 表示请求已经完成,响应也已经就绪,也就是说响应内容已经解析完成,可以在客户端进行调用了</p>
</li>
<li>
<p><code>status</code> 服务器返回的状态码,有几种常见的类型:</p>
<p>以1开头代表请求已经接受</p>
<p>以2开头代表请求已经成功</p>
</li>
<ol class=" list-paddingleft-2" style="list-style-type: lower-alpha;"><li><p>200,请求成功</p></li></ol>
</ol><p>以3开头代表网页重定向,常见的几个:</p><ol class=" list-paddingleft-2"><li><p>304,代表浏览器缓存可以继续使用,服务器没有返回数据,直接从浏览器中获取数据</p></li></ol><p>以4开头代表请求错误 ,检查是不是url输入错误或者是后台人员接口给错了</p><ol class=" list-paddingleft-2">
<li><p>404,无法找到指定的资源,也就是url地址错误</p></li>
<li><p>405,请求方法对请求资源不适用</p></li>
<li><p>403,请求不允许</p></li>
</ol><p>以5开头代表服务器错误,需要后台人员配合进行调试</p><h4>如何解决服务器返回304</h4><p>浏览器有默认的缓存机制,在第一次向服务器请求数据的时候,在发现页面中存在文件请求时会发出请求,并将这些请求缓存在本地,在第二次向服务器发送请求的时候,在请求头中发送一个<code>Last-Modified</code>,它包含了上一次从服务器获得数据的日期。如果服务器判断从这个日期起服务器中数据没有进行修改,那么直接返回<code>304</code>的状态,不再重新发送数据,此时用户仅仅是获取了<code>304</code>状态码,不会再次请求数据,而是直接从本地读取缓存</p><p>避免服务器返回<code>304</code>最简单的方法就是直接在url地址中添加一个随机数的时间戳,例如:/Home/GetMusic?c_time=时间戳</p><p>在前端有个设置可以解决读取缓存的方法,设置meta标签的属性</p><pre class="brush:php;toolbar:false"><meta>或者设置Ajax默认禁止缓存
    var xhr=createRequst();//封装的函数
    xhr.open("GET","data.php",true);
    xhr.onreadystatechange=()=>{
      if(xhr.readyState===4){
        if(xhr.status>=200&&xhr.status<p>如果使用jQuery进行开发,可以在在jQuery中设置Ajax的cache属性,该值默认为ture,设置为false即代表禁止浏览器缓存</p><h3>发送请求头</h3><p>在使用<code>POST</code>发送页面的时候需要注意的是,要发送请求头,格式如下:</p><pre class="brush:php;toolbar:false">xhr.setRequestHeader('Content-Type', 'application/x-www-form-urlencoded');
//设置请求头格式为仿照form表单提交在发送Ajax请求时默认发送的请求头格式为文本格式,如果用来提交表单数据会报错,所以需要我们认为的设置请求头格式,以上的代码的作用就是告诉服务器我们发送的是form表单格式的数据
xhr.send();
这里我们注意一个问题,关于send()的位置问题,之前我们一直把send()放在监听事件状态onreadystatechange之前,这样写在默认的异步状态下是没有问题的,但如果是在同步的状态下看,是会报错的,这里涉及到了执行顺序的问题,我们是需要先准备好怎么样接收数据,然后才能对数据进行接收
json是一种键值对模式的字符串,其中的键和值都是用双引号进行包裹,由于json的轻量和便于使用,现在大部分公司使用的都是json格式的数据
var str={"name":"Tom","age",18}//如果值是数字的话可以不使用双引号包裹具体关于json的定义可以参考JSON
在浏览器中为我们提供了两种json数据格式转化的方法
JSON.parse(ison),该方法表示将接收到的json数据格式转化为对象格式,需要重点注意的是在使用该方法时,必须是键值对使用双引号包裹,所以外层的需要是单引号
JSON.stringify(object),该方法表示将JavaScript中的对象转化为json格式的字符串
这里其实还有一个方法可以解析json格式的字符串,eval,这个方法比较特殊,W3C对它的介绍是,很强大的一个功能,但是运用的很少,这是因为eval方法本身会自动执行字符串中所包含的逻辑语句,所以如果我们使用该方法直接接收没有验证过的返回信息就会很容易遭到攻击,例如:
  var str={"name":alert("弹出")};
var o=eval(str);在执行上述代码时会自动弹出alert提示框,因为在使用eval时已经执行了字符串内部的逻辑代码,所以不推荐使用该方法
在JQuery中对Ajax方法进行了封装,JQuery的Ajax封装是非常强大的,在其它框架中也大量借鉴了该方法,下面我们来看一下在JQuery中是如何使用Ajax的
比较简单方法:
      $(function(){
          $("#btn").on("click",function(){
             $.post("02.php",{name:"Tom",age:18},function(data){
                console.log(data)
             },'json')
          })
      })
//相对应的还有GET和getJSON等其它方法,基本套路都一样下面的是我们经常用到的,同样也是在其他框架中被参考的方法$.ajax
      $.ajax({
        type:"get",//设置请求的方式
        url:"02.php",//设置请求的地址
        data:{name:"tom",age:18},//设置发送的参数
        dataType:"json",//请求的数据类型,自动转化为对象
        async:true,//设置是否异步,默认为true
        cache:false,//设置浏览器是否缓存该页面,默认为true
        timeout:300,//设置请求超时时间
        beforeSend:function(xhr){//请求开始前回调该函数
          console.log("请求开始前");
          //return false  如果在请求开始前直接return等于阻止了ajax请求
        },
        success:function(result,status){//请求成功时回调该函数,,result代表返回的数据,status为状态描述
          console.log("请求成功了");
        },
        error:function(xhr,status,error){//请求失败时回调该函数,xhr为 XMLHttpRequest对象,status为错误信息,error表示捕获的错误对象
          console.log("请求失败,"+xhr.status);
        }
      })
//以上只是我们常用的一些方法和参数,JQuery中还封装了很多其它的方法和参数,包括上面提到的$.get和$.post等方法都是该方法的变种我们简单的模拟一下jQuery对Ajax的封装
function formatData(data) {//格式化数据的方法
    var ret = [];
    for (var key in data) {
        ret.push(encodeURIComponent(key) + "=" + encodeURIComponent(data[key]));
        //有时候传入的可能是汉字,所以需要利用encodeURIComponent转化成编码格式
        //encode方法废弃了,现在提供的是encodeURLConponent方法
    }

    ret.push(("=" + new Date().getTime()));
    //添加时间戳,防止获取缓存的数据(http状态码304)
    return ret.join("&");
}

function createRequst() {//创建Ajax引擎对象
    return XMLHttpRequest() ? new XMLHttpRequest() : new ActiveXObject("Msxml2.XMLHTTP")
}

function jsonp(option) { //jsonP方法
    //判断用户传入的参数
    if (!option || !option.url || !option.callback) {
        console.error("参数异常");
        return;
    }
    //如果用户参数传入正确,创建script标签,添加到head标签中
    var scriptElement = document.createElement("script"),
        headElement = document.getElementsByTagName("head")[0];
    headElement.appendChild(scriptElement);

    //注意jsonp创建的函数是全局函数,为了防止代码污染,起特定的名字
    var fnName = ("jsonp_" + Math.random()).replace(".", "");
    option.data[option.callback] = fnName;

    //给用户传入的向后台发送的data数据中添加一个option.callback属性,并赋值为我们自定义创建的函数名,让后台接收我们的函数名,后台才能返回给我们数据
    window[fnName] = function (data) {
        if (option.timeout) {//用户如果设置了超时时间,在接收到数据后将计时器清除
            window.clearTimeout(scriptElem.timer);
        }
        delete    window[fnName];//删除全局函数
        headElement.removeChild(scriptElem);//删除创建的script标签
        option.success && option.success(data);
    }
    if (option.timeout) {//如果用户设置了超时时间,设置计时器,在用户设置的超时时间到达后如果该函数执行,说明超时,那么执行其中的代码
        scriptElement.timeout = window.setTimeout(function () {
            delete global[fnName];
            headElem.removeChild(scriptElem);
            option.fail && option.fail({"message": "请求超时"});
        }, option.timeout)
    }
    scriptElem.src = option.url + '?' + formatData(option.data);//执行跨域请求,跨域的时候不需要其它参数,所以data中的数据就是callback和它的值
}

$.extend({
    AjaxSetting: {//设置用户默认输入的各项参数
        url: "",
        type: "GET",
        dataType: "json",
        async: true,
        success: null,//成功后执行的函数
        fail: null,//失败后执行的的函数
        contentType: "application/x-www-form-urlencoded;charset=UTF-8"//模拟表单提交的请求头

    },
    ajax: function (url, option) {//在JQuery中使用的两个参数,这里仿照JQuery写法

        var context, xhr;

        if (typeof url === "object") {//判断url类型,如果用户直接传入一个对象,说明没有单独传入URL地址,那么我们执行下面的代码
            option = url;
            url = null;
        } else {//如果用户单独传入了url地址,那么我们执行下面的代码
            option.url = url;
            url = undefined;
        }

        if (!option || !option.url || !option.success) {//判断用户是否输入option,option中的url和success是我们设置为默认必须的,所以在用户传入时就进行判断
            console.error("参数传入异常");
            return;
            //如果用户传入的参数异常,那么我们弹出异常,并且直接返回
        }
        // 通过JQuery中的extend方法获取默认设置
        $.extend($.AjaxSetting, context);
        // 通过JQuery中的extend方法获取用户设置,覆盖或新增默认的设置
        $.extend(option, context);

        if (context.dataType.toLowerCase() === "jsonp") {//判断用户是否要求跨域
            jsonp(context);//如果是的话执行jsonp的方法
        } else {//否则的话执行Ajax函数
            xhr = createRequst();//通过createReqyst方法执行函数
            xhr.onreadystatechange = function () {
                if (xhr.readyState == 4) {
                    if (xhr.status >= 200 && xhr.status <h1>Ajax轮询和长连接</h1><p>Ajax轮询和长连接都是为了实现页面的实时刷新,但是需要注意,如果在不是必要的情况下尽量不要使用这两种方法,大量的不间断的数据请求对前台和后台都是非常有压力的,如果要实现页面的实时刷新,建议使用<code>WebSocket</code></p><h2>Ajax轮询</h2><p>客户端定时向服务器发送Ajax请求,服务器在返回数据后断开连接,轮询能够实现页面的实时刷新,但是缺点也很明显,定时的发送数据大部分是没有意义的,而且占用额外的服务器资源</p><pre class="brush:php;toolbar:false">
    function Ajax(){
        setInterval(function(){
             var xhr=new XMLHttpRequest();
                 xhr.open("open","url",true);
                 xhr.onreadystatechange=function(){
                     if(xhr.readyState===4){
                         if(xhr.status>=200&&xhr.status<p>代码实际上很简单,就是调用计时器,每过一段时间向后台发送一次请求</p><h2>long-polling</h2><p>所以为了能够使页面及时刷新,并且改善轮询存在的弊端,我们一般使用的是长轮询的方法,也就是ling-poling</p><pre class="brush:php;toolbar:false">    $(function(){
        (function longPolling(){
            $.ajax({
                url:"01.php",
                type:"get",
                datatype:"json",
                timeout:5000,
                error:function(xml,status,eror){
                     //可以选择报请求超时的错误,不过一般不这么做
                     longPolling();

                },
                success:function(data,status,xhr){
                    console.log(data);
                    //如果有数据返回,那么将数据添加到页面
                    longPolling();
                }
            })
        })()
})Ajax长轮询需要后台写相应的代码来配合完成,实际代码也就是无论成功或者失败都再次调用自身来向后台发起请求
什么是模板引擎,说白了就是在字符串中有几个变量待定,我们可以用来配合Ajax请求返回的数据来动态填充页面内容,例如:
//这里用到的是attTemplate模板引擎
<script>
//为了防止script对内容进行解析,将script的type属性变为非javascript即可,改为template主要是为了增加代码的可读性
        <tr>
            <td><%=name%> //<%= %>代表输出值
            <td><%=skill%>//在这里<%= %>中的skill代表的就是我们设定的待定的变量
            <td><%=wife%>
            <td>
                <% for(var i=0;i<friends.length;i++){ %>  // <%  %>里的内容代表的是输出的逻辑语句
                <a><%=friends[i]%>
                <% }%>


</script>我们可以在写一个完整的:
nbsp;html>
<meta>
<title>Document</title>
<script></script>//导入模板引擎js文件
<script>
<% for(var i = 0;i < posts.length; i++) {%>
<% var post = posts[i]; %>
<% if(!post.expert){ %>
<span>post is null
<% } else { %>
<a href="#"><%= post.expert %> at <%= post.time %>
<% } %>
<% } %>
</script>
<script>
var data = {
"posts": [{
"expert": "content 1",
"time": "yesterday"
},{
"expert": "content 2",
"time": "today"
},{
"expert": "content 3",
"time": "tomorrow"
},{
"expert": "",
"time": "eee"
}]
};
var str=template('template',data);//artTemplate模板引擎的使用就是调用template方法,传入模板的id和变量的值
console.log(str)
</script>
封装方法主要是使用了string的方法和正则进行匹配,下面写一下大概的封装
    function template(templateStr,data){//传入两个值,templateStr代表模板的字符串,data代表传入的变量对象

        var reg = /]+\S)\s*%>/,//定义正则匹配
            result;

        while(result=reg.exec(templateStr)){//根据正则的exec方法的属性如果没有符合的返回null来确定循坏停止的条件

            var matchString=result[0],//根据exec方法返回的是这部分的字符串

                matchWord=result[1];//根据exec方法返回的是中的字符,也就是我们传入的data中的键

            templateStr=templateStr.replace(matchString,data[matchWord]);
            //调用字符串的rplace方法,符合的目标进行替换
        }
        return templateStr;
}出于安全性的考量,现代所有的浏览器都遵循同源策略,同源策略不允许Ajax获取其它网站的数据,我们通过某种方式来获取其它网页的数据的方式就是跨域
简单来说就是在两个网页域名,端口,协议任意不同的情况下,A网页无法获取B网页的数据,举一个例子来说明:
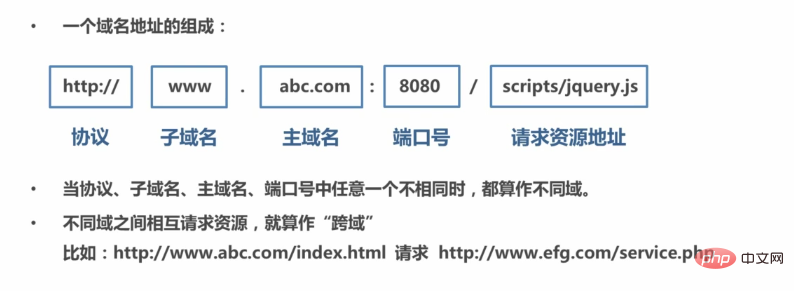
http://www.example.com/dir/page.html
http://www.example.com/dir2/other.html  //同源
http://example.com/dir/other.html    //不同源,域名不同
http://v2.www.example.com/dir/other.html    //不同源,域名不同
http://www.example.com:81/dir/other.html    //不同源,端口不同
注意,同一域名下的不同服务器获取数据也是跨域,例如两台电脑的IP地址不同,A不能直接获取B电脑服务器的数据
如果是非同源那么会受到以下限制:
cookie, localStorage和indexDB无法读取
DOM无法获取
AJAX请求可以发送,但是无法获取响应
具体的内容可以参考:同源策略
什么是JSONP,很多人会把jsonp和Ajax搞混,或者认为jsonp是Ajax提供的跨域方法,但特别需要注意,这两者是相互独立的,这里引用一段知乎的回答

jsonp的本质可以认为是由于src属性不受同源策略的限制,可以获取其它域的数据,利用src能够跨域获取数据的特性来实现我们从其它的网站获取数据,前提是必须在该网站配合下
实际在之前的很多操作中我们已经使用到了src能够跨域的这个特性,例如我们在img中插入一张图片,可以直接把图片的地址复制到src中
<img alt="Detailed introduction to Ajax in JavaScript communication (code example)" >
所以需要注意,src这个属性实际上是等同于发送了一个GET形式的Ajax请求,包括href,所以我们在页面中尽量不要写空的href和src属性,可以减小服务器的压力
下面我们来举一个jsonP跨域的例子:
<script>
</script>
<script>
function sayhi(data) {
//参数data就是我们要获取的跨域的数据,在拿到之后可以配合模板引擎在页面中放置
console.log(data);
//sayHi方法会自执行,因为在后台传送数据时会用括号将callback的值包裹起来
}
//后台在接收到`callBack`后,获取到`sayhi`的名称,返回`sayhi('("+data+")')`,所以我们接收的函数的参数就是我们要获取的数据
</script>在JQ中为我们封装了跨域的方法,有两种方式:
1.$.ajax()方法
<script>
$(function(){
$.ajax({
url:"http://api.map.baidu.com/telematics/v3/weather?location=北京 &output=json&ak=tq0Kt0NFYheTCj5mszast0drkIqqVTNn",
dataType:"jsonp",//只需要将dataType设置为jsonp即可
success:function(data){
console.log(data)
}
})
})
</script>
2.getJson方式
<script>
$.getJson('http://csdn.net/blog/data.java?callback=?',function(data){console.log(data)//处理返回的数据});
</script>在一个window的存活周期下,窗口载入的所有页面都共享一个window.name属性,每个页面都对它有可读可写的权限,即使window.location重载也不会有变化
window.name的格式为字符串,更多的时候我们使用json的格式来进行书写,window.name存在字符串的限制,最大的大小为2M
下面我们来举一个栗子:
a.html
      <input>
      <script>
          window.name="这是a网页设置的";
          document.getElementById("btn").onclick=function(){
              window.location.href="b.html"
          }
      </script>
b.html
      <script>
          console.log(window.name);//"这是a网页设置的"
      </script>
这个方法和window.name一样,需要是同一个页面打开的窗口
我们直接来举一个栗子:
//数据端发送
<script>
//弹出一个新窗口
var myPopup = window.open(domain
+ '/windowPostMessageListener.html','myWindow');
//周期性的发送消息
setInterval(function(){
var message = 'Hello! The time is: ' + (new Date().getTime());
var domain = 'http://scriptandstyle.com';
console.log('blog.local: sending message: ' + message);
myPopup.postMessage(message,domain);
//postMessage有两个参数1.message代表的是要发送的数据
// 2.domain代表的是要发送数据到哪个地址
},6000);
</script>
//数据端接收
<script>
//响应事件
window.addEventListener('message',function(event) {
if(event.origin !== 'http://davidwalsh.name') return;
console.log('message received: ' + event.data,event);
event.source.postMessage('holla back youngin!',event.origin);
},false);
//需要注意的是1.需要对浏览器进行判断,众所周知IE使用的是attachEvent
//这里注意message是postMessage的接收事件,其中有三个参数1.source,代表消息源,也就是发送消息的窗口
//2.origin,代表消息源的url,包含协议,端口,域名,用来验 证数据源
//3.data,发送方发送过来的数据
</script>这个方法是实际工作中最常用的,我们如果有需要跨域请求数据,一般会让后台配合请求到数据然后在返回给前台使用。
The above is the detailed content of Detailed introduction to Ajax in JavaScript communication (code example). For more information, please follow other related articles on the PHP Chinese website!
