html除了显示字符和图像的语言以外,其实还具有创建简单表单的功能,本篇文章就来给大家分享关于如何使用html格式创建发送表单。
我们先来解释一下表单元素:表单元素是创建提交表单的必要元素。
基本格式如下:
<form action =""method ="">
  //填写表单的内容
</ form>
实际上,它虽然不显示仅使用表单元素进行成像的输入表单,但可以通过在表单中放置诸如input属性之类的部分来显示表单。
表单元素是一个图像,例如通过将部分放在一起发送订单的标签。
立即学习“前端免费学习笔记(深入)”;
说了这些,可能对于表单还是不够清晰,下面我们就来看看具体的内容。
action属性
action属性的作用是指定在发送表单后将数据发送到的位置。
示例:
指定为外部URL
我们将表单数据发送到URL(//m.sbmmt.com/)
<form action ="//m.sbmmt.com/">
指定为内部URL
将表单数据发送到form.php,在添加到当前URL末尾的位置进行处理。
<form action ="form.php">
未指定
将表单数据发送到当前URL。
<form>
method属性
发送表单时指定method属性的作用和发送方法。
常见的传输方法是POST和GET。
我们来看一个具体的例子
<!DOCTYPE html>
<html>
<head>
<meta charset="utf-8">
	<title></title>
</head>
<body>
<form action="" method="">
  <div>
    <label for="message">message:</label>
    <br>
    <input type="text" />
  </div>

  <div class="button">
    <button type="submit">发送消息</button>
  </div>
</form>
</body>
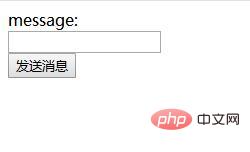
</html>效果如下:

说明:上述代码中,form是一个大的标签;下面是label,这可以设置在表单上的标签,这次生成的是一个message的标签。接下来是input标签,使用input的话可以生成输入的形式;最后是button,button是可以生成按钮的标签。
以上就是如何使用HTML创建表单的发送的详细内容,更多请关注php中文网其它相关文章!

HTML怎么学习?HTML怎么入门?HTML在哪学?HTML怎么学才快?不用担心,这里为大家提供了HTML速学教程(入门课程),有需要的小伙伴保存下载就能学习啦!


Copyright 2014-2025 //m.sbmmt.com/ All Rights Reserved | php.cn | 湘ICP备2023035733号