The content of this article is a summary of relevant knowledge about Dom in JS. It has certain reference value. Friends in need can refer to it. I hope it will be helpful to you.
Purpose
Used to record and summarize learned knowledge points in order to review the past and learn new things
Explanation
Write it this way to facilitate your own memory
Memory Click
Node related
Dom node acquisition
getElement (Id, ClassName, TagName) and querySelector (/All this is a static node collection, not real-time)
childNodes/firstChild/lastChild/nextSibling/previousSibling/parentNode gets all types of related nodes, not just element nodes
children/firstElmentChild/lastElmentChild/nextElmentSibling/previousElmentSibling/parentElment, gets only element-related nodes
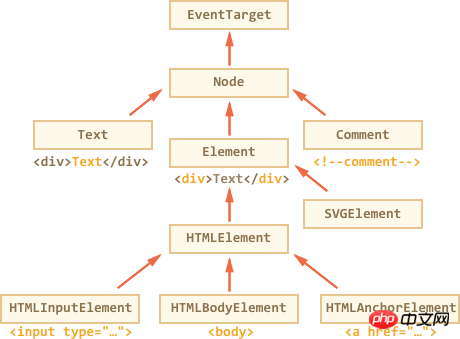
Node tree

The key point is:
HTMLBodyElement These are all constructors, and the terminal of the prototype chain is still Object.prototype
document.body.__proto__ === HTMLBodyElement.prototype  //true
document.documentElement.__proto__.__proto__ === HTMLBodyElement.prototype.__proto__  //true
document.documentElement.__proto__.__proto__===HTMLElement.prototype  //true
Copy after login
nodeType
| Constant |
Value |
Description |
| Node.ELEMENT_NODE |
1 |
Element node, element |
| Node.TEXT_NODE |
3 |
Text node, textContent |
##Node.PROCESSING_INSTRUCTION_NODEE | 7 | A ProcessingInstruction for XML documents, such as declaration. |
Node.COMMENT_NODE | 8 | A comment node |
Node.DOCUMENT_NODE | 9 | Document Node |
Node.DOCUMENT_TYPE_NODE | 10 | DocumentType node that describes the document type. For example, document type declaration. |
Node.DOCUMENT_FRAGMENT_NODE | 11 | A DocumentFragment node, code fragment node |
innerHTML,outerHTML,textContent
elem.innerHTML:指的是elem中所有的childNodes,包括注释节点可利用elem.innerHTML += "xxx"进行累计全覆盖
elem.outerHTML:指的是elem中所有的childNodes以及elem自身包括注释节点
elem.textContent:指的是elem的childNodes中所有的文本节点,不包括注释节点
注意点:
对于文本内容例如:,innerHTML会进行转译> innerHTML会对内容中的标签进行转译为html相应节点
当script片段放入innerHTML中时不会执行,但是对于包含事件类型的脚本就存在注入风险
"<script>alert('I am John in an annoying alert!')</script>"; //无风险
"<img alt="Summary of related knowledge about Dom in JS" >"; //有风险
Copy after login
所以对于纯文本建议使用textContent
outerHTML可以用来replace替换当前及自身的内容
nodeValue只有文本和注释节点才有值,否则输出null
属性相关
attributes
元素属性的map集合,可通过for-of迭代遍历出name-value
hasAttribute/get/set/remove ==>检测是否存在属性/得到/设置/删除
elem.proName与elem.getAttribute(proName)基本一致,有个别不一致,例如input-value
let input = document.querySelector("input");
input.setAttribute("value", 3);            //行间样式显示3
input.value = 666;                         //页面内容显示666
console.log(input.getAttribute("value"));  //3
Copy after login
自定义属性
通过data-log-n = 1可以通过elem.dataset.logN获取属性
元素创建以及增删改查
元素节点创建let div = document.createElement('div');文本节点创建let textNode = document.createTextNode('Here I am');
简单补充一个表格的创建
let table = document.createElement("table"); //创建一个table元素节点
let tbody = document.createElement("tbody"); //创建一个tbody元素节点
tbody.insertRow(0); //创建一行
tbody.rows[0].insertCell(0); //创建一行第一列
tbody.rows[0].cells[0].append(document.createTextNode("(0,0)")); //补充其内容
tbody.rows[0].insertCell(1); //创建一行第二列
tbody.rows[0].cells[1].append(document.createTextNode("(0,1)"));
table.append(tbody);
div.append(table);
Copy after login
元素增删改查
node.append()与node.prepend()都是在node内部添加,一个始终往队尾加一个往队首加
node.before()与node.after(),一个加在node自身节点的上面,一个加在下面
node.replace();自身节点替换成参数节点
还有一个node.insertAdjacentHTML(where,html);where有4种值
"beforebegin"与"afterbegin"在node开始位置的前或者后添加html
"beforeend"与"afterend"在node结束位置的前或者后添加html
elem.removeChild():删除子节点,还存在内存中通过变量可以读取
node.remove():则彻底删除,不再内存中,不再能被读取
class相关
className将class的value以字符串形式返回
classList将class的value以类数组对象返回,提供了4种方法方便对class进行增删改查
elem.classList.add/remove("class"):增加和删除类
elem.classList.toggle("class"): 如果类存在,则删除它,否则添加它
elem.classList.contains("class"): 返回true/false,检查给定的类
style相关
通过style获取属性值必须是在行间样式中有填写的,否则空;elem.style.borderLeftWidth="100px"通过破折号"-"变成大写可以获取属性,必须带有px
重置样式:elem.style.borderLeftWidth="";利用空字符串浏览器会应用CSS类及其内置样式
完全重写样式:div.style.cssText="color: red !important;"或者div.setAttribute('style', 'color: red...')
一种有css关联的样式,而不局限与行间样式:getComputedStyle(element[, pseudo])
       <style>
        .box {
            width: 100px;
        }

        .a {
            font-size: 1em;
        }
        .a:after {
            content: "666";
            display: inline-block;
            width: 10px;
            height: 10px;
        }
    </style>


    <div>
        <div>213</div>
    </div>

    <script>
        let div = document.querySelector(".a");
        //let style = getComputedStyle(div,"after");   读取伪类元素
        //console.log(style.content);
        let style = getComputedStyle(div);
        console.log(style.left);     //auto
        console.log(style.fontSize); //16px
    </script>
Copy after login
返回结果与css样式关联,返回结果是经过计算的,例如16px,并且结果不一定是我们想要的例如auto
它还能读取伪类元素的样式属性,将第二个参数填写after;getComputedStyle(element, "after")
元素大小属性

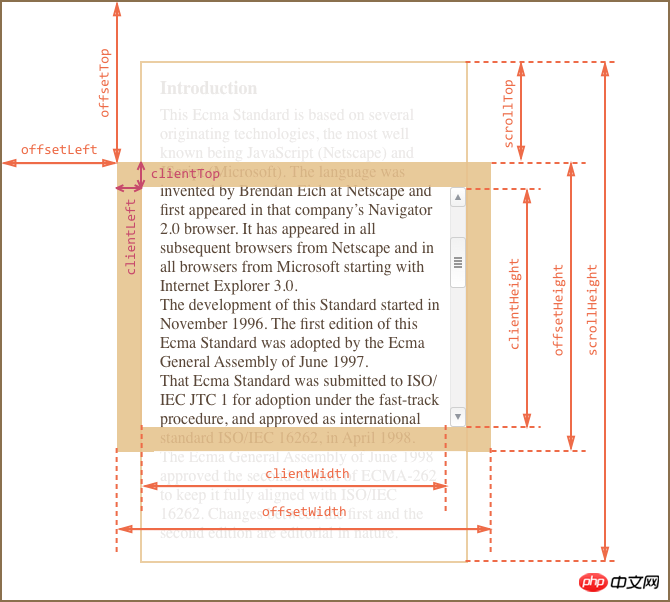
记住这张图基本搞定:
简单写写:offsetWidth:元素全尺寸=border+padding+content+滚动条宽度;clientWidth/Height:只考虑可见部分content+padding(不加滚动条);
顶部边框宽度:clientTop,左边边框宽度:clientLeft,但是当滚动条在左边时要加上其宽度=clientLeft
offsetParent来获取最近的CSS定位祖先。并offsetLeft/offsetTop提供相对于它左上角的x / y坐标。
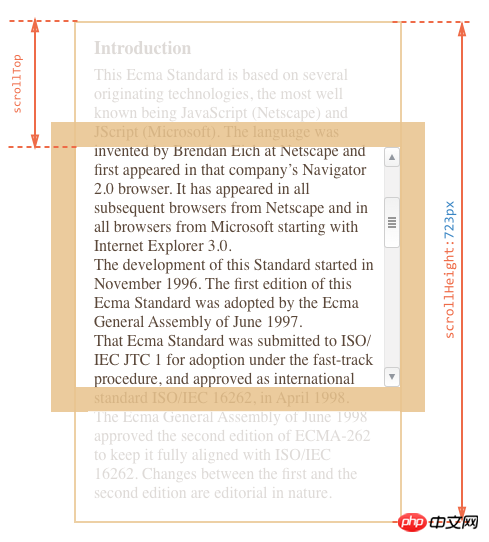
属性scrollWidth/scrollHeight还包括滚出(隐藏)部分,例如没有水平滚动,scrollWidth等于clientWidth
大多数几何属性是只读的,但scrollLeft/scrollTop可以更改,浏览器将滚动元素。
scrollLeft/scrollTop - 元素的滚动部分的宽度/高度
注意点:
如果一个元素不能被滚动(例如,它没有溢出,或者这个元素有一个"non-scrollable"属性), scrollTop将被设置为0。
设置scrollTop的值小于0,scrollTop 被设为0
如果设置了超出这个容器可滚动的值, scrollTop 会被设为最大值.

顺便提提如何是浏览器滚动条滚动:scrollTo(x,y)让滚动条到水平x,垂直y的位置;scrollBy(x,y)让滚动条每次以水平x,垂直y的距离滚动;
scrollIntoView():参数true默认值,滚到顶部,false滚到底部;document.body.style.overflow = "hidden"禁止滚动
整个文档的宽度/高度,带有滚动的部分
let scrollHeight = Math.max(
  document.body.scrollHeight, document.documentElement.scrollHeight,
  document.body.offsetHeight, document.documentElement.offsetHeight,
  document.body.clientHeight, document.documentElement.clientHeight
);
Copy after login
窗口大小
两种办法:document.documentElement.clientWidth/Height ,window.innerWidth/Height有细微区别当有滚动条时,前者不包括后者包括
坐标相关
获取元素相对窗口的坐标elem.getBoundingClientRect()返回的包换坐标的对象,左上顶点的(left,top)以及右下顶点的(right,bottom)
网页滚出窗口部分,有两种方式计算pageYOffset或者document.documentElement.scrollTop
因此我们可以计算元素相对与页面的位置
function getCoords(elem) {
  let box = elem.getBoundingClientRect();

  return {
    top: box.top + pageYOffset,
    left: box.left + pageXOffset
  };
}
Copy after login
The above is the detailed content of Summary of related knowledge about Dom in JS. For more information, please follow other related articles on the PHP Chinese website!


