Speaking of tabs, everyone should be familiar with it, but do you know how to use native JS to achieve the switching effect of tabs? This article will share with you how to make tab tabs and the code to achieve tab switching effect in js. It has certain reference value and interested friends can refer to it.
Using native JS to achieve the tab switching effect requires a lot of JavaScript knowledge, such as: function, document.getElementById(), mouse events, etc. If you are unclear, you can refer to the PHP Chinese website Related articles, or visit JavaScript Video Tutorial.
Instance description: To achieve the Tab switching effect, we can easily think of adding an id to each label to be controlled, and then using mouse events to obtain each element using the id, thereby controlling the style of each element. .
HTML part:
<div class="tab-head">
      <h2 id="tab1" onmouseover="changeTab1()" class="selected">按钮1</h2>
      <h2 id="tab2" onmouseover="changeTab2()">按钮2</h2>
      <h2 id="tab3" onmouseover="changeTab3()">按钮3</h2>
</div>
<div class="tab-content">
       <div id="c1" class="show">content1</div>
       <div id="c2">content2</div>
       <div id="c3">content3</div>
</div>CSS part:
*{padding: 0;margin: 0;}
   h2 {
                width: 150px;
                height: 30px;
                margin: 0 auto;
                float: left;
                text-align: center;
            }
            .tab-content div{
             width: 148px;
             height: 150px;
             border: 1px solid black;
             display: none;
             position: relative;
             background: pink;
            }
            #c1{
             position: absolute;
             top: 30px;
             left: 0;
            }
            #c2{
             position: absolute;
             top: 30px;
             left: 150px;
            }
            #c3{
             position: absolute;
             top: 30px;
             left: 300px;
            }
            .selected {
                background-color: cornflowerblue;
            }
            .tab-content .show{
                display: block;
}JavaScript part:
var tab1 = document.getElementById('tab1'),
            tab2 = document.getElementById('tab2'),
            tab3 = document.getElementById('tab3'),
            c1 = document.getElementById('c1'),
            c2 = document.getElementById('c2'),
            c3 = document.getElementById('c3');
            function changeTab1() {
                tab1.className = 'selected';
                tab2.className = '';
                tab3.className = '';
                c1.className = 'show'
                c2.className = '';
                c3.className = '';
            }
            function changeTab2() {
                tab1.className = '';
                tab2.className = 'selected';
                tab3.className = '';
                c1.className = '';
                c2.className = 'show';
                c3.className = '';
            }
            function changeTab3() {
                tab1.className = '';
                tab2.className = '';
                tab3.className = 'selected';
                c1.className = ''
                c2.className = '';
                c3.className = 'show';
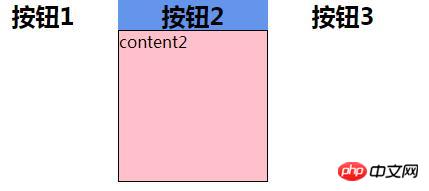
}The effect is as shown in the picture:

In this method, there are several elements with several IDs, and a function must be written for each tab. If you want to add tabs, you must also add IDs and functions. The code is redundant and not easy. Extension, so this method is suitable for situations where there are not many tabs.
The above has shared with you how to use native JS to achieve the tab switching effect. The steps are very detailed. Beginners can try it by themselves to see if they can achieve the tab switching effect. I hope this article will be helpful to you. Helps!
【Recommended tutorials】
1. JavaScript Chinese Reference Manual
2. CSS3 Video Tutorial
3. bootstrap tutorial
The above is the detailed content of How to use native JS to achieve tab switching effect (code attached). For more information, please follow other related articles on the PHP Chinese website!