This article brings you an introduction to the history of IDEs in Java and the use of ideas. It has certain reference value. Friends in need can refer to it. I hope it will be helpful to you.
Historical changes in Java development tools

JCreator
Jcreator is a tool for Java developed by Xinox Software in the Netherlands Integrated development environment (IDE) for programming, the company was founded in 2001;
Official website: http://www.jcreator.com/
JBuilder
JBuilder It is an integrated development tool for Java developed by Borland Company. This tool is chargeable;
Borland Company was founded in 1983 and is headquartered in California, USA;
JBuilder was among the Java integrated development tools at that time It was popular for a while, but was gradually defeated by new tools soon after;
On May 6, 2009, British software company Micro Focus announced the acquisition of Borland Software Company for US$75 million in cash;
eclipse
Eclipse was originally developed by IBM as a new generation of Java integrated development environment to replace the commercial software Visual Age for Java;
In November 2001, IBM contributed Eclipse to the open source community, and has since Managed by the Eclipse Foundation, a non-profit software vendor alliance, until now;
myeclipse
is an Eclipse-based Java development integrated environment developed by the American Genuitec company. Founded in 1997;
MyEclipse Enterprise Workbench was launched in 2003. This tool is chargeable;
Official website: http://www.genuitec.com/
MyEclipse is a powerful enterprise-level Java integrated development environment developed on the basis of eclipse with its own plug-ins. It is mainly used for the development of Java, Java EE and mobile applications;
MyEclipse has very It is powerful and has extensive support, especially for various open source frameworks and technical support; The source code is an integrated development environment for developers to develop Java programs;
NetBeans is a university student project that began in 1997. The project later developed and established a company, and then launched a commercial version of NetBeans;
Sun acquired this company in 1999 and released NetBeans as an open source project in June 2000;
Intellij IDEA
IntelliJ IDEA is referred to as IDEA, which is The Java integrated development environment under JetBrains is recognized as one of the best Java development tools in the industry;
JetBrains is a Czech software company headquartered in Prague, the capital of the Czech Republic. Developers Mainly composed of Eastern European programmers who are known for their rigor, they have developed a variety of software development tools;
Official website: https://www.jetbrains.com/
Intellij IDEA tools already have many It has a long history. IntelliJ IDEA version 1.0 was released in January 2001, but it has not been widely used;
IntelliJ IDEA used to be a paid software, but after 2009, it began to launch a free community open source version;
Currently IntelliJ IDEA has a free community version (with relatively few functions) and a paid flagship version (with more comprehensive functions);
Products under JetBrains
IntelliJ IDEA
Mainly for Java integrated development tools;
AppCode
Mainly for Objective-C / Swift integrated development tools;
CLion
Mainly for C / C integrated development tools;
GoLand
Mainly for Go language integrated development tools;
PhpStorm
Mainly for Integrated development tools for PHP;
PyCharm
are mainly integrated development tools for Python;
RubyMine
are mainly integrated development tools for Ruby ;
WebStorm
is mainly an integrated development tool for JavaScript, HTML5, CSS3 and other front-end technologies;
Rider
is mainly for .net integration Development tools;
DataGrip
Mainly a database visualization connection and operation tool;
Features of Idea
IntelliJ IDEA is mainly used to support Java language development tools and supports almost all current mainstream technologies and frameworks. Specializing in the development of enterprise applications, mobile applications and Web applications;
IntelliJ IDEA is very user-friendly, intelligent, self-customizable, and extremely efficient in development;
Idea version
IntelliJ IDEA is divided into "Ultimate Edition" and "Community Edition";
The Ultimate Edition is a paid version with powerful functions and a 30-day free trial period;
Community Edition (Community Edition) is a free version with much fewer functions than the flagship version and can always be used for free;
Generally, the large version of IntelliJ IDEA is iterated once a year, and the iteration time of small versions under the large version is not fixed. , as fast as one month, as slow as two to three months;
The latest version is: IntelliJ IDEA 2018.2.4
Idea usage pre-instructions
1. Since Idea does not have a server in Asia, some problems may occur during the use of idea, such as accessing plug-in libraries, updating versions, etc. This is caused by network problems;
2. Idea’s hardware requirements Although the basic requirements are not very high, in actual development, especially when developing large-scale Java Web projects, 2G memory is basically not enough. 4G memory can be used, but it will be laggy. It is best to use 8G memory or above;
3. There are some differences in the use of Idea and eclipse. We need to change our thinking and cannot learn Idea in the same way as eclipse;
4. Since we have been accustomed to eclipse, we When learning an idea, you may not adapt to it for a period of time, or even have the idea of giving up. This is normal, just stick to it for a few days;
Download and installation of Idea
Official website download :https://www.jetbrains.com/
The download package of Idea has two formats: one is the exe installation version, the other is the zip decompressed version;
exe format The installation version needs to be installed, but the decompressed version in zip format does not need to be installed and can be used directly by decompressing it;
It is recommended to use the decompressed version of zip, which can be used directly by decompressing it, which is convenient;
Idea directory structure
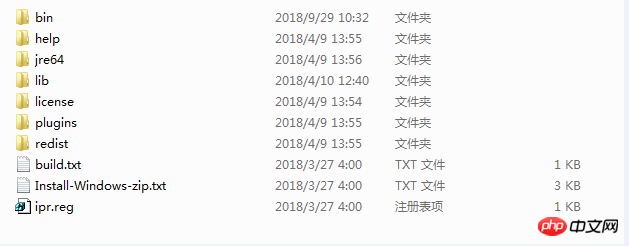
The directory structure after decompression of Idea is as follows:

bin is the executable program directory of IDEA;
help is IDEA The help file directory;
jre32 is the 32-bit JRE environment that comes with IDEA;
jre64 is the 64-bit JRE environment that comes with IDEA, so IDEA can be run on a computer that does not have JDK installed. Development of Java language;
lib is the library file directory that IDEA depends on, which contains many Jar files;
license is the license file directory of IDEA;
plugins is IDEA's plug-in directory;
redist is the redist library directory on which the indexing mechanism in IDEA depends;
Two .txt description files and a registry file;
Idea startup Run
If the computer is 32-bit, double-click idea.exe to start running idea. If it is 64-bit, double-click idea64.exe to start running;
1. Let you choose whether to import an existing file Old configuration information;
2. Let you choose the theme color of Idea;
3. Set the supported frameworks, which can be customized. Those that are not selected will not be supported, but they can be added later in the plug-in. Add in the column;
4. Enter the Idea creation Project interface;
command Create New Project to create a new project;
command Import Project to import an existing project;
Command Open to open an existing project;
Command Check out from Version Control can check out the project on Github or other projects on other Git hosting servers through the project address on the server;
Note: After Idea is started, the configuration and cache index information directories will be created in the C:\Users\computer username\.IntelliJIdea2017.3 user directory by default;
Create Project
Normally The first time we use idea, we will choose to create a project;
The first time you start using idea, the project created here is actually equivalent to creating a workspace, so we usually choose to create an empty project;
Project and Mudoule
IntelliJ IDEA does not have a concept of workspaces (workspaces) similar to Eclipse. The largest unit of Idea is Project;
If you want to open multiple projects at the same time, the solution provided by IntelliJ IDEA is to open multiple project instances, that is Opening multiple Ideas, that is, starting multiple ideas, is of course not very convenient;
So, if we want to look at multiple projects in one idea, we create an empty project as a workspace. Then create multiple modules under the empty project as our project project;
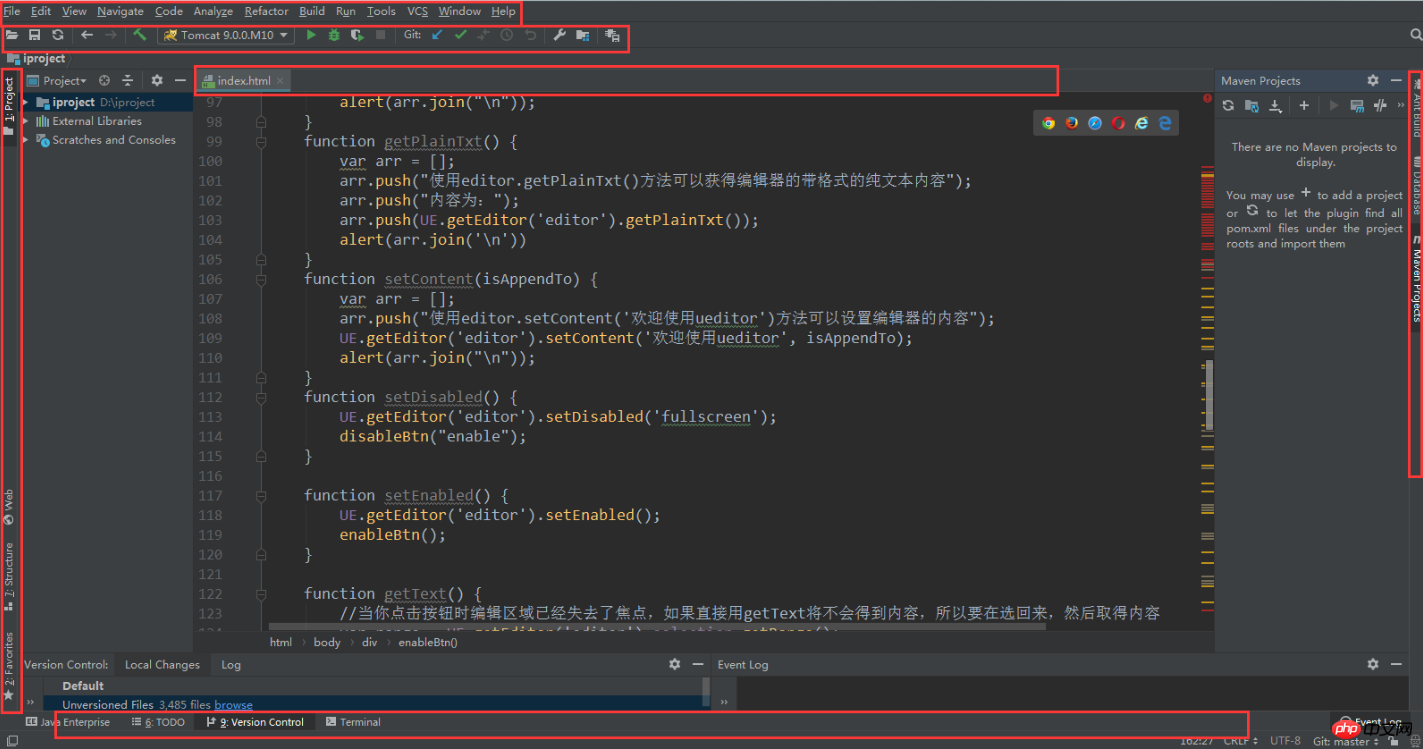
Idea’s interface introduction
Menu bar

Toolbar

Navigation bar
Left navigation area
Middle editing operation area
Right navigation area
Bottom navigation area

-------------------------- Application of --------idae------------------------------------------ ----
Create Java project
It is recommended to create our Java project under an empty Project, which means we create a Java module under an empty Project;
Method: In the menu bar File-->New-->Module-->Java
Project configuration instructions
.iml is the configuration file of the module module;
.idea is the configuration file of the project;
IntelliJ IDEA is an IDE without Ctrl S (save), so every time you modify the code, you can just run or debug it, without worrying about saving or Lost code problem;
Although IntelliJ IDEA does not need to press Ctrl S to save the code, the error checking of the code is also real-time, so there is no need to worry about code compilation problems;
If you need to compile the project as a whole, then You need to build it manually;
Set the sdk under the File-->project structure in the menu bar, and then you can also set the language level, java8 or java9, etc. Of course, the sdk selection must be consistent with the language level selection;
Idea font encoding settings
Set through File -->Settings in the menu (basically all settings of IntelliJ IDEA are under this menu);
Font settings
It is generally not recommended to modify the font of the theme. The theme refers to the entire Idea tool;
It is recommended to modify the font of the editor for code development. Modify the Font option under the Editor. It is recommended that the font size be 18;
Encoding settings
File encoding and project encoding settings can be modified in the File Encodings option under the Editor. It is recommended that all be changed to UTF-8;
Java project jar packaging
In the menu bar File-->Project Structure
1, configure the dependencies of the Module, and add the third-party jar that the Java project depends on under Dependencies on the right side (if not, don’t add it);
2. Configure Artifacts, select Add Symbol in the middle area--> From module and dependency, select module and main class, select copy to the output directory;
3. In the menu bar Build- ->Build Artifacts... Select the Artifact you just created and click OK to generate a jar file in the output directory;
Create a web project
Create a Module
Select Java Enterprise, select Java EE8 (or Java EE 7/6), choose to create web.xml (there is a small bug here, maybe web.xml cannot appear)
Configure tomcat
In the menu Set under run-->Edit Configurations, you can set tomcat, port, jvm, etc., and you can configure multiple tomcats;
Start tomcat, click the green triangle arrow;
Stop tomcat Click the red square button. The stop button may not stop after clicking it. Usually a skull will appear to indicate that it has not stopped. You can click it again;
Sometimes even if you click twice, the Tomcat container may not be completely stopped. At this time, the port is easily occupied. At this time, you need to open the system's resource manager and manually kill all Java processes on the system;
Web deployment on Idea
Usually during development, our web project is deployed to tomcat for debugging and running to develop code.
Idea develops web projects. The steps to deploy to tomcat in the idea tool are as follows:
Before deploying tomcat, configure actifacts first,
under File -->project Structure-->Actifacts in the menu bar Select the Web Application under Add: Exploded -->From Module
Add the configured Actifacts under tomcat's Deployment, and set the Application context
Idea to create a war package
Open Project Structure
Configure Module dependencies, add dependent jars under Dependencies on the right;
Configure Artifacts, select under File -->project Structure-->Actifacts in the menu bar Add the Web Application under: Archive -->for xxx
In the menu bar Build-->Build Artifacts... Select the Artifact just created and click OK to generate the war file in the output directory
Idea’s indexing and caching
IntelliJ IDEA will create an index when it loads the project for the first time, and the time to create the index is proportional to the number of files in the project; even if you edit the index creation process in IntelliJ IDEA The code cannot be compiled or run, so it is recommended to wait until IntelliJ IDEA completes index creation before proceeding;
IntelliJ IDEA's cache and index are mainly used to speed up file queries, thereby speeding up various searches and code prompts Wait for the speed of the operation;
However, under certain special conditions, IntelliJ IDEA's cache and index files will also be damaged, such as power outage, forced shutdown, etc. When IntelliJ IDEA is reopened, it is likely that IntelliJ IDEA will Various inexplicable errors are reported;
If you encounter such problems, you can solve them by clearing the cache through File-->Invalidate Cache and Restart. It is generally recommended to click Invalidate and Restart, which will be cleaner;
The directory address where the index file is located: C:\Users\Currently logged in system user name\.IntelliJIdea14\system
If you do not use the above method, you can also delete the entire system to clear the index and cache. When IntelliJ IDEA starts again When creating a project, a new system directory and the corresponding project cache and index will be re-created;
Idea deleting the project
Idea deleting a project or module cannot be physically deleted, it is just a logical deletion,
To actually delete, you need to enter the directory and delete it manually on the disk;
Idea code template settings
IntelliJ IDEA’s default class annotation format for new classes is generally not friendly enough Or specifications, so we generally need to set up according to the company's coding specifications;
Set under the menu bar File-->Settings-->Editor-->File and Code Templates;
Select different file types for settings;
Live code template
In the menu bar File--Settings -->Editor, under Live Templates, for example, enter soout for System .out.println() prints;
You can also customize the real-time code template;
maven settings
In File-->Build,Execution,Deployment--> ;Maven can be set under Build Tools;
You can specify the Maven installation home directory, maven's settings.xml location and local warehouse location;
Create a maven project
Create a project, You can choose not to use the plug-in method provided by Maven to create the Maven project skeleton, or you can choose to use methods such as xx-webapp and xxx-war to create the project skeleton;
Maven project compilation and packaging is on the right side of the workspace , displays the maven projects area. Expand and double-click the corresponding life cycle command under lifecycle to perform the corresponding operation;
There are also some function buttons in the expanded area of Maven, such as you can view jar package dependencies, etc.;
Use of Idea plug-ins
Many functions of IntelliJ IDEA itself are also implemented through plug-ins. IntelliJ IDEA itself has developed a large number of plug-ins integrated into the Idea tool, which means that Idea After installation, it comes with many excellent plug-ins;
Official plug-in library: https://plugins.jetbrains.com/
Open the plug-in window in the menu bar File -->Settings -->Plugins;
IntelliJ IDEA has a good classification of plug-ins:
All plugins displays all plug-ins;
Enabled displays all currently enabled plug-ins;
Disabled displays all current disabled plug-ins;
Bundled displays all IntelliJ IDEA built-in plug-ins;
Custom displays all the plug-ins we installed ourselves. If you have installed plug-ins many times, this option will be used more;
Enabled plug-ins are checked, if you want to disable a plug-in , just remove the check;
There is also a plug-in warehouse below, which is officially provided by idea. You can download and install it. Of course, you can also install plug-ins from the local disk and browse the local plug-in files for installation instead of from the server. Download and install;
Because the plug-in warehouse is abroad, the plug-in list may not be displayed, or the plug-in list may be displayed, and the download and installation cannot be completed. At this time, you can try a few more times or download and install at another time;
Idea Install MyBatis plug-in
MyBatis plugin, but this plug-in is a paid plug-in and cannot be used directly;
Free Mybatis plugin can be used for free, you can use this plug-in ;
IntelliJ IDEA configures Mybatis automatic code generation
Configure a plug-in:
<build>
<plugins>
<plugin>
<groupId>org.mybatis.generator</groupId>
<artifactId>mybatis-generator-maven-plugin</artifactId>
<version>1.3.6</version>
<configuration>
<!--配置文件的位置-->
<configurationFile>src/main/resources/GeneratorMapper.xml</configurationFile>
<verbose>true</verbose>
<overwrite>true</overwrite>
</configuration>
</plugin>
</plugins>
</build>
Configure the code generation file:
<?xml version="1.0" encoding="UTF-8"?>

<!DOCTYPE generatorConfiguration

PUBLIC "-//mybatis.org//DTD MyBatis Generator Configuration 1.0//EN"

"http://mybatis.org/dtd/mybatis-generator-config_1_0.dtd">

<generatorConfiguration>

<!-- 指定连接数据库的JDBC驱动包所在位置,指定到你本机的完整路径 -->

<classPathEntry location="C:/Users/jimly/.m2/repository/mysql/mysql-connector-java/5.1.44/mysql-connector-java-5.1.44.jar"/>

<!-- 配置table表信息内容体,targetRuntime指定采用MyBatis3的版本 -->

<context id="tables" targetRuntime="MyBatis3">

<!-- 抑制生成注释,由于生成的注释都是英文的,可以不让它生成 -->

<commentGenerator>

<property name="suppressAllComments" value="true" />

</commentGenerator>

<!-- 配置数据库连接信息 -->

<jdbcConnection driverClass="com.mysql.jdbc.Driver"

connectionURL="jdbc:mysql://192.168.230.128:3306/p2padmin"

userId="root"

password="123456">

</jdbcConnection>

<!-- 生成model类,targetPackage指定model类的包名, targetProject指定生成的model放在eclipse的哪个工程下面-->

<javaModelGenerator targetPackage="com.bjpowernode.p2p.admin.model" targetProject="src/main/java">

<property name="enableSubPackages" value="false" />

<property name="trimStrings" value="false" />

</javaModelGenerator>

<!-- 生成MyBatis的Mapper.xml文件,targetPackage指定mapper.xml文件的包名, targetProject指定生成的mapper.xml放在eclipse的哪个工程下面 -->

<sqlMapGenerator targetPackage="com.bjpowernode.p2p.admin.mapper" targetProject="src/main/java">

<property name="enableSubPackages" value="false" />

</sqlMapGenerator>

<!-- 生成MyBatis的Mapper接口类文件,targetPackage指定Mapper接口类的包名, targetProject指定生成的Mapper接口放在eclipse的哪个工程下面 -->

<javaClientGenerator type="XMLMAPPER" targetPackage="com.bjpowernode.p2p.admin.mapper" targetProject="src/main/java">

<property name="enableSubPackages" value="false" />

</javaClientGenerator>

<!-- 数据库表名及对应的Java模型类名 -->

<table tableName="u_permission_info"

domainObjectName="PermissionInfo"

enableCountByExample="false"

enableUpdateByExample="false"

enableDeleteByExample="false"

enableSelectByExample="false"

selectByExampleQueryId="false"/>

</context>

</generatorConfiguration>
Configure Maven to run
mybatis-generator:generate -e
Code debugging in Idea
F7: In Debug mode, enter the next step. If the current line breakpoint is a method, enter the current method body , if the method body has a method, the embedded method will not be entered.
F8: In Debug mode, enter the next step. If the current line breakpoint is a method, the current method will not be entered. In vivo
F9: In Debug mode, resume program operation, but if there is a breakpoint in the code below the breakpoint, it will stop at the next breakpoint
Alt F8: In Debug state , select the object, and a debugging box for inputting calculation expressions will pop up to view the debugging results of the input content
There are three commonly used methods to view the selected object:
After selecting the object, use the shortcut keys Alt F8
After selecting the object, drag the object to Watches
After selecting the object, hover the mouse over the object for about 2 seconds
Idea’s search
Search for classes
Go to Class under Navigate on the menu bar...
Search for files
Go to File under Navigate on the menu bar...
Search all
In the menu bar Edit-->Find--Find in path
In the search icon button on the far right side of the toolbar, click to open;
Press the Shift key twice in succession;
After all the search boxes above are brought up, press the esc key to cancel;
Postfix Completion
The suffix is automatically completed:
fori
100.fori
sout
new User().sout can print out the user object
nn
Determine how many are not equal to null, user.nn
return
user.return
View the method and field outline of the class
Open the current class, Click on the structure outline on the left to view;
View the method call level of the class
Right-click the method, Find Usages or press the shortcut key: Alt F7
IdeaView interface The implementation class
Click the green dot on the left side of the interface, and the list that appears is the class that is implemented by the interface;
To view the implementation of the method in the interface, also click the green dot in front of the interface method Click; (shortcut key: Ctrl Alt B)
Idea automatically imports packages
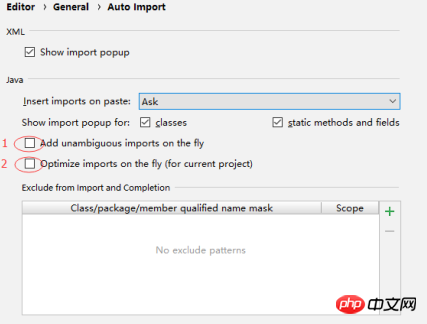
When using idea to develop java projects, it is often necessary to import jdk or third-party class library classes. We know , import third-party classes into Idea through the Alt Enter shortcut key, but it is very troublesome and inefficient to import it manually. Idea provides a more efficient way;
Set under File-->Settings-->Editor-->General-->Auto Import in the menu bar:

Option 1, IntelliJ IDEA will automatically help us import the packages we need when we write code, but for those packages with the same name, we still need to manually Alt Enter to import;
Option 2, IntelliJ IDEA will import it when we write code Automatically help us optimize imported packages, such as automatically removing some unused packages;
Idea common shortcut keys
Ctrl Y deletes the line where the cursor is located or deletes the selected line;
Ctrl
##Ctrl C CopyCtrl V PasteCtrl Z UndoCtrl G Jump to the specified line in the current fileCtrl / Comment the line of code where the cursor is located. Different comment symbols will be used according to the current file type; Ctrl Shift / Multi-line code comment; Alt Insert code is automatically generated, such as the set of the generated object / get method, construction method, toString(), etc.; Ctrl Alt L format code, can be used for the current file and the entire package directory; Ctrl Shift / code block comments; Alt Enter imports the classes in the referenced jar; ctrl shift alt j selects all the same words or characters in the current file, and can directly modify them all at once; Shift F6 refactors code, renames, etc.; Shift Tab indents the code forward; Ctrl Alt O optimizes imported classes and cleans up useless imports; Ctrl Shift U Convert the selected code to uppercase/lowercase alternately;The above is the detailed content of History of IDE in Java and introduction to the use of ideas. For more information, please follow other related articles on the PHP Chinese website!