Directory
1. Basic idea
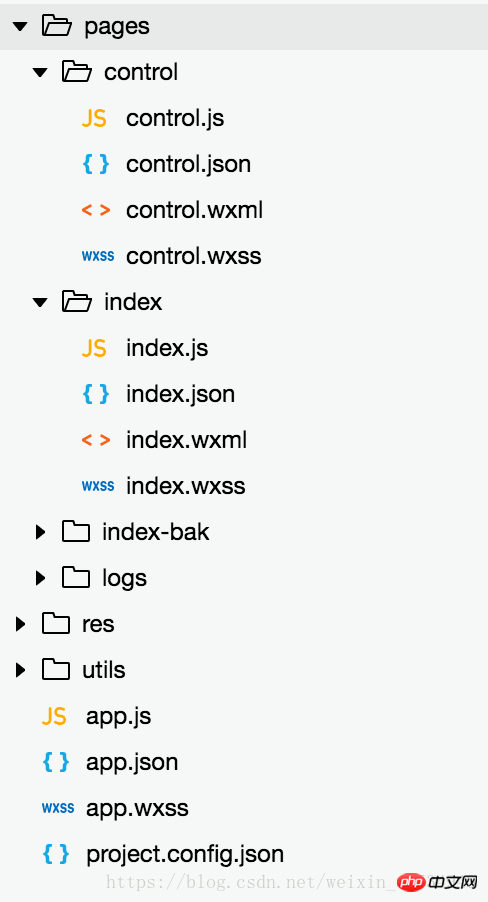
2. The code structure is as follows:
3. index directory
4. Control directory
5. Global project control
Mainly practiced the development of WeChat applet. Here is a brief record of the main code snippets. We also went through many pitfalls, for example: WeChat applet does not support full full screen, and WeChat applet cannot be displayed horizontally. Therefore, some extraordinary means were also used during the development process. It can be said that this is just a very basic demo, so I used hard-coded values for many things in it, such as camera monitoring IP and page element positioning. Especially the interface, I only did the experiment on iPhone 6, so when I switch to other phones, the interface will change.
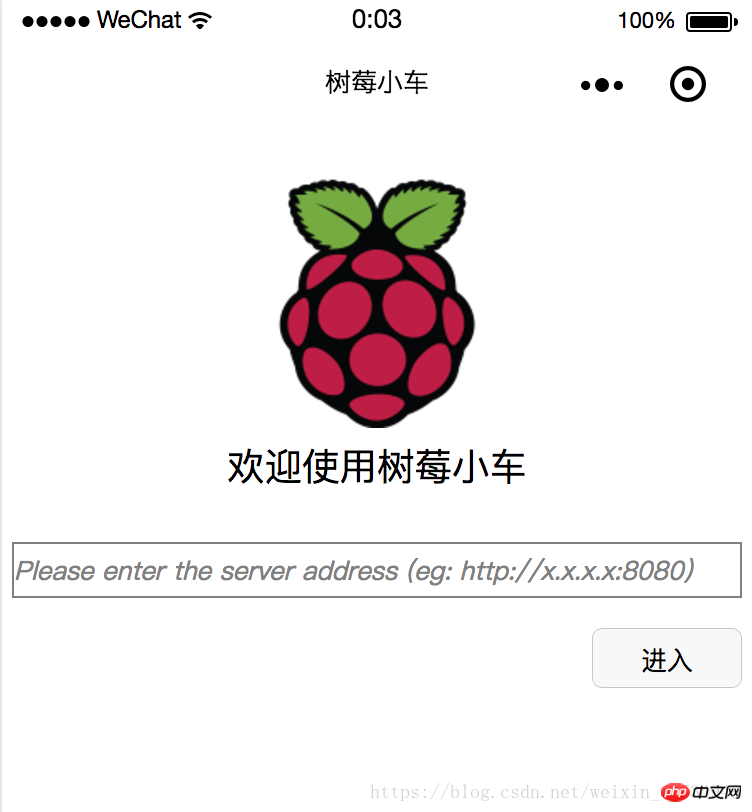
The index page is displayed when entering the mini program, allowing the user to enter the server URL (simulating the get request in the browser in the previous article)
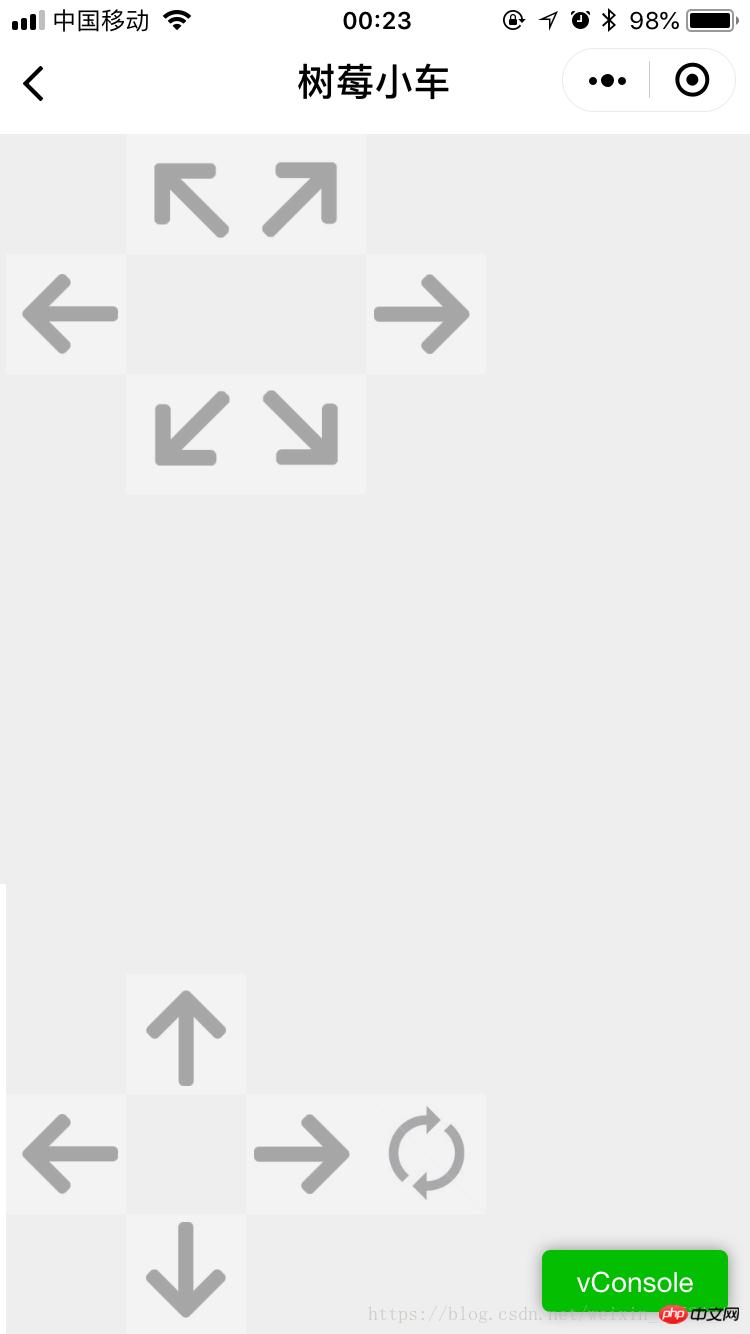
Then jump to the actual car control interface, and you can control the car by clicking the button
Control the movement of the car, mainly in The response to the interface button event is defined in control.js. In the process of responding to the event, the http request is sent
The index page is as follows:

The page after entering is as follows (the camera monitoring will be displayed in the middle blank space, but I have not started it, so I cannot see it):

Among them, the home page is below index, control is the control page, and the image resources are stored in the res directory

index.js
//index.js
//获取应用实例
const app = getApp()

Page({
  data: {
    logo: "/res/rasp-logo.png",
    welcome: "欢迎使用树莓小车",
    enterBtn: "进入",
    PromoteMsg: "Please enter the server address (eg: http://x.x.x.x:8080)",
    reqURL: ""
  },
  // 从输入框中获取用户输入的服务器地址信息
  getURL: function (e) {
    this.setData({
      reqURL: e.detail.value
    })
  },
  enterClicked: function (e) {
    /*
     * 当按下进入按钮,需要做以下事情:
     * 1. 首先判断用户是否已经在输入框中输入完整的服务器地址
     * 2. 发起一个到服务器的GET请求,并分析服务器的响应结果
     * 3. 跳转到小车控制界面
    */
    console.log(this.data.reqURL)

    if (this.data.reqURL == '') {
      wx.showModal({
        title: '提示',
        content: '请先输入正确的服务器地址!',
      })
      return
    }

    // 发起到服务器的GET请求
    wx.request({
      url: this.data.reqURL,
      success: function (res) {
        // 在这里获取POST请求地址,以及视频流地址,然后赋值给全局变量,供control页面调用
        console.log(res.data.match(/url = \"(\S*)\"/)[1])
        console.log(res.data.match(/src=\"(\S*)\"/)[1])
        app.globalData.postURL = res.data.match(/url = \"(\S*)\"/)[1]
        app.globalData.cameraURL = res.data.match(/src=\"(\S*)\"/)[1]

        // 跳转到control页面
        wx.navigateTo({
          url: '/pages/control/control',
        })
      },
      fail: function(res) {
        wx.showModal({
          title: '提示',
          content: '请检查输入的服务器地址!',
        })
      }
    })
  }
})index.json: No data, only a pair of brackets
index.wxml
<!--index.wxml-->
<view>
<view class="welcome">
<view class="logo">
<image style="width: 250rpx; height: 250rpx" src="{{logo}}"></image>
</view>
<view>
<text class="words">{{welcome}}</text>
</view>
</view>
<input class="requestURL" type="text" placeholder="{{PromoteMsg}}" focus='1' cursor='10' confirm-type="done" bindinput='getURL'></input>
<button class='enter' bindtap='enterClicked'>{{enterBtn}}</button>
</view>index.wxss
/**index.wxss**/
.welcome{
  display: flex;
  margin-top: 50rpx;
  flex-direction: column;
  align-items: center;
  justify-content: space-between;
}

.requestURL{
  margin: 50rpx 10rpx 30rpx 10rpx;
  border: 1px solid gray;
  font-style: italic;
  font-size: small
}

.enter{
  margin-right: 10rpx;
  width: 150rpx;
  height: 60rpx;
  font-size: small
}control.js
// pages/control/control.js
const app = getApp()

Page({

  /**
   * 页面的初始数据
   */
  data: {
    // Car control images
    "forwardBtn": "/res/forward.png",
    "leftBtn": "/res/left.png",
    "rightBtn": "/res/right.png",
    "backLeftBtn": "/res/back-left.png",
    "backRightBtn": "/res/back-right.png",
    "backBtn": "/res/backward.png",

    // Camera control images
    "upBtn": "/res/forward.png",
    "camLeftBtn": "/res/camLeft.png",
    "camRightBtn": "/res/camRight.png",
    "downBtn": "/res/backward.png",
    "resetBtn": "/res/reset.png"
  },

  carMove: function(event) {
    wx.request({
      url: this.data.postURL,
      data: event.currentTarget.dataset.direction,
      method: "POST",
      success: function(res){

      },
      fail: function(res){

      }
    })
  },

  carStop: function(event) {
    wx.request({
      url: this.data.postURL,
      data: "S",
      method: "POST",
      success: function (res) {

      },
      fail: function (res) {

      }
    })
  },

  camMove: function(event) {
    wx.request({
      url: this.data.postURL,
      data: event.currentTarget.dataset.direction,
      method: "POST",
      success: function (res) {

      },
      fail: function (res) {

      }
    })
  },

  /**
   * 生命周期函数--监听页面加载
   */
  onLoad: function (options) {
    //this.data.cameraURL = app.globalData.cameraURL
    this.setData({
      cameraURL: app.globalData.cameraURL,
      postURL: app.globalData.postURL
    })
    console.log(this.data.cameraURL)
    console.log("post url in control page: " + app.globalData.postURL)
  },

  /**
   * 生命周期函数--监听页面初次渲染完成
   */
  onReady: function () {

  },

  /**
   * 生命周期函数--监听页面显示
   */
  onShow: function () {
    //console.log(wx.getSystemInfoSync().windowWidth)
    //console.log(wx.getSystemInfoSync().windowHeight)
  },

  /**
   * 生命周期函数--监听页面隐藏
   */
  onHide: function () {

  },

  /**
   * 生命周期函数--监听页面卸载
   */
  onUnload: function () {

  },

  /**
   * 页面相关事件处理函数--监听用户下拉动作
   */
  onPullDownRefresh: function () {

  },

  /**
   * 页面上拉触底事件的处理函数
   */
  onReachBottom: function () {

  },

  /**
   * 用户点击右上角分享
   */
  onShareAppMessage: function () {

  }
})control.json
{
  "navigationBarBackgroundColor": "#ffffff",
  "navigationBarTextStyle": "black",
  "navigationBarTitleText": "树莓小车",
  "backgroundColor": "#eeeeee",
  "backgroundTextStyle": "light",
  "enablePullDownRefresh": false,
  "navigationStyle": "custom",
  "disableScroll": true
}control.wxml
<!--pages/control/control.wxml-->
<view class='control'>
<!-- This image shows the camera view -->
<image class='cameraView' src='http://192.168.1.104:8080/?action=stream' style="z-index:1"></image>
<!-- The following six images control the car move -->
<image class='button' id='forward' src='{{forwardBtn}}' style="position:absolute;z-index:2" bindtouchstart='carMove' data-direction='F' bindtouchend='carStop'></image>
<image class='button' id='left' src='{{leftBtn}}' style="position:absolute;z-index:2" bindtouchstart='carMove' data-direction='L' bindtouchend='carStop'></image>
<image class='button' id='right' src='{{rightBtn}}' style="position:absolute;z-index:2" bindtouchstart='carMove' data-direction='R' bindtouchend='carStop'></image>
<image class='button' id='backLeft' src='{{backLeftBtn}}' style="position:absolute;z-index:2" bindtouchstart='carMove' data-direction='BL' bindtouchend='carStop'></image>
<image class='button' id='backRight' src='{{backRightBtn}}' style="position:absolute;z-index:2" bindtouchstart='carMove' data-direction='BR' bindtouchend='carStop'></image>
<image class='button' id='back' src='{{backBtn}}' style="position:absolute;z-index:2" bindtouchstart='carMove' data-direction='B' bindtouchend='carStop'></image>
<!-- The following images control the camera move -->
<image class='button' id='up' src='{{upBtn}}' style="position:absolute;z-index:2" bindtouchstart='camMove' data-direction='VU'></image>
<image class='button' id='camLeft' src='{{camLeftBtn}}' style="position:absolute;z-index:2" bindtouchstart='camMove' data-direction='HL'></image>
<image class='button' id='camRight' src='{{camRightBtn}}' style="position:absolute;z-index:2" bindtouchstart='camMove' data-direction='HR'></image>
<image class='button' id='down' src='{{downBtn}}' style="position:absolute;z-index:2" bindtouchstart='camMove' data-direction='VD'></image>
<image class='button' id='reset' src='{{resetBtn}}' style="position:absolute;z-index:2" bindtouchstart='camMove' data-direction='RESET'></image>
</view>control.wxss
/* pages/control/control.wxss */

.control {
  width: 100%;
  height: 100%;
  transform: rotate(90deg);
  background-color: #eee;
  justify-content: center;
}

.cameraView {
  margin-left: 0px;
  width: 603px;
  height: 375px;
  background-color: #eee;
  justify-content: center;
}

.button {
  height: 60px;
  width: 60px;
  opacity: 0.3;
}

#forward {
  left: 60px;
  top: 135px;
}

#left {
  left: 0px;
  top: 195px;
}

#right {
  left: 120px;
  top: 195px;
}

#backLeft {
  left: 0px;
  top: 255px;
}

#backRight {
  left: 120px;
  top: 255px;
}

#back {
  left: 60px;
  top: 315px;
}

#up {
  left: 480px;
  top: 195px;
}

#camLeft {
  left: 420px;
  top: 255px;
}

#camRight {
  left: 540px;
  top: 255px;
}

#down {
  left: 480px;
  top: 315px;
}

#reset{
  left: 480px;
  top: 135px
}app.js: It seems that it is not actually used. It contains the default code when the project was created.
//app.js
App({
  onLaunch: function () {
    // 展示本地存储能力
    var logs = wx.getStorageSync('logs') || []
    logs.unshift(Date.now())
    wx.setStorageSync('logs', logs)

    // 登录
    wx.login({
      success: res => {
        // 发送 res.code 到后台换取 openId, sessionKey, unionId
      }
    })
    // 获取用户信息
    wx.getSetting({
      success: res => {
        if (res.authSetting['scope.userInfo']) {
          // 已经授权,可以直接调用 getUserInfo 获取头像昵称,不会弹框
          wx.getUserInfo({
            success: res => {
              // 可以将 res 发送给后台解码出 unionId
              this.globalData.userInfo = res.userInfo

              // 由于 getUserInfo 是网络请求,可能会在 Page.onLoad 之后才返回
              // 所以此处加入 callback 以防止这种情况
              if (this.userInfoReadyCallback) {
                this.userInfoReadyCallback(res)
              }
            }
          })
        }
      }
    })
  },
  globalData: {
    userInfo: null,
    postURL: null,
    cameraURL: null
  }
})app.json:
{
  "pages": [
    "pages/index/index",
    "pages/control/control"
  ],
  "window": {
    "backgroundTextStyle": "light",
    "navigationBarBackgroundColor": "#fff",
    "navigationBarTitleText": "树莓小车",
    "navigationBarTextStyle": "black",
    "showStatusBar": false
  }
}app.wxss:
/**app.wxss**/
.container {
  height: 100%;
  display: flex;
  flex-direction: column;
  align-items: center;
  justify-content: space-between;
  padding: 200rpx 0;
  box-sizing: border-box;
}project.control.json:
{
	"description": "项目配置文件。",
	"packOptions": {
		"ignore": []
	},
	"setting": {
		"urlCheck": false,
		"es6": true,
		"postcss": true,
		"minified": true,
		"newFeature": true
	},
	"compileType": "miniprogram",
	"libVersion": "2.0.4",
	"appid": "wx18414b9f85bfc895",
	"projectname": "wechat-control",
	"isGameTourist": false,
	"condition": {
		"search": {
			"current": -1,
			"list": []
		},
		"conversation": {
			"current": -1,
			"list": []
		},
		"game": {
			"currentL": -1,
			"list": []
		},
		"miniprogram": {
			"current": -1,
			"list": []
		}
	}
}Related recommendations:
Detailed introduction to Raspberry Pi (RPi)
Use Raspberry Pai implements conversational robot_PHP tutorial
The above is the detailed content of WeChat applet--code flow for Raspberry Pi car control. For more information, please follow other related articles on the PHP Chinese website!
 function function usage
 How to view stored procedures in MySQL
 How to check deleted call records
 The difference between insertbefore and before
 What language is generally used to write vscode?
 How to convert nef to jpg format
 Ranking of the top ten digital currency exchanges
 What is the core of a database system?


