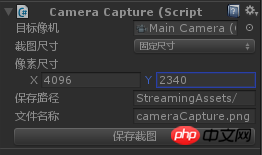
When I was working on a project recently, I needed to take a high-definition screenshot in the game. I studied it and wrote it into a script for future use.
The script can customize the resolution and use the camera to take high-definition screenshots. You can use code to take screenshots dynamically, or you can take screenshots in edit mode.
Pay attention to the correct aspect ratio of the screenshot. Problems may occur if the aspect ratio is incorrect.
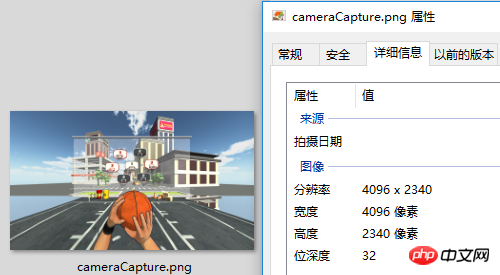
Screenshot effect:


# #Script:CameraCapture.cs
using UnityEngine; using System.IO; ////// 相机截图 /// public class CameraCapture : MonoBehaviour { // 截图尺寸 public enum CaptureSize { CameraSize, ScreenResolution, FixedSize } // 目标摄像机 public Camera targetCamera; // 截图尺寸 public CaptureSize captureSize = CaptureSize.CameraSize; // 像素尺寸 public Vector2 pixelSize; // 保存路径 public string savePath = "StreamingAssets/"; // 文件名称 public string fileName = "cameraCapture.png"; #if UNITY_EDITOR private void Reset() { targetCamera = GetComponentZhangYu 2018-07-06 ///(); pixelSize = new Vector2(Screen.currentResolution.width, Screen.currentResolution.height); } #endif /// 保存截图 /// 目标摄像机 public void saveCapture() { Vector2 size = pixelSize; if (captureSize == CaptureSize.CameraSize) { size = new Vector2(targetCamera.pixelWidth, targetCamera.pixelHeight); } else if (captureSize == CaptureSize.ScreenResolution) { size = new Vector2(Screen.currentResolution.width, Screen.currentResolution.height); } string path = Application.dataPath + "/" + savePath + fileName; saveTexture(path, capture(targetCamera, (int)size.x, (int)size.y)); } ///相机截图 /// 目标相机 public static Texture2D capture(Camera camera) { return capture(camera, Screen.width, Screen.height); } ///相机截图 /// 目标相机 /// 宽度 /// 高度 public static Texture2D capture(Camera camera, int width, int height) { RenderTexture rt = new RenderTexture(width, height, 0); rt.depth = 24; rt.antiAliasing = 8; camera.targetTexture = rt; camera.RenderDontRestore(); RenderTexture.active = rt; Texture2D texture = new Texture2D(width, height, TextureFormat.ARGB32, false, true); Rect rect = new Rect(0, 0, width, height); texture.ReadPixels(rect, 0, 0); texture.filterMode = FilterMode.Point; texture.Apply(); camera.targetTexture = null; RenderTexture.active = null; Destroy(rt); return texture; } ///保存贴图 /// 保存路径 /// Texture2D public static void saveTexture(string path, Texture2D texture) { File.WriteAllBytes(path, texture.EncodeToPNG()); #if UNITY_EDITOR Debug.Log("已保存截图到:" + path); #endif } }
Script Editor:
CameraCaptureEditor.csusing UnityEditor; using UnityEngine; ////// 相机截图 编辑器 /// [CanEditMultipleObjects] [CustomEditor(typeof(CameraCapture))] public class CameraCaptureEditor : Editor { public override void OnInspectorGUI() { // 属性 CameraCapture script = (CameraCapture)target; int selected = (int)script.captureSize; // 重绘GUI EditorGUI.BeginChangeCheck(); drawProperty("targetCamera", "目标像机"); string[] options = new string[] { "像机尺寸", "屏幕尺寸", "固定尺寸"}; selected = EditorGUILayout.Popup("截图尺寸", selected, options, GUILayout.ExpandWidth(true)); script.captureSize = (CameraCapture.CaptureSize)selected; if (script.captureSize == CameraCapture.CaptureSize.FixedSize) { drawProperty("pixelSize", "像素尺寸"); EditorGUILayout.HelpBox("请保持正确的宽高比!\n否则截图区域可能出现错误。", MessageType.Info); } drawProperty("savePath", "保存路径"); drawProperty("fileName", "文件名称"); // 保存截图按钮 bool isPress = GUILayout.Button("保存截图", GUILayout.ExpandWidth(true)); if (isPress) script.saveCapture(); if (EditorGUI.EndChangeCheck()) serializedObject.ApplyModifiedProperties(); } private void drawProperty(string property, string label) { EditorGUILayout.PropertyField(serializedObject.FindProperty(property), new GUIContent(label), true); } }ZhangYu 2018-07-06 ///
Vuforia Unity Camera Image Access
Related videos:The above is the detailed content of Use Unity script to customize the resolution to take a high-definition screenshot from the camera. For more information, please follow other related articles on the PHP Chinese website!


