This article mainly introduces the function of cropping pictures and uploading to the server in vue. It is very good and has reference value. Friends who need it can refer to the
preview link and click to preview
Renderings As shown below, everyone feels good, please refer to the implementation code.

Requirements
[x] Preview: According to selection The image size adaptively fills the left cropping area
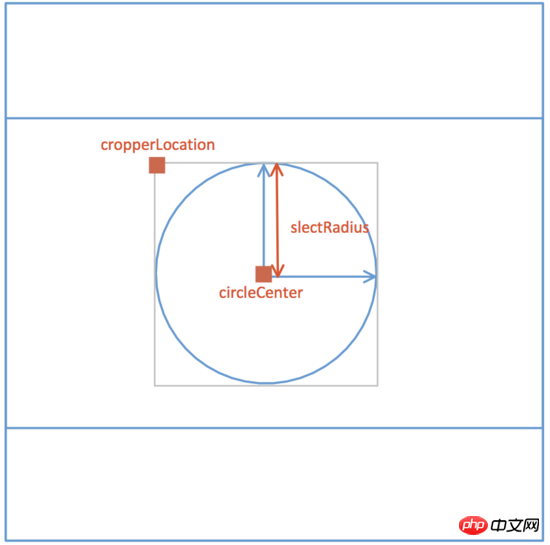
[x] Cropping: Move the preview area on the right side of the cropping frame to preview in real time
[x ] Upload & Clear: Click Confirm to upload the cropped image, click the Cancel button to clear the image
[ ] The cropping frame can be resized
Implementation steps
methods:funName() - corresponds to the funName method in methods in the source code
data:dataName - corresponds to the funName method in data in the source code dataName data
1. Picture selection and reading
Select pictures: (methods:selectPic) Use input[ type="file"] pops up the picture selection box, and js actively triggers the click event;
Read the picture: (methods:readImage) Create a picture object and use createObjectURL to display the picture. objectURL = URL.createObjectURL(blob) ;
2. Display images in canvas
Canvas you need to master Related knowledge:
Clear the canvas ctx.clearRect(x,y,width,height);
Fill the rectangle ctx.fillRect(x, y,width,height) ;
Draw an arc ctx.arc(x,y,r,startAngle,endAngle,counterclockwise) ;Draw a rectangle ctx.rect(x,y,width ,height);
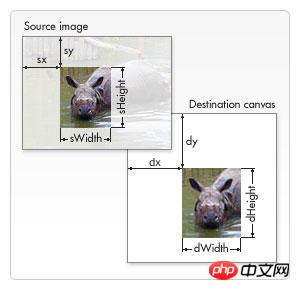
Draw image drawImage

##
# 语法
 ctx.drawImage(image, dx, dy);
 ctx.drawImage(image, dx, dy, dWidth, dHeight);
 ctx.drawImage(image, sx, sy, sWidth, sHeight, dx, dy, dWidth, dHeight);
 # 参数
 image    # 绘制的元素(可以为HTMLImageElement,HTMLVideoElement,或者 HTMLCanvasElement。)
 dx,dy    # 目标画布(destination canvas)左上角的坐标
 dWidth,dHeight  # 目标画布(destination canvas)上绘制图像宽高
 sx,sy    # 源画布(source canvase)左上角的坐标
 sWidth,sHeight  # 源画布(source canvase)选择的图像宽高
5. Cut the picture ctx.clip() ;
Specific steps:

3. Move the cropping box
Knowledge points: onmousedown, onmousemove, onmouseupSpecific implementation:methods:drag()
canvas.onmousedown = e => {
  let [lastX, lastY] = [e.offsetX, e.offsetY];
  self.movement = true;
  canvas.onmousemove = e => {
   self.circleCenter = {
   X:
    self.cropperCanvasSize.width > 2 * self.slectRadius
    ? self.circleCenter.X + (e.offsetX - lastX)
    : self.cropperCanvasSize.width / 2,
   Y:
    self.cropperCanvasSize.height > 2 * self.slectRadius
    ? self.circleCenter.Y + (e.offsetY - lastY)
    : self.cropperCanvasSize.height / 2
   };
   self.renderCropperImg();
   [lastX, lastY] = [e.offsetX, e.offsetY];
  };
  canvas.onmouseup = e => {
   self.movement = false;
   canvas.onmousemove = null;
   canvas.onmouseup = null;
  };
};4. Upload pictures to the server
Knowledge points:
methods:upload()
this.$refs.preview.toBlob((blob)=> {
  const url = URL.createObjectURL(blob);
  const formData = new FormData();
  formData.append(this.uploadProps.name, blob, `${Date.now()}.png`);
  if(this.data){
   Object.keys(this.uploadProps.data).forEach(key => {
    formData.append(key, this.uploadProps.data[key]);
   });
  }
  const request = new XMLHttpRequest();
  request.open("POST", this.uploadProps.action, true);
  request.send(formData);
  request.onreadystatechange = () => {
   if (request.readyState === 4 && request.status === 200) {
    // ...
   }
  };
});About the installation and use of the vux uploader image upload component
Vue has multiple methods to implement headers And the first column fixed method
The above is the detailed content of Vue implements the function of cropping images and uploading them to the server. For more information, please follow other related articles on the PHP Chinese website!


