

This article mainly introduces the steps to build the Webpack Babel React development environment in detail. It has certain reference value. Interested friends can refer to it
1. Get to know Webpack
Before building the application, let’s first understand Webpack. Webpack is a module packaging tool that can compile various files (such as ReactJS, Babel, Coffeescript, Less/Sass, etc.) as modules. Pack.
2. Install Webpack
To start using Webpack for development in the project, we first need to install it in the global environment.
npm install webpack -g
3. Create a project
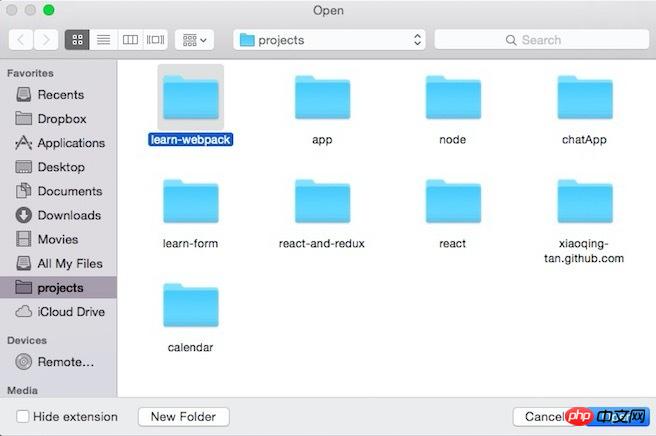
After installation, create a project named learn-webpack and enter the project folder. Of course, you can name the project as you wish. The name you want.
mkdir learn-webpack && cd learn-webpack
Find the project folder you just created through the editor
Now let’s create 2 files:
app. js
document.querySelector('#app').innerHTML = 'Hello World!';
index.html
<!DOCTYPE html>
<html lang="en">
<head>
 <meta charset="UTF-8">
 <title>Learn-webpack</title>
</head>
<body>
 <p id="app"></p>
 <script src="dist/bundle.js"></script>
</body>
</html>
Then execute
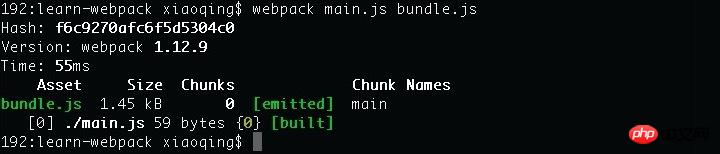
webpack ./app.js ./dist/bundle.js
 in the terminal
Finally execute to start the local http service
python -m SimpleHTTPServer
At this time you can enter in the browser: http://localhost:8000
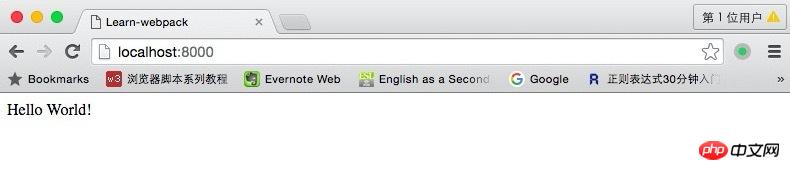
If you can see Hello world! in the browser, it means that you have successfully used Webpack to package and compile main.js into bundle.js. Isn’t it very simple?
Define a configuration file
The above is just a brief introduction to the use of Webpack. In fact, every project should contain a webpack.config. js, used to tell Webpack what needs to be done.
module.exports = {
 entry: "app.js",
 output: {
  path: __dirname+"/dist",
  filename: "bundle.js"
 }
}Now run in the terminal: webpack
See if the packaging and compilation result of webpack ./app.js ./dist/bundle.js is the same as before.
entry: Specify the packaged entry file
1. Package a single file into a single output file and write the name of the file directly, for example: entry: "main.js "
2. Pack multiple files into a single output file and put the file names into an array, for example: entry:['main.js','xx.js']
3 .Package multiple files into multiple output files, put the file names into a key pair, for example: entry: {a:'main.js',b:'xx.js'}
output: Configure packaging results
path is the defined output folder, filename is the name of the packaging result file, if the designated packaging entry file is the above 1 or 2 situations, filename is directly as you want The output file name. If it is the third case, filename needs to be written as [name].filename.js, and [name] in filename is the key in entry.
Monitoring changes and automatic packaging
When we are constantly changing the code, in order not to modify it once, we package it manually again. You can use webpack's watch function.
webpack --watch or webpack -w
Or you can set watch to true directly in the configuration code
module.exports = {
 entry: "app.js",
 output: {
  path: __dirname+"/dist",
  filename: "bundle.js"
 },
 watch: true
}4. Use Babel
What is Babel? Babel is a JavaScript compiler. Use it to convert ES6 syntax to ES5 syntax so that it can be executed in current environments.
Execute in the terminal: npm install webpack babel-loader babel-core babel-preset-es2015 --save-dev
After the installation is completed, you need to modify the previous webpack.config.js to :
module.exports = {
 entry: "./app.js",
 output: {
  path: __dirname+"/dist",
  filename: "bundle.js"
 },
 module: {
  loaders: [
   {
    test: /\.jsx?$/,
    loader: 'babel-loader',
    exclude: /node_modules/,
    query: {
     presets: ['es2015']
    }
   }
  ]
 },
 resolve: {
  extensions: ['','.coffee','.js']
 }
}Now you can write code in the file using ES6 syntax. Let’s test it by adding:
var func = str => {
 console.log(str);
};
func('我现在在使用Babel!');ES6 supports using arrows to define functions. If You can see the printed text "I am using Babel now!" on the console, indicating that our Babel module is successfully installed and you can start writing code using ES6.
The loaders item indicates the loader used to load this type of resource.
test is a regular rule indicating the resource type to be matched.
exclude specifies files that should be ignored. We specify /node_modules/ here.
There are two ways to write query. One is to directly follow the loader name in string form:
loader: 'babel-loader?presets[]=es2015
The other is as shown in this article:
query: {
 presets: ['es2015']
}resolve. extensions is used to indicate which suffixes the program automatically completes and recognizes.
Note that the first one in extensions is an empty string! Corresponding to the situation where suffixes are not needed.
5. Combined with React
We have configured and introduced Webpack and Babel before. The basic environment has been set up. Now we are starting to use React.
Enter the following code in the terminal to install react and react-dom
npm install react react-dom --save
Babel has all the default plug-ins for React
npm install babel-preset-react --save-dev
Since we have added the default plug-in for react , so webpack.config.js needs to be modified.
Modify the query under module -> loaders as follows:
query: {
  presets: ['es2015','react']
}Now create a file named hello.js
import React from "react";

class Hello extends React.Component{
 render() {
  return (
   <p>
     Hello, World!
   </p>
  )
 }
}

export default Hello;Then change the file in app.js Modify as follows:
import React from "react";
import ReactDOM from "react-dom";
import Hello from "./hello";
// var func = str => {
// console.log(str);
// };
//
// func('我现在在使用Babel!');
// document.querySelector('#app').innerHTML = 'Hello World!';
ReactDOM.render(
如果你能在浏览器里面看到 "Hello, React!",就说明我们已经将Webpack+Babel+React的环境搭建好了,接下来我们就可以此基础上来进行开发了。
上面是我整理给大家的,希望今后会对大家有帮助。
相关文章:
如何解决vue 更改计算属性后select选中值不更改的问题,具体操作如下
如何解决iview 的select下拉框选项错位的问题,具体操作如下
The above is the detailed content of Detailed answers to Webpack+Babel+React environment construction (detailed tutorial). For more information, please follow other related articles on the PHP Chinese website!


![[Web front-end] Node.js quick start](https://img.php.cn/upload/course/000/000/067/662b5d34ba7c0227.png)


