

Image carousel is a function that often needs to be implemented in the front end. I recently learned Vue.js and encapsulated Swiper to implement a simple image carousel component. Interested friends, let’s learn together
Picture carousel is a function that often needs to be implemented in the front end. I recently learned Vue.js and encapsulated Swiper to implement a simple image carousel component.
1. Swiper
Before implementing encapsulation, let’s introduce Swiper first.
Swiper is a sliding special effects plug-in created purely with Javascript, targeting mobile terminals such as mobile phones and tablets.
Swiper can achieve common effects such as touch screen focus image, touch screen Tab switching, touch screen multi-image switching, etc.
Swiper is open source, free, stable, simple to use, and powerful. It is an important choice for building mobile terminal websites.
Swiper has a wide range of application scenarios and the implementation effect is very good. The following actual case is a typical application scenario of Swiper.
For specific usage tutorials and detailed API of Swiper, please refer to Swiper Chinese website
.
2. Vue components
The original intention of Vue component design is to be used together to improve maintainability and reusability. The picture carousel is suitable to be completed using components, so before introducing the specific implementation, let's first introduce the Vue components and component communication.
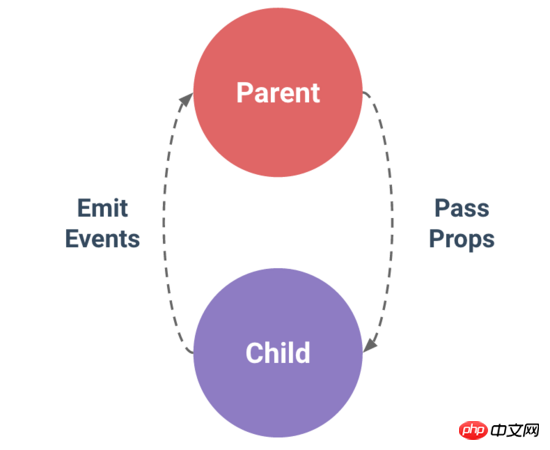
The most common thing among Vue components is the relationship between parent and child components: component A uses component B in its template.
They must communicate with each other: the parent component may need to send data to the child component, and the child component may need to inform the parent component of what is happening inside it. However, it is also important to decouple parent and child components as much as possible through a well-defined interface. This ensures that the code of each component can be written and understood in a relatively isolated environment, thereby improving its maintainability and reusability.
In Vue, the relationship between parent and child components can be summarized as props are passed downwards and events are passed upwards. The parent component sends data to the child component through props, and the child component sends messages to the parent component through events.
##3. Encapsulation implementation
1.Introducing Swiper
First, you need to install Swiper.npm install --save swiper
import Swiper from "swiper"; import "swiper/dist/css/swiper.min.css";
2.HTML code
Set the html layout of the carousel image in the template.3. Initialize Swiper
Since Swiper is encapsulated to implement the carousel chart, and Swiper has been installed previously, it needs to be initialized now. Before initialization, based on the understanding of Swiper usage, first determine the attribute information required by the carousel component, and then pass it to the encapsulated Swiper component through the parent component. You need to use props at this time.props: { swipeid: { type: String, default: "" }, effect: { type: String, default: "slide" }, loop: { type: Boolean, default: false }, direction: { type: String, default: "horizontal" }, pagination: { type: Boolean, default: true }, paginationType: { type: String, default: "bullets" }, autoPlay: { type: Number, default: 3000 } }
了解了上面每个属性的含义,下面就可以初始化Swiper,并设置具体的属性。
初始化Swiper时,需要传入两个参数。
轮播容器的类名
代表图片轮播组件详细功能的对象
var that = this; this.dom = new Swiper("." + that.swipeid, { //循环 loop: that.loop, //分页器 pagination: { el: ".swiper-pagination", bulletClass : 'swiper-pagination-bullet', }, //分页类型 paginationType: that.paginationType, //自动播放 autoPlay: that.autoPlay, //方向 direction: that.direction, //特效 effect: that.effect, //用户操作swiper之后,不禁止autoplay disableOnInteraction: false, //修改swiper自己或子元素时,自动初始化swiper observer: true, //修改swiper的父元素时,自动初始化swiper observeParents: true }); }
四、自定义轮播效果
经过上面的步骤,轮播器就封装好了。我们可以自定义实现自己想要的轮播器效果。下面以知乎的API为例,实现图片轮播。
1.HTML代码
![]()
{{top.title}}
首先要引用注册组件,这里就不详细写出。
其中 m-swipe 就是前面实现的图片轮播组件,而其中的子组件就是通过具名插槽插入的轮播内容。
2.CSS代码
.swiper-container { width: 100%; } .swiper-slide { height: 8rem; overflow: hidden; position: relative; } .swiper-slide { p { top: 0; left: 0; width: 100%; height: 100%; opacity: 0.4; position: absolute; background-color: @blue; } img { top: 50%; position: relative; transform: translate(0, -50%); } h3 { width: 70%; color: #fff; margin: 0; font-size: 0.5rem; line-height: 1rem; right: 5%; bottom: 2.6rem; text-align: right; position: absolute; text-shadow: 1px 1px 10px rgba(0, 0, 0, 0.5); &:before { content: ""; width: 3rem; bottom: -0.6rem; right: 0; display: block; position: absolute; border: 2px solid @yellow; } } } .swiper-pagination-bullet-active { background: #fff; } .swiper-container-horizontal > .swiper-pagination-bullets { bottom: 1rem; width: 95%; text-align: right; }
其中swiper-pagination-bullet-active代表分页器中当前指示的小圆点的类名。 .swiper-pagination-bullets 代表分页器的类名,详情见pagination分页器内元素的类名 。
关于网络请求数据展示的代码就不贴了,下面有源码地址。
3.效果
这只是一个简单的封装效果,想要实现更多的效果,可以通过Swiper中提供的更多功能来实现。
Github地址: 图片轮播
上面是我整理给大家的,希望今后会对大家有帮助。
相关文章:
The above is the detailed content of How to implement image carousel by encapsulating Swiper in Vue. For more information, please follow other related articles on the PHP Chinese website!


| Meaning | |
|---|---|
| Carousel The class name of the container class attribute. | |
| The switching effect of the picture, the default is "slide", and can also be set to "fade", "cube", "coverflow", "flip", See effect for details. | |
| Set to true to enable loop mode. Loop mode: several pictures will be copied before and after the original picture and switched at the appropriate time, making Swiper appear to be looping. For details, see loop. | |
| The sliding direction of the picture can be set to horizontal (horizontal) or vertical (vertical). For details, see direction. | |
| Use pagination navigation, see pagination for details. | |
| Paginator style type can be set to "bullets", "fraction", "progressbar", "custom", see type for details. | |
| Set to true to start automatic switching and use the default switching settings. See autoplay for details. |


![[Web front-end] Node.js quick start](https://img.php.cn/upload/course/000/000/067/662b5d34ba7c0227.png)


