This article mainly introduces various methods of Python simulated login. It provides you with roughly four methods. Each method is introduced to you in detail. Friends who are interested should take a look.
Text
Features:
Simple, but you need to log in to the browser first
Principle:
Simply put, cookies are stored in the client that initiates the request, and the server uses cookies to distinguish between different client. Because HTTP is a stateless connection, when the server receives several requests at once, it cannot determine which requests were initiated by the same client. The behavior of "accessing pages that can only be seen after logging in" requires the client to prove to the server: "I am the client who just logged in." So a cookie is needed to identify the client and store its information (such as login status).
Of course, this also means that as long as we get the cookie of another client, we can pretend to be it to talk to the server. This gives our program an opportunity.
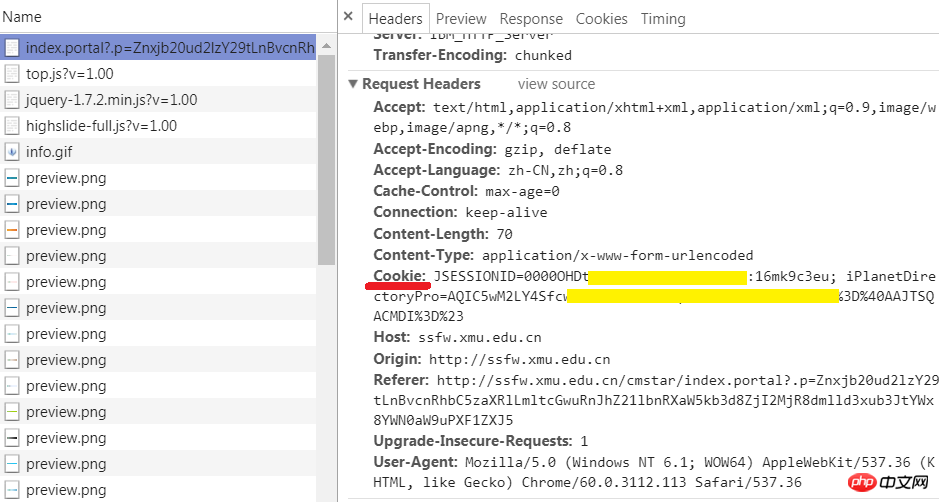
We first log in with a browser, and then use developer tools to view cookies. Then, by carrying the cookie in the program and sending a request to the website, your program can pretend to be the browser you just logged in and get the page that can only be seen after logging in.
Specific steps:
1. Log in with a browser and get the cookie string in the browser
Use first Browser login. Open the developer tools again and go to the network tab. Find the current URL in the Name column on the left, select the Headers tab on the right, and view the Request Headers, which contains the cookies issued to the browser by the website. Yes, it's the string behind it. Copy it, we will use it in the code later.
Note, it is best to log in before running your program. If you log in too early or close the browser, it is likely that the copied cookie will expire.

2. Write code
Version of urllib library:
import sys
import io
from urllib import request
sys.stdout = io.TextIOWrapper(sys.stdout.buffer,encoding='utf8') #改变标准输出的默认编码
#登录后才能访问的网站
url = 'http://ssfw.xmu.edu.cn/cmstar/index.portal'
#浏览器登录后得到的cookie,也就是刚才复制的字符串
cookie_str = r'JSESSIONID=xxxxxxxxxxxxxxxxxxxxxx; iPlanetDirectoryPro=xxxxxxxxxxxxxxxxxx'
#登录后才能访问的网页
url = 'http://ssfw.xmu.edu.cn/cmstar/index.portal'
req = request.Request(url)
#设置cookie
req.add_header('cookie', raw_cookies)
#设置请求头
req.add_header('User-Agent', 'Mozilla/5.0 (Windows NT 6.1; WOW64) AppleWebKit/537.36 (KHTML, like Gecko) Chrome/60.0.3112.113 Safari/537.36')
resp = request.urlopen(req)
print(resp.read().decode('utf-8'))
requests Library version:
import requests
import sys
import io
sys.stdout = io.TextIOWrapper(sys.stdout.buffer,encoding='utf8') #改变标准输出的默认编码
#登录后才能访问的网页
url = 'http://ssfw.xmu.edu.cn/cmstar/index.portal'
#浏览器登录后得到的cookie,也就是刚才复制的字符串
cookie_str = r'JSESSIONID=xxxxxxxxxxxxxxxxxxxxxx; iPlanetDirectoryPro=xxxxxxxxxxxxxxxxxx'
#把cookie字符串处理成字典,以便接下来使用
cookies = {}
for line in cookie_str.split(';'):
 key, value = line.split('=', 1)
cookies[key] = valuePrinciple:
We first send a login request to the website in the program, that is, submit a form containing login information (user name, password, etc.). Obtain the cookie from the response and bring this cookie with you when visiting other pages in the future, so that you can get the page that can only be seen after logging in.
Specific steps:
1. Find out the page to which the form is submitted
You still need to use the browser developer tool. Go to the network tab and check Preserve Log (important!). Log in to the website in your browser. Then find the page to which the form was submitted in the Name column on the left. How to find it? Look to the right and go to the Headers tab. First of all, in the General section, the Request Method should be POST. Secondly, there should be a section called Form Data at the bottom, where you can see the user name and password you just entered. You can also look at the Name on the left. If it contains the word login, it may be the page where the form is submitted (not necessarily!).

It should be emphasized here that the "page to which the form is submitted" is usually not the page where you fill in your username and password! So use the tools to find it.
2. Find out the data to be submitted
Although you only filled in your username and password when logging in in the browser, the form contains more than that. You can see all the data that needs to be submitted from Form Data.

3. Write code
Version of urllib library:
import sys
import io
import urllib.request
import http.cookiejar
sys.stdout = io.TextIOWrapper(sys.stdout.buffer,encoding='utf8') #改变标准输出的默认编码
#登录时需要POST的数据
data = {'Login.Token1':'学号',
 'Login.Token2':'密码',
 'goto:http':'//ssfw.xmu.edu.cn/cmstar/loginSuccess.portal',
 'gotoOnFail:http':'//ssfw.xmu.edu.cn/cmstar/loginFailure.portal'}
post_data = urllib.parse.urlencode(data).encode('utf-8')
#设置请求头
headers = {'User-agent':'Mozilla/5.0 (Windows NT 6.1; WOW64) AppleWebKit/537.36 (KHTML, like Gecko) Chrome/60.0.3112.113 Safari/537.36'}
#登录时表单提交到的地址(用开发者工具可以看到)
login_url = ' http://ssfw.xmu.edu.cn/cmstar/userPasswordValidate.portal
#构造登录请求
req = urllib.request.Request(login_url, headers = headers, data = post_data)
#构造cookie
cookie = http.cookiejar.CookieJar()
#由cookie构造opener
opener = urllib.request.build_opener(urllib.request.HTTPCookieProcessor(cookie))
#发送登录请求,此后这个opener就携带了cookie,以证明自己登录过
resp = opener.open(req)
#登录后才能访问的网页
url = 'http://ssfw.xmu.edu.cn/cmstar/index.portal'
#构造访问请求
req = urllib.request.Request(url, headers = headers)
resp = opener.open(req)
print(resp.read().decode('utf-8'))requests Library version:
import requests
import sys
import io
sys.stdout = io.TextIOWrapper(sys.stdout.buffer,encoding='utf8') #改变标准输出的默认编码
#登录后才能访问的网页
url = 'http://ssfw.xmu.edu.cn/cmstar/index.portal'
#浏览器登录后得到的cookie,也就是刚才复制的字符串
cookie_str = r'JSESSIONID=xxxxxxxxxxxxxxxxxxxxxx; iPlanetDirectoryPro=xxxxxxxxxxxxxxxxxx'
#把cookie字符串处理成字典,以便接下来使用
cookies = {}
for line in cookie_str.split(';'):
 key, value = line.split('=', 1)
 cookies[key] = value
#设置请求头
headers = {'User-agent':'Mozilla/5.0 (Windows NT 6.1; WOW64) AppleWebKit/537.36 (KHTML, like Gecko) Chrome/60.0.3112.113 Safari/537.36'}
#在发送get请求时带上请求头和cookies
resp = requests.get(url, headers = headers, cookies = cookies)
print(resp.content.decode('utf-8'))Obviously it feels more convenient to use the requests library~~~
Principle:
Session means session. Similar to cookies, it also allows the server to "recognize" the client. The simple understanding is to treat every interaction between the client and the server as a "session". Since they are in the same "session", the server will naturally know whether the client has logged in.
Specific steps:
1. Find out the page to which the form is submitted
2. Find out the data to be submitted
这两步和方法二的前两步是一样的
3.写代码
requests库的版本
import requests
import sys
import io
sys.stdout = io.TextIOWrapper(sys.stdout.buffer,encoding='utf8') #改变标准输出的默认编码
#登录时需要POST的数据
data = {'Login.Token1':'学号',
 'Login.Token2':'密码',
 'goto:http':'//ssfw.xmu.edu.cn/cmstar/loginSuccess.portal',
 'gotoOnFail:http':'//ssfw.xmu.edu.cn/cmstar/loginFailure.portal'}
#设置请求头
headers = {'User-agent':'Mozilla/5.0 (Windows NT 6.1; WOW64) AppleWebKit/537.36 (KHTML, like Gecko) Chrome/60.0.3112.113 Safari/537.36'}
#登录时表单提交到的地址(用开发者工具可以看到)
login_url = 'http://ssfw.xmu.edu.cn/cmstar/userPasswordValidate.portal'
#构造Session
session = requests.Session()
#在session中发送登录请求,此后这个session里就存储了cookie
#可以用print(session.cookies.get_dict())查看
resp = session.post(login_url, data)
#登录后才能访问的网页
url = 'http://ssfw.xmu.edu.cn/cmstar/index.portal'
#发送访问请求
resp = session.get(url)
print(resp.content.decode('utf-8'))特点:
功能强大,几乎可以对付任何网页,但会导致代码效率低
原理:
如果能在程序里调用一个浏览器来访问网站,那么像登录这样的操作就轻而易举了。在Python中可以使用Selenium库来调用浏览器,写在代码里的操作(打开网页、点击……)会变成浏览器忠实地执行。这个被控制的浏览器可以是Firefox,Chrome等,但最常用的还是PhantomJS这个无头(没有界面)浏览器。也就是说,只要把填写用户名密码、点击“登录”按钮、打开另一个网页等操作写到程序中,PhamtomJS就能确确实实地让你登录上去,并把响应返回给你。
具体步骤:
1.安装selenium库、PhantomJS浏览器
2.在源代码中找到登录时的输入文本框、按钮这些元素
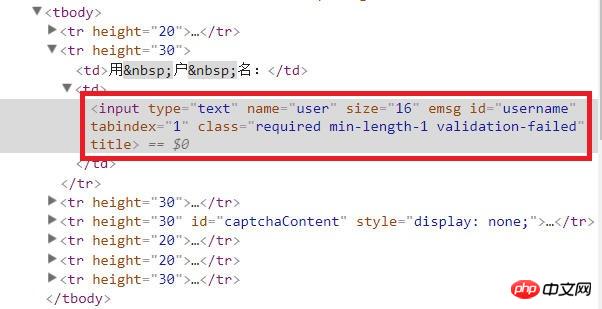
因为要在无头浏览器中进行操作,所以就要先找到输入框,才能输入信息。找到登录按钮,才能点击它。
在浏览器中打开填写用户名密码的页面,将光标移动到输入用户名的文本框,右键,选择“审查元素”,就可以在右边的网页源代码中看到文本框是哪个元素。同理,可以在源代码中找到输入密码的文本框、登录按钮。

3.考虑如何在程序中找到上述元素
Selenium库提供了find_element(s)_by_xxx的方法来找到网页中的输入框、按钮等元素。其中xxx可以是id、name、tag_name(标签名)、class_name(class),也可以是xpath(xpath表达式)等等。当然还是要具体分析网页源代码。
4.写代码
import requests
import sys
import io
from selenium import webdriver
sys.stdout = io.TextIOWrapper(sys.stdout.buffer, encoding='utf8') #改变标准输出的默认编码
#建立Phantomjs浏览器对象,括号里是phantomjs.exe在你的电脑上的路径
browser = webdriver.PhantomJS('d:/tool/07-net/phantomjs-windows/phantomjs-2.1.1-windows/bin/phantomjs.exe')
#登录页面
url = r'http://ssfw.xmu.edu.cn/cmstar/index.portal'
# 访问登录页面
browser.get(url)
# 等待一定时间,让js脚本加载完毕
browser.implicitly_wait(3)
#输入用户名
username = browser.find_element_by_name('user')
username.send_keys('学号')
#输入密码
password = browser.find_element_by_name('pwd')
password.send_keys('密码')
#选择“学生”单选按钮
student = browser.find_element_by_xpath('//input[@value="student"]')
student.click()
#点击“登录”按钮
login_button = browser.find_element_by_name('btn')
login_button.submit()
#网页截图
browser.save_screenshot('picture1.png')
#打印网页源代码
print(browser.page_source.encode('utf-8').decode())
browser.quit()
相关推荐:
The above is the detailed content of Multiple methods of Python simulated login. For more information, please follow other related articles on the PHP Chinese website!


