


Python PyQt4 implements QQ drawer effect

This article mainly introduces Python PyQt4 to implement QQ drawer effect in detail. It has certain reference value. Interested friends can refer to it.
The example of this article shares with everyone the implementation of QQ in Python PyQt4. The specific code for displaying the drawer effect is for your reference. The specific content is as follows
First look at the screenshot effect:
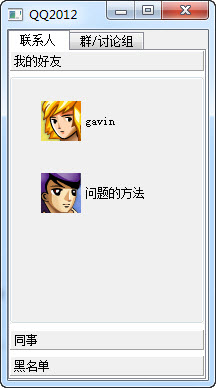
Mainly uses QT’s QTabWidget and QToolBox Page widget
# -*- coding: utf-8 -*-
from PyQt4.QtGui import *
from PyQt4.QtCore import *
import sys

QTextCodec.setCodecForTr(QTextCodec.codecForName("utf8"))

class MyQQ(QTabWidget):
  def __init__(self,parent=None):
    super(MyQQ,self).__init__(parent)

    toolButton1=QToolButton()
    toolButton1.setText(self.tr("gavin"))
    toolButton1.setIcon(QIcon("d:/image/1.png"))
    toolButton1.setIconSize(QSize(60,60))
    toolButton1.setAutoRaise(True)
    toolButton1.setToolButtonStyle(Qt.ToolButtonTextBesideIcon)


    toolButton2=QToolButton()
    toolButton2.setText(self.tr("问题的方法"))
    toolButton2.setIcon(QIcon("d:/image/2.png"))
    toolButton2.setIconSize(QSize(60,60))
    toolButton2.setAutoRaise(True)
    toolButton2.setToolButtonStyle(Qt.ToolButtonTextBesideIcon)

    toolButton3=QToolButton()
    toolButton3.setText(self.tr("为什么"))
    toolButton3.setIcon(QIcon("d:/image/3.png"))
    toolButton3.setIconSize(QSize(60,60))
    toolButton3.setAutoRaise(True)
    toolButton3.setToolButtonStyle(Qt.ToolButtonTextBesideIcon)

    groupbox1=QGroupBox()
    vlayout1=QVBoxLayout(groupbox1)
    vlayout1.setMargin(10)
    vlayout1.setAlignment(Qt.AlignCenter)
    vlayout1.addWidget(toolButton1)
    vlayout1.addWidget(toolButton2)
    vlayout1.addStretch()

    groupbox2=QGroupBox()
    vlayout2=QVBoxLayout(groupbox2)
    vlayout2.setMargin(10)
    vlayout2.setAlignment(Qt.AlignCenter)
    vlayout2.addWidget(toolButton3)
    vlayout2.addStretch()

    groupbox3=QGroupBox()

    toolbox1 = QToolBox()
    toolbox1.addItem(groupbox1,self.tr("我的好友"))
    toolbox1.addItem(groupbox2,self.tr("同事"))
    toolbox1.addItem(groupbox3,self.tr("黑名单"))

    toolbox2 = QToolBox()

    self.addTab(toolbox1, "联系人")
    self.addTab(toolbox2, "群/讨论组")

app=QApplication(sys.argv)
myqq=MyQQ()
myqq.setWindowTitle("QQ2012")
myqq.show()
app.exec_()
Problem record
1. When using Chinese in the script, an error message appears:
SyntaxError:
'utf8' codec can't decode byte 0xc4 in position 0: invalid continuation byte
Need to save the *.py file as utf-8, I use gvim, and I have never understood the encoding settings of vim, so I used a relatively stupid method, opening it with Notepad and saving it as utf-8 format
2. At the beginning , I placed the avatar directory image in the \Python32\Lib\site-packages directory, and then called the module in the explanation, but it could not be displayed. Later, I changed to the absolute path
The above is the detailed content of Python PyQt4 implements QQ drawer effect. For more information, please follow other related articles on the PHP Chinese website!

Hot AI Tools

Undress AI Tool
Undress images for free

Undresser.AI Undress
AI-powered app for creating realistic nude photos

AI Clothes Remover
Online AI tool for removing clothes from photos.

Clothoff.io
AI clothes remover

Video Face Swap
Swap faces in any video effortlessly with our completely free AI face swap tool!

Hot Article
Hot Tools

Notepad++7.3.1
Easy-to-use and free code editor

SublimeText3 Chinese version
Chinese version, very easy to use

Zend Studio 13.0.1
Powerful PHP integrated development environment

Dreamweaver CS6
Visual web development tools

SublimeText3 Mac version
God-level code editing software (SublimeText3)


 How to handle large datasets in Python that don't fit into memory?
Aug 14, 2025 pm 01:00 PM
How to handle large datasets in Python that don't fit into memory?
Aug 14, 2025 pm 01:00 PM
When processing large data sets that exceed memory in Python, they cannot be loaded into RAM at one time. Instead, strategies such as chunking processing, disk storage or streaming should be adopted; CSV files can be read in chunks through Pandas' chunksize parameters and processed block by block. Dask can be used to realize parallelization and task scheduling similar to Pandas syntax to support large memory data operations. Write generator functions to read text files line by line to reduce memory usage. Use Parquet columnar storage format combined with PyArrow to efficiently read specific columns or row groups. Use NumPy's memmap to memory map large numerical arrays to access data fragments on demand, or store data in lightweight data such as SQLite or DuckDB.
 How to debug Python code in Sublime Text?
Aug 14, 2025 pm 04:51 PM
How to debug Python code in Sublime Text?
Aug 14, 2025 pm 04:51 PM
UseSublimeText’sbuildsystemtorunPythonscriptsandcatcherrorsbypressingCtrl Baftersettingthecorrectbuildsystemorcreatingacustomone.2.Insertstrategicprint()statementstocheckvariablevalues,types,andexecutionflow,usinglabelsandrepr()forclarity.3.Installth
 How to run Python code in Sublime Text?
Aug 16, 2025 am 04:58 AM
How to run Python code in Sublime Text?
Aug 16, 2025 am 04:58 AM
Make sure that Python is installed and added to the system PATH, run python--version or python3--version verification through the terminal; 2. Save the Python file as a .py extension, such as hello.py; 3. Create a custom build system in SublimeText, Windows users use {"cmd":["python","-u","$file"]}, macOS/Linux users use {"cmd":["python3
 How to debug a Python script in VSCode
Aug 16, 2025 am 02:53 AM
How to debug a Python script in VSCode
Aug 16, 2025 am 02:53 AM
To debug Python scripts, you need to first install the Python extension and configure the interpreter, then create a launch.json file to set the debugging configuration, then set a breakpoint in the code and press F5 to start the debugging. The script will be paused at the breakpoint, allowing checking variables and step-by-step execution. Finally, by checking the problem by viewing the console output, adding logs or adjusting parameters, etc., to ensure that the debugging process is simple and efficient after the environment is correct.
 How to automatically format Python code in VSCode
Aug 14, 2025 pm 04:10 PM
How to automatically format Python code in VSCode
Aug 14, 2025 pm 04:10 PM
ToautomaticallyformatPythoncodeinVSCode,installBlackusingpipinstallblack,installtheofficialMicrosoftPythonextension,setBlackastheformatterinsettings.jsonwith"python.formatting.provider":"black",enableformatonsavebyadding"edit
 How to create a Python project in Sublime Text?
Aug 16, 2025 am 08:53 AM
How to create a Python project in Sublime Text?
Aug 16, 2025 am 08:53 AM
InstallSublimeTextandPython,thenconfigureabuildsystembycreatingaPython3.sublime-buildfilewiththeappropriatecmdandselectorsettingstoenablerunningPythonscriptsviaCtrl B.2.OrganizeyourprojectbycreatingadedicatedfolderwithPythonfilesandsupportingdocument
 python asyncio queue example
Aug 21, 2025 am 02:13 AM
python asyncio queue example
Aug 21, 2025 am 02:13 AM
asyncio.Queue is a queue tool for secure communication between asynchronous tasks. 1. The producer adds data through awaitqueue.put(item), and the consumer uses awaitqueue.get() to obtain data; 2. For each item you process, you need to call queue.task_done() to wait for queue.join() to complete all tasks; 3. Use None as the end signal to notify the consumer to stop; 4. When multiple consumers, multiple end signals need to be sent or all tasks have been processed before canceling the task; 5. The queue supports setting maxsize limit capacity, put and get operations automatically suspend and do not block the event loop, and the program finally passes Canc
 What are class methods in Python
Aug 21, 2025 am 04:12 AM
What are class methods in Python
Aug 21, 2025 am 04:12 AM
ClassmethodsinPythonareboundtotheclassandnottoinstances,allowingthemtobecalledwithoutcreatinganobject.1.Theyaredefinedusingthe@classmethoddecoratorandtakeclsasthefirstparameter,referringtotheclassitself.2.Theycanaccessclassvariablesandarecommonlyused
