

This time I will bring you the html basics knowledge in the front end. What are the precautions when using the basic knowledge of html in the front end. The following is a practical case. Let’s take a look. .
To learn html, first let’s take a look at the essence of HTML:
We are learning socket, we create a socketserver, and then When running, there is a client that wants to connect to the socket server. After connecting, if neither side is closed, it will not be disconnected and requests can be made continuously.
Let’s talk about a website. We run our website on the server side, and all clients can access the website we wrote through the browser, so the iis, apache, etc. we use are essentially onesocket server, and the browser we open is the client for data transmission.
If we are based on TCP, after the client and server are connected, as long as both sides are not closed, they can continue to access and interact. But website browser browsing is different from this. The browser accesses the server, and the server gives us the data. After the browser gets the data, the connection is immediately disconnected. If you still want to get the data, you have to establish the connection again. That is, one request, one response, and one disconnection.
Let’s write a socket server below:
1 import socket 2 3 def handle_request(client): 4 buf = client.recv(1024) 5 client.send(bytes("HTTP/1.1 200 ok\r\n\r\n",encoding="utf-8")) 6 client.send(bytes("Hello,Charles",encoding="utf-8")) 7 8 9 def main():10 sock = socket.socket(socket.AF_INET,socket.SOCK_STREAM)11 sock.bind(('localhost',8000))12 sock.listen(5)13 14 while True:15 connection,addr = sock.accept()16 handle_request(connection)17 connection.close()18 19 if name == 'main':20 main()After we run it, we can access it with a browser:
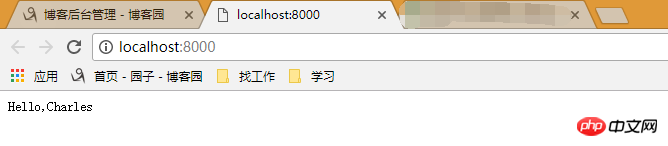
So the essential root of the server It is these 20 lines of code that establish a socket connection.
In fact, the display content of my website is essentially a lot of strings. We sent hello and clarles in the send function, and that content is displayed on the website. If we add some tags, such as
<h1 style='background-color:red'>Hello,Charles</h1>
Then what is displayed in the browser is as follows:

So when the client interacts with the server, the server always returns String, the reason why we can see the style of the above picture on the browser is because the browser parses this string. Browsers recognize this format.
So the html we want to learn is actually a set of rules that browsers understand. This is the essence of html.
What our developers have to do is:
1. Learn html rules | (act as a template)
2. Get the data from the database, and then replace it with The specified location of the html file, this will be done by the web framework in the future
Comment:
Tag classification:
1. Self-closing tag:
2. Active closing tag:
1. Page encoding (tell the browser what encoding it is)
2. Refresh and jump:
The page is refreshed every 30 seconds by default
3. Keywords: for search engines
4. Description: Describe the content of the website
5 .X-UA-Compatible: specially set for IE
网页头部信息:
1.css
2.icon:网站图标

在页面中写样式
例如:
1.引进文件
2.写js代码
< script type="text/javascript" > ...
标签一般分为两种:块级标签 和 行内标签
行内标签:a、span、select 等
块级标签:p、h1、p 等
http://www.cnblogs.com/web-d/archive/2010/04/16/1713298.html
空格: 小于号:> 大于号:<
1.p和br
p表示段落,默认段落之间是有间隔的!
br 是换行
<p>1231<br/>32132</p>
<p>123132132</p>
<p>123132132</p>
2.H 标签
3.input系列:
a.text文本框: ,显示效果:
b.password密码框:输入的密码是点,显示效果:
c. submit提交按钮:,显示效果:
用于表单的提交
d.button按钮:,显示效果:
仅仅只是一个按钮,没有办法进行表单的提交
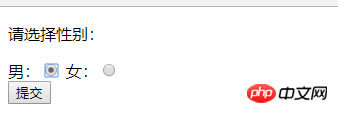
e. radio单选框:,
name属性如果都相同,则互斥
value属性用于后台获取选择的值
<form>
        <p>
            <p>请选择性别:</p>
        男:<input type="radio" name="gender" value="1"/>
        女:<input type="radio" name="gender" value="2"/>
        </p>
        <input type="submit" value="提交"/>
    </form>
f.checkbox多选框:
<p>爱好</p>篮球:<input type="checkbox" name="hobby" value="1"/>足球:<input type="checkbox" name="hobby" value="2"/>排球:<input type="checkbox" name="hobby" value="3"/>网球:<input type="checkbox" name="hobby" value="4"/><p>技能</p>
 python:<input type="checkbox" name="skill" value="python"/>
 php:<input type="checkbox" name="skill" value="php"/>
效果:
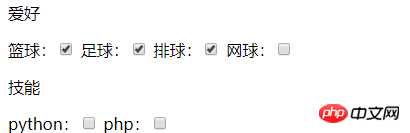
如果需要默认选中的话:加一个属性:checked="checked"
g.file上传文件:
如果你要用上传文件功能,你再form表单中一定要加一个属性:enctype='multipart/form-data'
h:reset内容重置:
4.textarea多行文本:
多行文本的默认值写在中间
5.select下拉框:
<select name="city" size="10" multiple="multiple">
      <option value="1">北京</option>
       <option value="2" selected="selected">上海</option>
       <option value="3">南京</option>
       <option value="4">广州</option>
       <option value="5">深证</option></select>
显示效果:
参数解释:
size设置一次显示多少个值
multiple可以多选,按住control键
selected="selected":默认选择的值
分组显示:optgroup,但是这些江苏省,湖南省没有办法选中
<select name="city2" size="5">
     <optgroup label="江苏省">
             <option>宿迁</option>
             <option>苏州</option>
     </optgroup>
     <optgroup label="湖南省">
             <option>湘潭</option>
             <option>长沙</option>
     </optgroup></select>
效果如图:
6. a标签
作用:
跳转
锚点 :href="#某个标签的id"标签的ID不允许重复
<!DOCTYPE html><html lang="en"><head>
    <meta charset="UTF-8">
    <title>Title</title></head><body>
    <a href="#i1">第一章</a>
    <a href="#i2">第二章</a>
    <a href="#i3">第三章</a>
    <a href="#i4">第四章</a>
    <p id="i1" style="height:600px;">第一章内容</p>
    <p id="i2" style="height:600px;">第二章内容</p>
    <p id="i3" style="height:600px;">第三章内容</p>
    <p id="i4" style="height:600px;">第四章内容</p></body></html>
这个就是一个锚的效果:点击第一章,跳转到本页面的第一章位置;点击第二章,跳转到本页面的第二个位置
7.img标签
注意:默认img标签,有一个1px的边框,在使用的时候应该先用border:0;把边框去掉
8.列表
<!DOCTYPE html><html lang="en"><head>
    <meta charset="UTF-8">
    <title>Title</title></head><body>
    <ul style="background-color: red">
        <li>asdf</li>
        <li>asdf</li>
        <li>asdf</li>
    </ul>
    <ol style="background-color: green">
        <li>asd</li>
        <li>asd</li>
        <li>asd</li>
    </ol>
    <dl style="background-color: yellow">
        <dt>asdf</dt>
            <dd>asdf12</dd>
            <dd>asdf12</dd>
        <dt>asdf</dt>
            <dd>asdf12</dd>
            <dd>asdf12</dd>
    </dl></body></html>
显示效果如图:

9.表格:
<!DOCTYPE html><html lang="en"><head>
    <meta charset="UTF-8">
    <title>Title</title></head><body>
    <table border="1">
        <tr>
            <td>主机名</td>
            <td>ip</td>
            <td>端口号</td>
        </tr>
        <tr>
            <td>localhost</td>
            <td>192.168.1.1</td>
            <td>8080</td>
        </tr>
    </table>
    <!--最规范的写法,有表头,有内容-->
    <table border="1">
        <thead>
            <tr>
                <th>主机名</th>
                <th>ip</th>
                <th>端口号</th>
            </tr>
        </thead>
        <tbody>
            <tr>
                <td>localhost</td>
                <td>192.168.1.1</td>
                <td>8080</td>
            </tr>
        </tbody>
    </table></body></html>
效果显示:
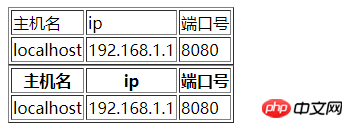
要注意代码的规范性!!
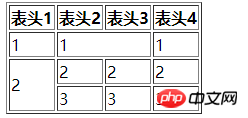
合并单元格:
<!DOCTYPE html><html lang="en"><head>
    <meta charset="UTF-8">
    <title>Title</title></head><body>
    <!--最规范的写法,有表头,有内容-->
    <table border="1">
        <thead>
            <tr>
                <th>表头1</th>
                <th>表头2</th>
                <th>表头3</th>
                <th>表头4</th>
            </tr>
        </thead>
        <tbody>
            <tr>
                <td>1</td>
                <td colspan="2">1</td>
                <td>1</td>
            </tr>
            <tr>
                <td rowspan="2">2</td>
                <td>2</td>
                <td>2</td>
                <td>2</td>
            </tr>
            <tr>
                <td>3</td>
                <td>3</td>
                <td>3</td>
            </tr>
        </tbody>
    </table></body></html>
行合并用:rowspan 列合并用:colspan
效果显示:
10.label标签:用于点击文字,使得关联的标签获得光标
<label for="username">用户名:</label><input id="username" type="text" name="user">

用id把input 和 label进行关联,原本如果只是写一个label和一个input,我们在点击用户名的时候,input没有被选中,如果用for关联了input里的id之后,我们点击“用户名”的时候也就选中input输入框
11.fieldset: 在一个框中然后插入标题
<!DOCTYPE html><html lang="en"><head>
    <meta charset="UTF-8">
    <title>Title</title></head><body>
    <fieldset>
        <legend>登录</legend>
        <label for="username">用户名:</label>
            <input id="username" type="text" name="user"><br>
        <label for="password">密    码:</label>
            <input id="password" type="text" name="pwd">
    </fieldset></body></html>
显示效果:

相信看了本文案例你已经掌握了方法,更多精彩请关注php中文网其它相关文章!
推荐阅读:
The above is the detailed content of HTML basics in front-end. For more information, please follow other related articles on the PHP Chinese website!


![[Web front-end] Node.js quick start](https://img.php.cn/upload/course/000/000/067/662b5d34ba7c0227.png)


