

Docker is an open source application container engine that allows developers to package their applications and dependencies into a portable container, and then publish it to any popular Linux machine, which can also be virtualized.This article mainly introduces the advanced version of docker data volume. I share it with you and hope it will be helpful to you.
Why do we need a data volume?
This starts with the file system of the docker container. For a series of reasons such as efficiency, the way the file system of the docker container exists on the host is very complicated, which will bring about the following problems:
cannot be easily stored on the host. Conveniently access files in containers.
Cannot share data between multiple containers.
When the container is deleted, the data generated in the container will be lost.
In order to solve these problems, docker introduced the data volume (volume) mechanism. A data volume is a specific file or folder that exists in one or more containers. This file or folder exists on the host machine independently of the docker file system. The biggest special feature of a data volume is that its life cycle is independent of the life cycle of the container.
The best scenario for using data volumes
Share data between multiple containers. Multiple containers can mount the same file in read-only or read-write mode at the same time. A data volume to share the data in the data volume.
When the host cannot guarantee that a certain directory or files with fixed paths must exist, using data volumes can circumvent the problems caused by this restriction.
When you want to store the data in the container outside the host, such as on a remote host or cloud storage.
When you need to back up, restore or migrate container data between different hosts, data volumes are a good choice.
docker volume subcommand
Docker specifically provides the volume subcommand to operate data volumes:
create creates a data volume
inspect displays details of data volumes
ls lists all data volumes
prune deletes all unused volumes with the -f option
rm deletes one or more unused volumes with - f option
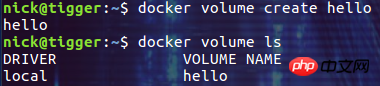
First create a data volume named hello and view it through the ls command:
Then you can use the inspect command to view the data Volume hello details:
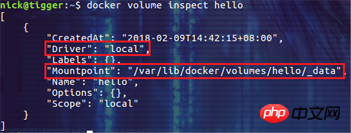
Here we can see the time when the data volume was created; the driver used by the data volume is the default "local", which means the data volume Use the local storage of the host; the mount point of the data volume is a directory under the local /var/lib/docker/volumes by default.
Finally, we can use the rm or prune command to delete the data volume. Later, the author will introduce some practices related to the deletion of data volumes in actual use.
Use mount syntax to mount data volumes
Before we used the --volume(-v) option to mount data volumes, now docker provides a more powerful - -mount option to manage data volumes. The mount option can provide multiple configuration items at once through multiple key-value pairs separated by commas, so the mount option can provide more detailed configuration than the volume option. The common
configuration using the mount option is as follows:
type specifies the mounting method. We use volume here. In fact, bind and tmpfs can also be used.
volume-driver specifies the driver to mount the data volume. The default value is local.
source Specifies the source of the mount. For a named data volume, the name of the data volume should be specified here. When using it, you can write source or abbreviate it as src.
destination specifies the path of the mounted data in the container. You can write destination when using it, or abbreviate it as dst or target.
readonly specifies that the mounted data is read-only.
volume-opt can be specified multiple times to increase more mount-related configurations.
Let’s look at a specific example:
$ docker volume create hello $ docker run -id --mount type=volume,source=hello,target=/world ubuntu /bin/bash
We created a data volume named hello and then mounted it in the /world directory in the container. Use the inspect command to view the "Mounts" information in the container details to verify the actual data volume mounting results:

Use the volume driver to store data elsewhere
In addition to storing the data in the data volume on the host by default, docker also allows us to store the data in the data volume in other places, such as Azrue Storge or AWS, by specifying the volume driver. S3.
简单起见,我们接下来的 demo 演示如何通过 vieux/sshfs 驱动把数据卷的存储在其它的主机上。
docker 默认是不安装 vieux/sshfs 插件的,我们可以通过下面的命令进行安装:
$ docker plugin install --grant-all-permissions vieux/sshfs
然后通过 vieux/sshfs 驱动创建数据卷,并指定远程主机的登录用户名、密码和数据存放目录:
docker volume create --driver vieux/sshfs \ -o sshcmd=nick@10.32.2.134:/home/nick/sshvolume \ -o password=yourpassword \ mysshvolume
注意,请确保你指定的远程主机上的挂载点目录是存在的(demo 中是 /home/nick/sshvolume 目录),否则在启动容器时会报错。
最后在启动容器时指定挂载这个数据卷:
docker run -id \ --name testcon \ --mount type=volume,volume-driver=vieux/sshfs,source=mysshvolume,target=/world \ ubuntu /bin/bash
这就搞定了,你在容器中 /world 目录下操作的文件都存储在远程主机的 /home/nick/sshvolume 目录中。进入容器 testcon 然后在 /world 目录中创建一个文件,然后打开远程主机的 /home/nick/sshvolume 目录进行查看,你新建的文件是不是已经出现在那里了!
数据卷原理
下图描述了 docker 容器挂载数据的三种方式: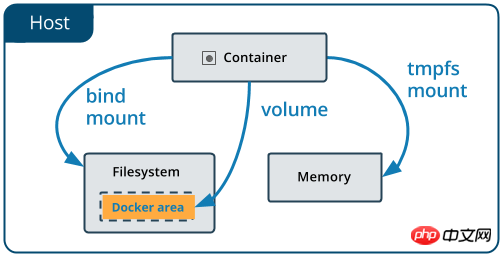
数据卷是完全被 docker 管理的,就像上图中的黄色区域描述的一样,docker 在宿主机的文件系统中找了个文件管理数据卷相关的数据。因此你可能根本不需要知道数据卷文件在宿主机上的存储位置(事实上抱着刨根问底的精神我们还是很想搞清楚它背后的工作原理!)。
docker 数据卷的本质是容器中的一个特殊目录。在容器创建的过程中,docker 会将宿主机上的指定目录(一个以数据卷 ID 为名称的目录)挂载到容器中指定的目录上。这里使用的挂载方式为绑定挂载(bind mount),所以挂载完成后的宿主机目录和容器内的目标目录表现一致。
比如我们执行下面的命令创建数据卷 hello,并挂载到容器 testcon 的 /world 目录:
$ docker volume create hello $ docker run -id --name testcon --mount type=volume,source=hello,target=/world ubuntu /bin/bash
实际上在容器的创建过程中,类似于在容器中执行了下面的代码:
// 将数据卷 hello 在宿主机上的目录绑定挂载到 rootfs 中指定的挂载点 /world 上 mount("/var/lib/docker/volumes/hello/_data", "rootfs/world", "none", MS_BIND, NULL)
在处理完所有的 mount 操作之后(真正需要 docker 容器挂载的除了数据卷目录还包括 rootfs,init-layer 里的内容,/proc 设备等),docker 只需要通过 chdir 和 pivot_root 切换进程的根目录到 rootfs 中,这样容器内部进程就只能看见以 rootfs 为根的文件系统以及被 mount 到 rootfs 之下的各项目录了。例如我们启动的 testcon 中的文件系统为:

下面我们介绍几个数据卷在使用中比较常见的问题。
数据的覆盖问题
如果挂载一个空的数据卷到容器中的一个非空目录中,那么这个目录下的文件会被复制到数据卷中。
如果挂载一个非空的数据卷到容器中的一个目录中,那么容器中的目录中会显示数据卷中的数据。如果原来容器中的目录中有数据,那么这些原始数据会被隐藏掉。
这两个规则都非常重要,灵活利用第一个规则可以帮助我们初始化数据卷中的内容。掌握第二个规则可以保证挂载数据卷后的数据总是你期望的结果。
在 Dockerfile 中添加数据卷
在 Dockerfile 中我们可以使用 VOLUME 指令向容器添加数据卷:
VOLUME /data
在使用 docker build 命令生成镜像并且以该镜像启动容器时会挂载一个数据卷到 /data 目录。根据我们已知的数据覆盖规则,如果镜像中存在 /data 目录,这个目录中的内容将全部被复制到宿主机中对应的目录中,并且根据容器中的文件设置合适的权限和所有者。
注意,VOLUME 指令不能挂载主机中指定的目录。这是为了保证 Dockerfile 的可一致性,因为不能保证所有的宿主机都有对应的目录。
在实际的使用中,这里还有一个陷阱需要大家注意:在 Dockerfile 中使用 VOLUME 指令之后的代码,如果尝试对这个数据卷进行修改,这些修改都不会生效!下面是一个这样的例子:
FROM ubuntu RUN useradd nick VOLUME /data RUN touch /data/test.txt RUN chown -R nick:nick /data
通过这个 Dockerfile 创建镜像并启动容器后,该容器中存在用户 nick,并且能够看到 /data 目录挂载的数据卷。但是 /data 目录内并没有文件 test.txt,更别说 test.txt 文件的所有者属性了。要解释这个现象需要我们了解通过 Dockerfile 创建镜像的过程:
Dockerfile 中除了 FROM 指令的每一行都是基于上一行生成的临时镜像运行一个容器,执行一条指令并执行类似 docker commit 的命令得到一个新的镜像。这条类似 docker commit 的命令不会对挂载的数据卷进行保存。
所以上面的 Dockerfile 最后两行执行时,都会在一个临时的容器上挂载 /data,并对这个临时的数据卷进行操作,但是这一行指令执行并提交后,这个临时的数据卷并没有被保存。因而我们最终通过镜像创建的容器所挂载的数据卷是没有被最后两条指令操作过的。我们姑且叫它 "Dockerfile 中数据卷的初始化问题"。
下面的写法可以解决 Dockerfile 中数据卷的初始化问题:
FROM ubuntu RUN useradd nick RUN mkdir /data && touch /data/test.txt RUN chown -R nick:nick /data VOLUME /data
通过这个 Dockerfile 创建镜像并启动容器后,数据卷的初始化是符合预期的。这是由于在挂载数据卷时,/data 已经存在,/data 中的文件以及它们的权限和所有者设置会被复制到数据卷中。
还有另外一种方法可以解决 Dockerfile 中数据卷的初始化问题。就是利用 CMD 指令和 ENTRYPOINT 指令的执行特点:与 RUN 指令在镜像构建过程中执行不同,CMD 指令和 ENTRYPOINT 指令是在容器启动时执行。因此使用下面的 Dockerfile 也可以达到对数据卷的初始化目的:
FROM ubuntu RUN useradd nick VOLUME /data CMD touch /data/test.txt && chown -R nick:nick /data && /bin/bash
总结
以上就是本文的全部内容,希望对大家的学习有所帮助,也希望大家支持php中文网。
The above is the detailed content of Docker data volume advanced chapter. For more information, please follow other related articles on the PHP Chinese website!
 The difference between k8s and docker
 How to bind data in dropdownlist
 What are the methods for docker to enter the container?
 What should I do if the docker container cannot access the external network?
 What is the use of docker image?
 How to solve the problem of garbled characters when opening a web page
 What are the inscribed coins?
 win10 upgrade patch method


![[Web front-end] Node.js quick start](https://img.php.cn/upload/course/000/000/067/662b5d34ba7c0227.png)


