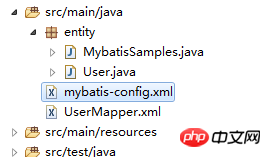
This article mainly shares with you mysql database connection and test examples, hoping to help everyone.
1. Import the jar package about mybatis through maven

You can directly download the relevant jar package through Alibaba Cloud's maven library
<dependencies>
    <dependency>
        <groupId>org.mybatis</groupId>
        <artifactId>mybatis</artifactId>
        <version>3.4.5</version>
    </dependency>
<dependency>
    <groupId>MySQL</groupId>
    <artifactId>mysql-connector-Java</artifactId>
    <version>5.1.38</version>
</dependency>
</dependencies>
2. Write the configuration file of mybatis
PUBLIC "-//mybatis.org//DTD Config 3.0//EN"
"http://mybatis.org/dtd/mybatis-3-config.dtd">
<environments default="development">
    <environment id="development">
        <transactionManager type="JDBC" />
        <!-- 配置数据库 -->
        <dataSource type="POOLED">
            <property name="driver" value="com.mysql.jdbc.Driver" />
            <property name="url" value="jdbc:mysql://localhost:3306/my_schema?useSSL=true" />
            <property name="username" value="root" />
            <property name="password" value="" />
        </dataSource>
    </environment>
</environments>
<!-- 映射文件 -->
<mappers>
    <mapper resource="UserMapper.xml" />
</mappers>
</configuration>
3. Write the mapping file UserMapper.xml
<?xml version="1.0" encoding="UTF-8"?>
<!DOCTYPE mapper
PUBLIC "-//mybatis.org//DTD Mapper 3.0//EN"
"http://mybatis.org/dtd/mybatis-3-mapper.dtd">
<mapper namespace="userMapper">
<select id="selectUser" resultType="entity.User">
    select * from user
</select>
</mapper>
4. Write the entity class User, which is a very common class, so I won’t explain too much.
public class User {
private String username;
private String email;
private String password;
private String create_time;
public String getUsername() {
    return username;
}
public void setUsername(String username) {
    this.username = username;
}
public String getEmail() {
    return email;
}
public void setEmail(String email) {
    this.email = email;
}
public String getPassword() {
    return password;
}
public void setPassword(String password) {
    this.password = password;
}
public String getCreate_time() {
    return create_time;
}
public void setCreate_time(String create_time) {
    this.create_time = create_time;
}
@Override
public String toString() {
    return "User [username=" + username + ", email=" + email + ", password=" + password + ", create_time="
            + create_time + "]";
}
public User(String username, String email, String password, String create_time) {
    super();
    this.username = username;
    this.email = email;
    this.password = password;
    this.create_time = create_time;
}
public User() {
    super();
}}
5. Write a class MybatisSamples, which contains the main method for testing.
The specific code is as follows
public static void main(String[] args) {
    String resource = "mybatis-config.xml";
    SqlSession session = null;
    try {
        InputStream is = Resources.getResourceAsStream(resource);
        //获取一个session工厂
        SqlSessionFactory sqlSessionFactory = new SqlSessionFactoryBuilder().build(is);
        //通过工厂获取session
        session = sqlSessionFactory.openSession();
        //根据映射文件中select标签的id获取集合
        List<User> list = session.selectList("userMapper.selectUser");
        for(User user: list) {
            System.out.println(user);

        }
    } catch (IOException e) {
        // TODO Auto-generated catch block
        e.printStackTrace();
    }finally {
        //注意关闭session!!!
        session.close();
    }

}The execution results are as follows:

Attachment:
Package structure


php mysql connection database instance_MySQL
MySQL connection database function memory leak solution
Problems connecting python and mysql to the database
The above is the detailed content of mysql connects to the database and tests instance sharing. For more information, please follow other related articles on the PHP Chinese website!


